Maya Visual Effects The Innovator's Guide
eBook - ePub

Maya Visual Effects The Innovator's Guide

Autodesk Official Press

Eric Keller

Buch teilen
  1. English
  2. ePUB (handyfreundlich)
  3. Über iOS und Android verfügbar
eBook - ePub

Maya Visual Effects The Innovator's Guide

Autodesk Official Press

Eric Keller

Angaben zum Buch
Buchvorschau
Inhaltsverzeichnis
Quellenangaben

Über dieses Buch

Create innovative CG solutions with Maya and this creative guide

Professional Maya artists have to think on their feet. It's nothing for them to receive just vague sketches or incomplete ideas of what the studio wants and have to come up with something brilliant. If you're an intermediate to advanced Maya user, Maya Visual Effects: The Innovator's Guide, Second Edition is what you need to meet the challenge. Professional Maya artist Eric Keller offers inspired solutions and hands-on projects, as well as numerous practical shortcuts and deadlines, so you learn to produce innovative CG assets from scratch, using Maya, on a deadline.

  • Shows intermediate to advanced Maya users new solutions, workarounds, and shortcuts for creating Maya visual effects on deadline
  • Gives readers plenty of hands-on projects, so they come up with solutions that they can add to their Maya toolsets
  • Offers workable ideas that can be applied, no matter which version of Maya software is being used
  • Presents projects in an engaging style, with pages of full-color imagery to illustrate concepts

Create amazing effects with the creative insights and fresh advice in this new edition of Maya Visual Effects: The Innovator's Guide.

Häufig gestellte Fragen

Wie kann ich mein Abo kündigen?
Gehe einfach zum Kontobereich in den Einstellungen und klicke auf „Abo kündigen“ – ganz einfach. Nachdem du gekündigt hast, bleibt deine Mitgliedschaft für den verbleibenden Abozeitraum, den du bereits bezahlt hast, aktiv. Mehr Informationen hier.
(Wie) Kann ich Bücher herunterladen?
Derzeit stehen all unsere auf Mobilgeräte reagierenden ePub-Bücher zum Download über die App zur Verfügung. Die meisten unserer PDFs stehen ebenfalls zum Download bereit; wir arbeiten daran, auch die übrigen PDFs zum Download anzubieten, bei denen dies aktuell noch nicht möglich ist. Weitere Informationen hier.
Welcher Unterschied besteht bei den Preisen zwischen den Aboplänen?
Mit beiden Aboplänen erhältst du vollen Zugang zur Bibliothek und allen Funktionen von Perlego. Die einzigen Unterschiede bestehen im Preis und dem Abozeitraum: Mit dem Jahresabo sparst du auf 12 Monate gerechnet im Vergleich zum Monatsabo rund 30 %.
Was ist Perlego?
Wir sind ein Online-Abodienst für Lehrbücher, bei dem du für weniger als den Preis eines einzelnen Buches pro Monat Zugang zu einer ganzen Online-Bibliothek erhältst. Mit über 1 Million Büchern zu über 1.000 verschiedenen Themen haben wir bestimmt alles, was du brauchst! Weitere Informationen hier.
Unterstützt Perlego Text-zu-Sprache?
Achte auf das Symbol zum Vorlesen in deinem nächsten Buch, um zu sehen, ob du es dir auch anhören kannst. Bei diesem Tool wird dir Text laut vorgelesen, wobei der Text beim Vorlesen auch grafisch hervorgehoben wird. Du kannst das Vorlesen jederzeit anhalten, beschleunigen und verlangsamen. Weitere Informationen hier.
Ist Maya Visual Effects The Innovator's Guide als Online-PDF/ePub verfügbar?
Ja, du hast Zugang zu Maya Visual Effects The Innovator's Guide von Eric Keller im PDF- und/oder ePub-Format sowie zu anderen beliebten Büchern aus Informatica & Media digitali. Aus unserem Katalog stehen dir über 1 Million Bücher zur Verfügung.

Information

Verlag
Sybex
Jahr
2013
ISBN
9781118654880
c01uf000.tif

Chapter 1
Texture Effects

All too often textures are overlooked as a solution for creating effects. The tendency is to think of textures as simply a means for coloring objects. The tutorials in this first chapter demonstrate some ways in which engaging visual effects can be created quickly and easily simply by taking advantage of the power that textures have to offer.
Chapter Contents
  • Create Animated Lighting Effects with a Ramp Texture
  • Use Ambient Occlusion for Holographic Effects
  • Use Creative Text Effects

Create Animated Effects with a Ramp Texture
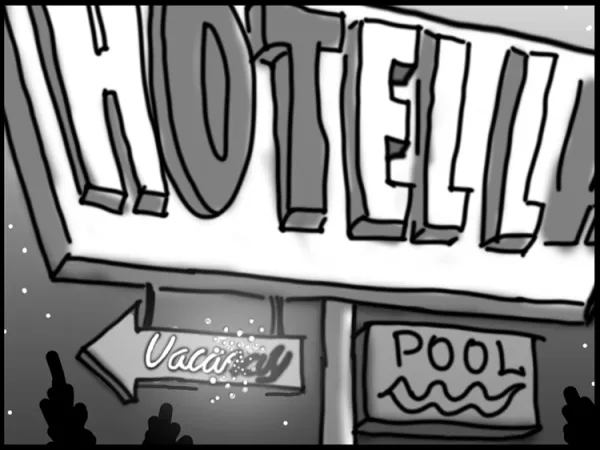
This first challenge involves adding an effect to the opening shot of an animated short. Figure 1-1 shows part of the storyboard for the opening. The camera moves down and out to reveal a dilapidated hotel sign with some broken lights. The gag is that the lighted parts of the sign spell “Hell.” The neon vacancy sign is just barely hanging on. The director would like to suggest that the hotel is possessed by demons, so as the camera stops, the Vacancy sign lights up, one of the bolts gives away, and the sign swivels so that the arrow points downward. Subtle, no?
c01f001.tif
Figure 1-1: The storyboard shows a neon sign magically coming to life.
Rather than have the sign blink on like a real neon sign would, the director would like the light of the neon Vacancy sign to start at the letter V and travel to the end over the course of about a second. A particle effect should be added to the leading end of the light.
The sign has already been modeled, and the basic camera move, along with the animation of the broken sign, is established. For the Vacancy sign, there is a NURBS curve but no neon geometry as of yet.
This effect should be fairly easy to create by extruding geometry along the length of the curve. A shader can be applied to the geometry, and then an animated ramp attached to the incandescence of the shader will provide the lighted effect. Whenever you’re confronted with an effect, it’s a good idea to design a rig with a few simple controls that can be easily animated. Whenever possible, the rig should be set up to anticipate changes as easily as possible because art directors are fussy and tend to change their minds a lot. This tutorial will take you through the steps of setting up a rig so that one control can be used to animate the light traveling along the length of the word Vacancy as well as the position emitter for the particle effect.
This exercise demonstrates one way of creating the rig and introduces you to several methods for navigating the node hierarchy in Autodesk® Maya®. Every Maya artist has their own style of working, but once in a while it’s a good idea to explore alternative methods of navigating the Maya interface. Doing so will open possible workflows that you may not be aware of, which can increase your efficiency as well as your understanding of how Maya works.

Create the Sign Geometry

The geometry for the Vacancy sign can be extruded along the existing curve in the scene. Before you start extruding geometry using NURBS geometry, I suggest you consider applying a Paint Effects stroke to the curve and then convert the stroke into polygons. The reason for this is that it’s easier to control the twisting and pinching that may occur as the geometry follows the curve. In addition, the UV texture coordinates created by the Paint Effects geometry will be easily adapted so that the ramp that creates the neon light can be animated without too much work.
  1. 1. The project files for this chapter can be downloaded from from the book’s support site. Use your web browser to navigate to www.sybex.com/go/mayavisualeffects2e and download the Chapter01_project. Once the files have been downloaded, unzip them to your local drive. Open Maya and use the File menu to set the Project to Chapter01_project. Then open the signSTart.ma file located in the Scenes directory of the Chapter01_project file directory. Once the scene is open, switch to the Persp camera using the View menu in the main viewport.
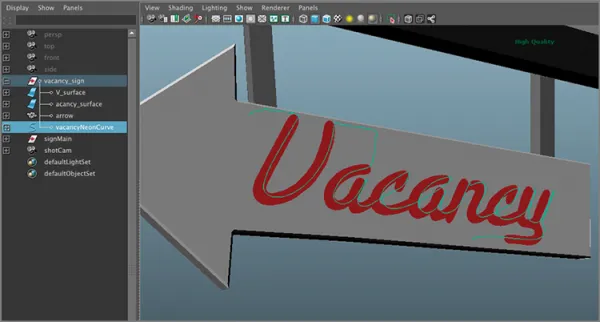
  2. 2. In the Outliner, expand the vacancy_sign group, and select the curve node named vacancyNeonCurve (see Figure 1-2).
    c01f002.tif
    Figure 1-2: Select the vacancyNeonCurve node in the Outliner.
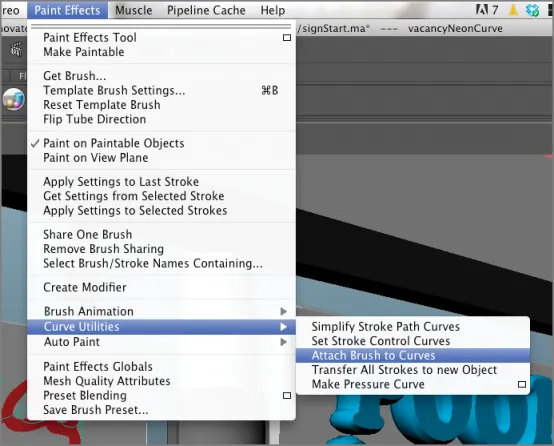
  3. 3. Switch to the Rendering menu set, and choose Paint Effects ⇒ Curve Utilities ⇒ Attach Brush To Curves (see Figure 1-3). The default stroke, which is a thick black line, is applied to the curve.
    c01f003.tif
    Figure 1-3: Use the Paint Effects menu to attach the default brush stroke to the curve.
  4. 4. Select the Stroke1 node in the Outliner, and open the Attribute Editor.
  5. 5. To convert the stroke into geometry, choose Modify ⇒ Convert ⇒ Paint Effects To Polygons ⇒ Options; in the options, turn on Quad Output and Hide Strokes.
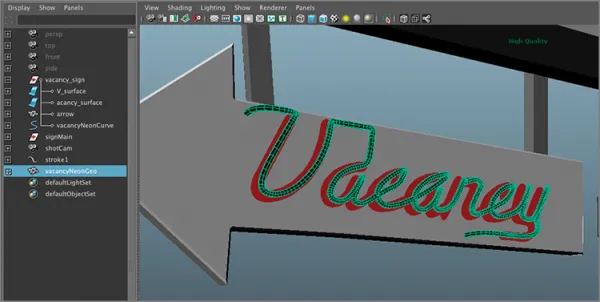
  6. 6. Maya creates a new node for the converted geometry and places it in a group called brush2MeshGroup. Expand this group, and select the brush2Main node. Press Shift+P to unparent the mesh, which moves it out of the group brush2MeshGroup.
  7. 7. Double-click the brush2Main node in the Outliner so it becomes highlighted, and rename the brush2Main node to vacancyNeonGeo. You can select and delete the brush2MeshGroup node (see Figure 1-4).
    c01f004.tif
    Figure 1-4: Conve...

Inhaltsverzeichnis