Learning PowerShell is a custom-built, handcrafted, painstakingly curated book designed to get you from total PowerShell newbie to confident PowerShell user in as little as four weeks. This book assumes no prior knowledge, perfect for non-developers and GUI addicts who recognize that PowerShell is the future but need a good bit of handholding to achieve mastery. It is also a simple guide for the hundreds of thousands of PowerShell users who have not attained the level of PowerShell knowledge that they really need.
With Learning PowerShell at your side, you will see that you don't have to be a developer to use PowerShell and you don't need to be a scripting wizard to derive value from integrating PowerShell into your daily administrative activities. The book is a learning resource that covers every topic worth discussing for a PowerShell beginner, with a depth of explanation unparalleled by any book currently on the market. With this book, you don't have to have a lot of time to learn the language and you can begin applying what you master almost immediately. Even skeptics of PowerShell, and command lines in general, will come away with a renewed sense of respect for the language and ideas on how to put it to use.
Häufig gestellte Fragen
Wie kann ich mein Abo kündigen?
Gehe einfach zum Kontobereich in den Einstellungen und klicke auf „Abo kündigen“ – ganz einfach. Nachdem du gekündigt hast, bleibt deine Mitgliedschaft für den verbleibenden Abozeitraum, den du bereits bezahlt hast, aktiv. Mehr Informationen hier.
(Wie) Kann ich Bücher herunterladen?
Derzeit stehen all unsere auf Mobilgeräte reagierenden ePub-Bücher zum Download über die App zur Verfügung. Die meisten unserer PDFs stehen ebenfalls zum Download bereit; wir arbeiten daran, auch die übrigen PDFs zum Download anzubieten, bei denen dies aktuell noch nicht möglich ist. Weitere Informationen hier.
Welcher Unterschied besteht bei den Preisen zwischen den Aboplänen?
Mit beiden Aboplänen erhältst du vollen Zugang zur Bibliothek und allen Funktionen von Perlego. Die einzigen Unterschiede bestehen im Preis und dem Abozeitraum: Mit dem Jahresabo sparst du auf 12 Monate gerechnet im Vergleich zum Monatsabo rund 30 %.
Was ist Perlego?
Wir sind ein Online-Abodienst für Lehrbücher, bei dem du für weniger als den Preis eines einzelnen Buches pro Monat Zugang zu einer ganzen Online-Bibliothek erhältst. Mit über 1 Million Büchern zu über 1.000 verschiedenen Themen haben wir bestimmt alles, was du brauchst! Weitere Informationen hier.
Unterstützt Perlego Text-zu-Sprache?
Achte auf das Symbol zum Vorlesen in deinem nächsten Buch, um zu sehen, ob du es dir auch anhören kannst. Bei diesem Tool wird dir Text laut vorgelesen, wobei der Text beim Vorlesen auch grafisch hervorgehoben wird. Du kannst das Vorlesen jederzeit anhalten, beschleunigen und verlangsamen. Weitere Informationen hier.
Ist Learning PowerShell als Online-PDF/ePub verfügbar?
Ja, du hast Zugang zu Learning PowerShell von Jonathan Hassell im PDF- und/oder ePub-Format sowie zu anderen beliebten Büchern aus Computer Science & Microsoft Programming. Aus unserem Katalog stehen dir über 1 Million Bücher zur Verfügung.
Welcome to Learning PowerShell! In this chapter, my main goal is to get you set up and ready to start working. To do so, there are a couple of applications you need to learn about and just a couple of notes I’d like to clear up so that you aren’t super confused as you start your march to PowerShell mastery.
Valid Platforms and Versions
PowerShell is designed, of course, to be run on all kinds of machines. In fact, the broader support that PowerShell has, the more likely more developers and hardware makers will adopt the language and incorporate it into their own offerings. It is sort of like a self-fulfilling prophecy, in that the more systems that support PowerShell, the more people and systems will want to use PowerShell, which will make even more systems use PowerShell, and so on.
The two most important things to note about the systems you will use to learn PowerShell is which version of PowerShell you will be using, and what platform your computer (or computers as we get more advanced, since we will be trying to script actions and fire commands across large swaths of machines simultaneously) is.
To determine what version of PowerShell you have, all you need to do is open PowerShell and type a single command. Click the Start menu and start typing “powershell” and you should come across “Windows PowerShell.” Click that to open it up and you should see what looks like a text-based prompt. Type the following at that prompt:
It should spit out a little table with four columns: Major, Minor, Build, and Revision. All you care about is the number in the Major column. That is the column that tells you what version you have. You need to have version 3 or higher to get the most from this book. PowerShell updates are free to download, so if you find you are using a version earlier than version 3, go to Microsoft.com and search for PowerShell, and you’ll find some pages that will help you download the new version and get it installed on your system. It just so happens that PowerShell 3 was a pretty big release, and a lot of new features were added to make life easier in a lot of ways, so it is a good baseline we can use for teaching. As I write this, Windows 10 ships with PowerShell version 5, so there have definitely been later revisions of the language, but they have mostly added more advanced features and scripting support and almost nothing has changed for the total beginner. So get to version 3 and then you are set on this point.
As far as your system’s platform goes, this is only a little bit trickier to figure out. Computing as we know it today is divided into a couple of camps:
–x64: 64-bit computing is pretty much the cutting edge of what you can buy today and really enables you to have gobs of RAM. PowerShell generally assumes you are running 64-bit, and pretty much everything you come across in this course or even on the Internet as you start searching for command and scripting ideas and then borrowing them (ahem) for personal use will work. If you have bought a machine within the past five years, then you have a 64-bit machine, and correspondingly you have nothing to worry about.
–x86: this is the platform of yesteryear. If you are running on machines purchased before 2007, then you probably are still 32-bit. If you have less than 4 GB of RAM, there is a chance that you are running a 32-bit operating system. PowerShell still works on this platform, but some more advanced stuff may run differently and some commands actually may not work at all. It is still plenty good enough to learn PowerShell with, so do not think in order to go any further you have to buy a whole new PC! Yours will work fine. All you need to do is use the x86 version of the Windows PowerShell console or the Windows PowerShell Integrated Scripting Environment. You will know which one because it specifically has “(x86)” in the title. But do not use this version unless you must.
Again, to keep it simple, use the 64-bit version of PowerShell (the one that does NOT have the (x86) designator in the title) unless you have a really specific reason why you need to use the 32-bit version.
Are you on version 3 and you know which platform version of PowerShell to use? Fantastic! Let’s move on.
Two Important PowerShell Tools
To use PowerShell, there are basically two avenues you can take: you can use a console window, which is just a place to type in commands and read the responses the system sends back to you, or you can use a graphical tool that lets you type in the same commands but also has a few more features to make it a little easier to explore PowerShell. The two are not mutually exclusive; you can use either or both depending on the task. Let me show you each of them, and while I am taking you through each of the utilities I will mention some sample situations in which each of them would be useful and when to think about using the other one.
The PowerShell Integrated Scripting Environment (ISE)
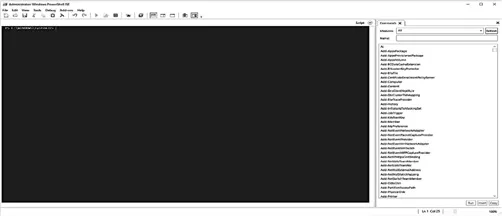
I think the easiest way to get started with PowerShell is to have a little bit of hand holding, and the Windows PowerShell Integrated Scripting Environment, which you will sometimes see labeled as the Windows PowerShell ISE, is the best way without spending any money. Figure 1.1 shows the way the Windows PowerShell ISE looks out of the box.
Figure 1.1: The default look of the Windows PowerShell ISE.
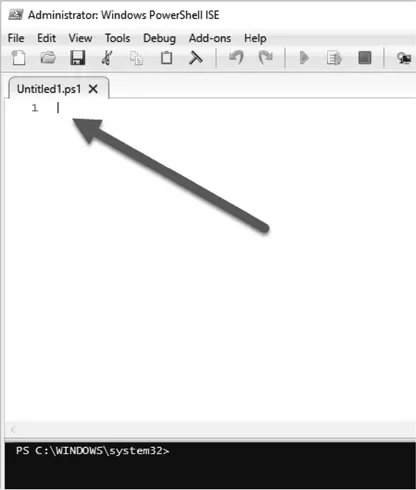
The main idea behind the ISE is to help you build scripts. You can do it in a friendlier, more aesthetically pleasing environment with a lot of help both in your face and behind the scenes, too. It gives you the console window, which is the big blue area that looks like a DOS prompt and kind of has the same look as the window you opened earlier in this chapter to check the version of PowerShell you are running. On the right, it gives you some graphical help in finding and selecting the best commands to use for any job. However, there is also the scripting pane, which you can turn on by going to the View menu and selecting Scripting Pane. Here, in Figure 1.2, is what that adds to the equation.
Figure 1.2: Adding the scripting pane to the Windows PowerShell ISE.
IntelliSense
It is easy to get started with PowerShell using the ISE because it includes some cool features. The best one for beginners is called IntelliSense, and it is like a PowerShell expert standing behind you, looking over your shoulder and helping you pick the right commands for the job. You can try it easily. Just type in
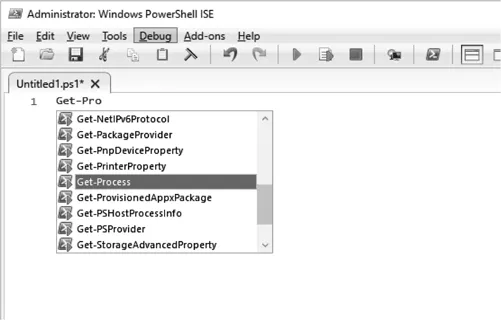
...into the scripting pane. You will see that as you start typing, the ISE will helpfully pop up a menu of choices that you can use. I have put an example of this in Figure 1.3. If you see one you like, you can simply hit the Tab key, and the ISE will automatically type in the rest of the command for you. To scroll up and down in the list, you can use the arrow keys if you do not want your fingers leaving the keyboard, or you can use the mouse to scroll up and down via the mouse’s center wheel or via the up and down buttons.
Figure 1.3: IntelliSense in the Windows PowerShell ISE will help you narrow the universe of commands from which you can choose.
Once you have finished the command you want to run, either hit the F5 key on your keyboard or click the green right arrow up in the toolbar that is a little to the right of the Help menu. What you have written will run in the console window, and you will see the results there, too.
The IntelliSense feature also works for the potatoes part of the command, too (the command itself is the meat, but the potatoes are all the stuff that follows the command; you’ll learn about these in the next chapter). For instance, and just take my word for this now, there is a command called Get-EventLog that will look inside the event logs that Windows keeps to track what happens on your system. Part of that command is specifying which event log you want to look at, and since Windows can generate and log a lot of events, you probably are ever interested only in a pretty small subset of all the events available in any one event log. So again, just taking my word for it now, I will show you how to puzzle through finding commands and thinking about what command to use when in this book, so fret not. The command we want to use is
Take that command and start typing it into the scripting pane of the ISE, but as you go, keep hitting Tab. As you hit Tab, you will see a list of appropriate choices to type in each place of the command. For instance, as you type LogName, you will see the other parameters you can enter come up. As you type Security and hit Tab, you will see a list of event logs from which you can choose. This sort of visual representation of the universe of PowerShell, but put into a really context specific perspective, can be invaluable as you are learning PowerShell and getting your head around it.
The scripting pane is also really useful because you can use it as a kind of notepad or staging area. You can use the scripting pane to write a script or store a couple of commands, and then to test it out, you can select a part of what you have typed into the scripting pane and run only that. You do this by hitting F8 on your keyboard, or choosing the icon in the toolbar that has the green right arrow with the document image behind it. Hover over that icon to make sure you are choosing the right one. That selection will run via the PowerShell engine in the console window below (again, the blue area by default), and it is a great way to interactively build a script over time.
Believe it or not, a unique feature of the ISE is that it supports copy and paste with the same keyboard shortcuts you have been using for years. Plus, you can copy and paste not only from the scripting pane, but also from the console window, too, which unless you are running Windows 10 is kind of a difficult thing to do. You would think that since Windows has been around for 30 years that Microsoft would have figured out how to make that work, but you would be wrong.
Getting the ISE Set Up
Frankly, I think the ISE looks pretty good out of the box. There is not a lot I would recommend that you change, but you might want to adjust the font sizes for both the scripting pane and the console pane if your eyes are getting old and tired like mine. This is fairly easy to do: just go to the Tools menu and select Options, and you’ll get a window like the one in Figure 1.4, where you can adjust the font, size, and color of just about every aspect of the ISE. Play around until you find something you are comfortable with and that you can re...