
eBook - ePub
Digital SLR Handbook
John Freeman
This is a test
Buch teilen
- English
- ePUB (handyfreundlich)
- Über iOS und Android verfügbar
eBook - ePub
Digital SLR Handbook
John Freeman
Angaben zum Buch
Buchvorschau
Inhaltsverzeichnis
Quellenangaben
Häufig gestellte Fragen
Wie kann ich mein Abo kündigen?
Gehe einfach zum Kontobereich in den Einstellungen und klicke auf „Abo kündigen“ – ganz einfach. Nachdem du gekündigt hast, bleibt deine Mitgliedschaft für den verbleibenden Abozeitraum, den du bereits bezahlt hast, aktiv. Mehr Informationen hier.
(Wie) Kann ich Bücher herunterladen?
Derzeit stehen all unsere auf Mobilgeräte reagierenden ePub-Bücher zum Download über die App zur Verfügung. Die meisten unserer PDFs stehen ebenfalls zum Download bereit; wir arbeiten daran, auch die übrigen PDFs zum Download anzubieten, bei denen dies aktuell noch nicht möglich ist. Weitere Informationen hier.
Welcher Unterschied besteht bei den Preisen zwischen den Aboplänen?
Mit beiden Aboplänen erhältst du vollen Zugang zur Bibliothek und allen Funktionen von Perlego. Die einzigen Unterschiede bestehen im Preis und dem Abozeitraum: Mit dem Jahresabo sparst du auf 12 Monate gerechnet im Vergleich zum Monatsabo rund 30 %.
Was ist Perlego?
Wir sind ein Online-Abodienst für Lehrbücher, bei dem du für weniger als den Preis eines einzelnen Buches pro Monat Zugang zu einer ganzen Online-Bibliothek erhältst. Mit über 1 Million Büchern zu über 1.000 verschiedenen Themen haben wir bestimmt alles, was du brauchst! Weitere Informationen hier.
Unterstützt Perlego Text-zu-Sprache?
Achte auf das Symbol zum Vorlesen in deinem nächsten Buch, um zu sehen, ob du es dir auch anhören kannst. Bei diesem Tool wird dir Text laut vorgelesen, wobei der Text beim Vorlesen auch grafisch hervorgehoben wird. Du kannst das Vorlesen jederzeit anhalten, beschleunigen und verlangsamen. Weitere Informationen hier.
Ist Digital SLR Handbook als Online-PDF/ePub verfügbar?
Ja, du hast Zugang zu Digital SLR Handbook von John Freeman im PDF- und/oder ePub-Format sowie zu anderen beliebten Büchern aus Médias et arts de la scène & Médias numériques. Aus unserem Katalog stehen dir über 1 Million Bücher zur Verfügung.
Information
Post-production
Setting up a digital darkroom
The digital darkroom brings you out from the gloom into the daylight but it needs some key kit: a fast computer with a good-quality screen, some image manipulation software and, at the very least, a printer.
The computer
The first thing to get right is the computer, and there are some basics to look for. No matter whether you opt for an Apple Mac or a Windows PC, buy the one with the biggest screen you can afford. Go for the largest amount of hard disk space (the storage) and ditto for the amount of RAM – I would recommend a gigabyte (GB) RAM but definitely no less than 256 megabytes (MB). This is because you’ll quickly find the hard drive filling up with the large images that modern DSLRs can make. Image editing software packages are memory-hungry beasts, needing lots of RAM to do their work. Too little RAM and you might find the programs running slowly or crashing on a regular basis.
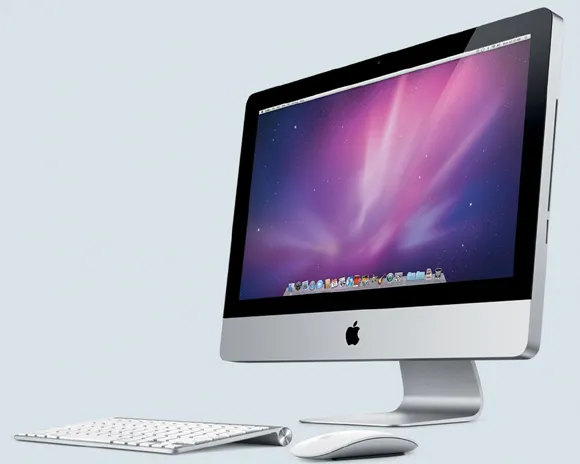
A computer (here, an Apple Mac) that’s ideal for image editing has plenty of hard disk space, lots of RAM and comes with a good-quality, large screen.
As cameras become more sophisticated and the files that they produce become ever larger a powerful computer is essential. This Apple Mac is such a model and could be thought of as the command centre for all post-shooting procedures.
Ideally, your computer should also have at least two USB ports (preferably the fast USB 2.0 system) and two FireWire (or IEEE 1394) ports to give you optimum communication speeds between devices.
The printer
Today’s desktop inkjet printers can produce stunning photographs. They range in size from small, inexpensive, stand-alone printers producing 15 × 10cm (6 × 4in) prints to expensive A3 and larger printers. Many machines are combined printers, copiers, faxes and scanners but all, bar the most basic (cheap) models, can still produce good prints. The advantage of buying an all-in-one model is that you save on desk space without necessarily compromising on print quality. Some printers can bypass the computer and print directly from the memory card.
The printer manufacturer will recommend which paper and ink to use. These are generally their own brands, and they tend to be more expensive. However, this really isn’t just a ploy to make you spend more money – the recommended ink and paper combination really does produce the best resuts.
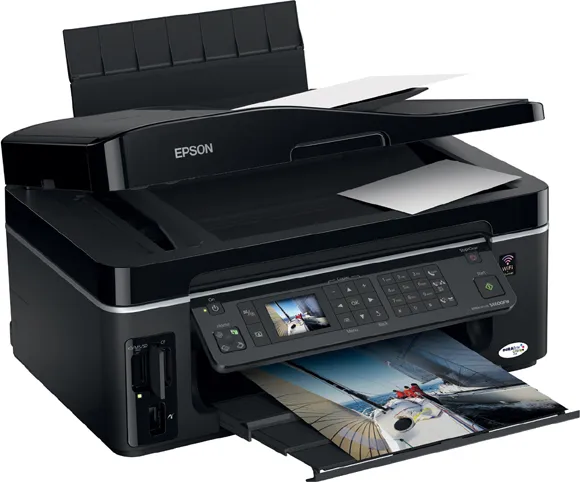
This Epson inkjet printer has a built-in memory card reader for both compact flash and SD cards, making printing possible without the need for a computer.
Most inkjet printers use at least four, but as many as nine, inks together to achieve a good result. The four main colours are CMYK: cyan (C), magenta (M), yellow (Y) and black (K, which stands for ‘key’ and means the black ink). Additional inks can include light cyan and magenta to help with fine detail rendering, or red and purple to improve the range of colours that can be achieved on the print), while additional blacks and ‘light blacks’ are used for the same reason or to help improve black-and-white output. Generally speaking, the more inks there are, the better the output, but the more expensive the printer. To help keep costs down, try to buy a printer with separate ink tanks because, unlike printers with combined ink tanks, where more than one colour is built into a unit, you need replace only the tanks that are empty. As a rule of thumb, choose the highest-specified printer you can afford, but keep in mind the costs of the ink and paper.
The software
Image editing software is the final factor involved in producing great prints. Although with many DSLRs you can print directly from the camera without linking up to a computer, being able to access your images and manipulate them on the computer screen offers you a whole new world of creativity. The software ranges from inexpensive to very pricey, depending on how creative you want to be.
Your DSLR may come supplied with some form of image editing software – certainly, the camera should come with software to deal with RAW files. Adobe’s Photoshop CS is one of the top-end very expensive image editing packages but Adobe also makes the much more affordable Photoshop Elements. Other packages include PaintShop Pro Photo XI, another Photoshop-like editing package. Again, this is much less expensive but it still has a full range of features and is very powerful.
The best course of action is to shop around and balance the level of skill you have (or don’t have) with your budget, and if the software that was provided with your DSLR seems sophisticated enough, then you need not spend any more money anyway.
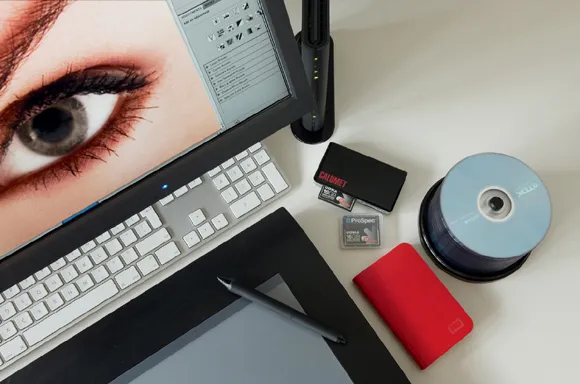
Another useful gadget that can help enormously with image manipulation is a graphics pad. Essentially, you ‘draw’ your edits on, and make changes to, your images with a pen-like stylus, instead of a computer mouse. Although this piece of equipment is quite costly, it does offer a more natural way of working than with a computer mouse, and you may consider that it is worth the investment.

A helpful accessory for image editing is a graphics pad. This allows you to draw edits onto your images, instead of using a mouse, which feels more natural and also gives you greater precision.
DSLRs are often supplied with image editing software but, if not, there are many packages available on the market, such as Adobe Photoshop.
Basic colour management
You have a memory card full-to-bursting wi...