
Hands-On Full Stack Development with Spring Boot 2.0 and React
Build modern and scalable full stack applications using the Java-based Spring Framework 5.0 and React
Juha Hinkula
- 302 Seiten
- English
- ePUB (handyfreundlich)
- Über iOS und Android verfügbar
Hands-On Full Stack Development with Spring Boot 2.0 and React
Build modern and scalable full stack applications using the Java-based Spring Framework 5.0 and React
Juha Hinkula
Über dieses Buch
Develop efficient and modern full-stack applications using Spring Boot and React 16
Key Features
- Develop resourceful backends using Spring Boot and faultless frontends using React.
- Explore the techniques involved in creating a full-stack app by going through a methodical approach.
- Learn to add CRUD functionalities and use Material UI in the user interface to make it more user-friendly.
Book Description
Apart from knowing how to write frontend and backend code, a full-stack engineer has to tackle all the problems that are encountered in the application development life cycle, starting from a simple idea to UI design, the technical design, and all the way to implementing, testing, production, deployment, and monitoring. This book covers the full set of technologies that you need to know to become a full-stack web developer with Spring Boot for the backend and React for the frontend.
This comprehensive guide demonstrates how to build a modern full-stack application in practice. This book will teach you how to build RESTful API endpoints and work with the data access Layer of Spring, using Hibernate as the ORM. As we move ahead, you will be introduced to the other components of Spring, such as Spring Security, which will teach you how to secure the backend. Then, we will move on to the frontend, where you will be introduced to React, a modern JavaScript library for building fast and reliable user interfaces, and its app development environment and components.
You will also create a Docker container for your application. Finally, the book will lay out the best practices that underpin professional full-stack web development.
What you will learn
- Create a RESTful web service with Spring Boot
- Understand how to use React for frontend programming
- Gain knowledge of how to create unit tests using JUnit
- Discover the techniques that go into securing the backend using Spring Security
- Learn how to use Material UI in the user interface to make it more user-friendly
- Create a React app by using the Create React App starter kit made by Facebook
Who this book is for
Java developers who are familiar with Spring, but have not yet built full-stack applications
Häufig gestellte Fragen
Information
Securing and Testing Your Backend
- How to secure your Spring Boot backend with Spring Boot
- How to secure your Spring Boot backend with JWT
- How to test your backend
Technical requirements
Spring Security
- An AuthenticationManager bean with an in-memory single user. The username is user and the password is printed to the console output.
- Ignored paths for common static resource locations, such as /css, /images, and more.
- HTTP basic security for all other endpoints.
- Security events published to Spring ApplicationEventPublisher.
- Common low-level features are on by default (HSTS, XSS, CSRF, and so forth).
 <dependency>
 <groupId>org.springframework.boot</groupId>
 <artifactId>spring-boot-starter-security</artifactId>
 </dependency>


package com.packt.cardatabase;

import org.springframework.context.annotation.Configuration;
import org.springframework.security.config.annotation.web.builders.HttpSecurity;
import org.springframework.security.config.annotation.web.configuration.EnableWebSecurity;
import org.springframework.security.config.annotation.web.configuration.WebSecurityConfigurerAdapter;

@Configuration
@EnableWebSecurity
public class SecurityConfig extends WebSecurityConfigurerAdapter {

 @Override
 protected void configure(HttpSecurity http) throws Exception {

 }

}
 @Bean
 @Override
 public UserDetailsService userDetailsService() {
 UserDetails user =
 User.withDefaultPasswordEncoder()
 .username("user")
 .password("password")
 .roles("USER")
 .build();

 return new InMemoryUserDetailsManager(user);
 }
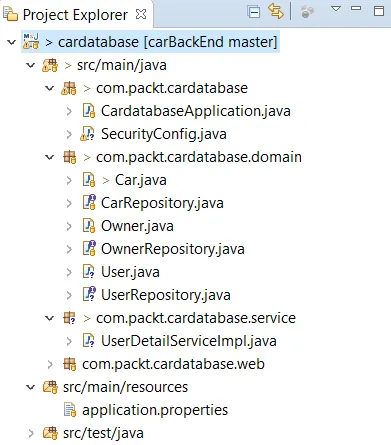
- Create a new class called User in the domain package. Activate the domain package and right click your mouse. Select New | Class from the menu and give the name User to a new class. After that, your project structure should look like the following screenshot:
- Annotate the User class with the @Entity annotation. Add the class fields—ID, username, password, and role. Finally, add the constructors, getters, and setters. We will set all fields to be nullable and that the username must be unique, by using the @Column annotation. See the following User.java source code of the fields and constructors:
package com.packt.cardatabase.domain;

import javax.persistence.Column;
import javax.persistence.Entity;
import javax.persistence.GeneratedValue;
import javax.persistence.GenerationType;
import javax.persistence.Id;

@Entity
public class User {
 @Id
 @GeneratedValue(strategy = GenerationType.IDENTITY)
 @Column(nullable = false, updatable = false)
 private Long id;

 @Column(nullable = false, unique = true)
 private String username;

 @Column(nullable = false)
 private String password;

 @Column(nullable = false)
 private String role;

 public User() {
 }

 public User(String username, String password, String role) {
 super();
 this.username = username;
 this.password = password;
 this.role = role;
 }
 public Long getId() {
 return id;
 }

 public void setId(Long id) {
 this.id = id;
 }

 public String getUsername() {
 return username;
 }

 public void setUsername(String username) {
 this.username = username;
 }

 public String getPassword() {
 return password;
 }

 public void setPassword(String password) {
 this.password = password;
 }

 public String getRole() {
 return role;
 }

 public void setRole(String role) {
 this.role = role;
 }
} - Create a new class called UserRepository in the domain package. Activate the domain package and right click your mouse. Select New | Class from the menu and give the name UserRepository to the new class.
- The source code of the repository class is similar to what we have done in the previous chapter, but there is one query method, findByUsername, that we need in the next steps. See the following UserRepository source code:
package com.packt.cardatabase.domain;

import org.springframework.data.repository.CrudRepository;
import org.springframework.stereotype.Repository;

@Repository
public interface UserRepository extends CrudRepository<User, Long> {
 User findByUsername(String username);
}
- Next, we create a class that implements the UserDetailsService interface provided by Spr...