
eBook - ePub
SharePoint Online Development, Configuration, and Administration
Advanced Quick Start Guide
Mark Beckner
This is a test
Buch teilen
- 114 Seiten
- English
- ePUB (handyfreundlich)
- Über iOS und Android verfügbar
eBook - ePub
SharePoint Online Development, Configuration, and Administration
Advanced Quick Start Guide
Mark Beckner
Angaben zum Buch
Buchvorschau
Inhaltsverzeichnis
Quellenangaben
Über dieses Buch
For those new to SharePoint Online, as well as those who have worked with previous versions of the SharePoint platform, this guide is intended to give concrete steps to rapidly understand how to configure, develop, and administrate solutions in this new environment.
SharePoint Online Development, Configuration, and Administration puts forth the most efficient way to get up to speed on the platform. This book, packed with value, provides clear, concise information about all of the common portions of SharePoint that you would need to work with – including WebParts, reporting, site management, administration and licensing with O365, and workflows using Microsoft Flow. These tips from a seasoned developer will teach you how to
-
- Work with Sites, Lists, Permissions, Access, and other core functionality
-
- Make customizations to the look and feel of SharePoint Online
-
- Understand Web Part development and deployment
-
- Develop Microsoft Flow processes for business process automation
-
- Utilize Reporting functionality available in O365
-
- Look at the many options for administrating SharePoint components
Häufig gestellte Fragen
Wie kann ich mein Abo kündigen?
Gehe einfach zum Kontobereich in den Einstellungen und klicke auf „Abo kündigen“ – ganz einfach. Nachdem du gekündigt hast, bleibt deine Mitgliedschaft für den verbleibenden Abozeitraum, den du bereits bezahlt hast, aktiv. Mehr Informationen hier.
(Wie) Kann ich Bücher herunterladen?
Derzeit stehen all unsere auf Mobilgeräte reagierenden ePub-Bücher zum Download über die App zur Verfügung. Die meisten unserer PDFs stehen ebenfalls zum Download bereit; wir arbeiten daran, auch die übrigen PDFs zum Download anzubieten, bei denen dies aktuell noch nicht möglich ist. Weitere Informationen hier.
Welcher Unterschied besteht bei den Preisen zwischen den Aboplänen?
Mit beiden Aboplänen erhältst du vollen Zugang zur Bibliothek und allen Funktionen von Perlego. Die einzigen Unterschiede bestehen im Preis und dem Abozeitraum: Mit dem Jahresabo sparst du auf 12 Monate gerechnet im Vergleich zum Monatsabo rund 30 %.
Was ist Perlego?
Wir sind ein Online-Abodienst für Lehrbücher, bei dem du für weniger als den Preis eines einzelnen Buches pro Monat Zugang zu einer ganzen Online-Bibliothek erhältst. Mit über 1 Million Büchern zu über 1.000 verschiedenen Themen haben wir bestimmt alles, was du brauchst! Weitere Informationen hier.
Unterstützt Perlego Text-zu-Sprache?
Achte auf das Symbol zum Vorlesen in deinem nächsten Buch, um zu sehen, ob du es dir auch anhören kannst. Bei diesem Tool wird dir Text laut vorgelesen, wobei der Text beim Vorlesen auch grafisch hervorgehoben wird. Du kannst das Vorlesen jederzeit anhalten, beschleunigen und verlangsamen. Weitere Informationen hier.
Ist SharePoint Online Development, Configuration, and Administration als Online-PDF/ePub verfügbar?
Ja, du hast Zugang zu SharePoint Online Development, Configuration, and Administration von Mark Beckner im PDF- und/oder ePub-Format sowie zu anderen beliebten Büchern aus Computer Science & Entreprise Applications. Aus unserem Katalog stehen dir über 1 Million Bücher zur Verfügung.
Information
Chapter 1
Licensing, Administration, and Data Migration
No matter how familiar you are with past versions of SharePoint, the licensing model and administration of your environment and underlying sites will be new territory. This chapter outlines the steps needed to get your SharePoint instance set up, how to add users, and how to administrate your solutions.
Licensing and the Office 365 Portal
If you have an Office 365 (O365) subscription, you should already have access to SharePoint. There are many different levels of licensing within O365. The individual consumer or small business may use a basic plan, while a larger corporation would use one of the enterprise levels of licensing. Most O365 licenses will have access to SharePoint, and the functionality in these environments is the same. The most noticeable difference are the web parts and controls that are available (enterprise level will have much more access to controls that allow for data reporting, for example).
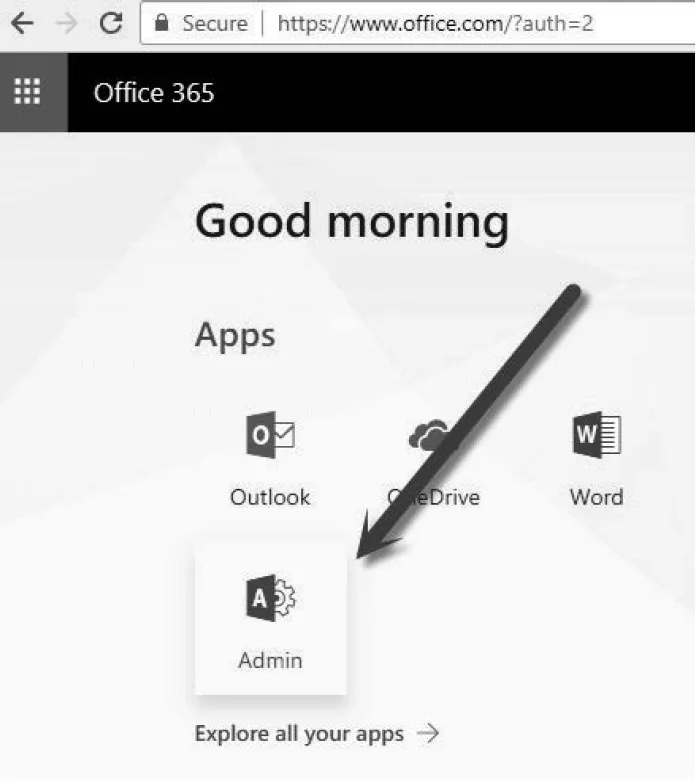
To gain access to your SharePoint Online instance, go to portal.office.com (if you don’t already have an account, you’ll need to sign up). Log in to your account and click on the Admin icon, as shown in Figure 1.1.
In the new window that opens, expand the Users tab and select Active users. You’ll see a list of all available user accounts. From here, you can create new users, delete users, and assign licenses. Click on the user that you want to assign a license and permissions to; an additional tab will open with several options (see Figure 1.2).

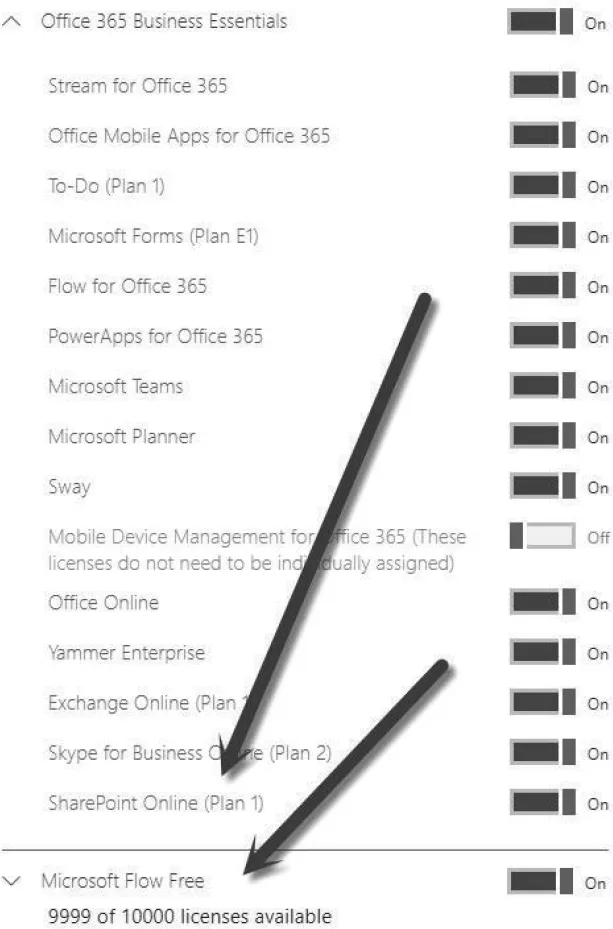
In the Product licenses section, you can see an overview of what licenses have been assigned. You’ll need to click Edit located next to this section to see what is included with your license. After you click Edit, you will see something like what is shown in Figure 1.3. In this example, we show the Office 365 Business Essentials license, which includes everything listed (SharePoint Online as well!). You may also see Microsoft Flow, Power BI, and other licenses that you’ve added at some point in your Azure development.
You can see a roll-up view of your licensing arrangement by expanding the Billing tab and clicking Licenses (Figure 1.4). This will allow you to quickly determine how many licenses you have and how many have been assigned. If you need additional licenses, you can easily acquire them from within this O365 portal.

External Users Licensing (Guest Access)
By default, you can turn licensing on and set permissions for each user that you have listed in the O365 portal and enable or restrict their access to tools based on this. You also can allow access to SharePoint Online to external users, who are not listed in your list of Users in O365, by invitation or request. This allows you to engage with the external users without having to purchase licenses for them. The value of this option is that organizations that work with outside vendors and the public do not have to purchase licenses for these users.
For example, you may have a company that has licensed O365 users that have full licenses for various products. Your company engages with the public and wants to share certain document libraries for read-only or basic contributions (like uploads). By allowing for external users, you only need to pay for the internal licenses and can allow for unlimited “guests.” There is no limit to the number of external users you can invite to your SharePoint sites.
To give permissions to External users (or “guest” users), you must first enable your O365 instance to allow for external sharing. In the main O365 Admin portal, click on the home page and in the search bar type “external.” You will see several actions available—click the “Sites external sharing” option, as shown in Figure 1.5. A screen will open where you can set restrictions on external usage and duration of available access for external (in this case “anonymous”) users.

To give access to external users within SharePoint sites, open a specific site, click the SharePoint settings option in the upper right-hand corner, and click Site permissions (refer to Figure 1.6). Once that has opened, click on Advanced permissions settings. You may also navigate to it from the Site settings page by clicking on Site permissions.
Note: accessing the permissions tab is different when accessing it from a parent site or a subsite.
- From the parent site, click the Settings icon (upper right corner), select Site settings, then select Site permissions.
- From a subsite, click the Settings icon (upper right corner), select Site permissions, then select Advanced permissions settings (as Figure 1.6 demonstrates below).

In the window that opens, you can click on the “Invite people” tab, or the Grant permissions icon, then type the email address of the person you want to give permissions to. Next, select “Send an email invitation” and then choose a permission level from the drop-down menu. We’ll choose “Contribute” permissions for this example (see Figure 1.7)—this will allow the person who is bein...