
eBook - ePub
Freehand Perspective and Sketching
Dora Miriam Norton
This is a test
Compartir libro
- 192 páginas
- English
- ePUB (apto para móviles)
- Disponible en iOS y Android
eBook - ePub
Freehand Perspective and Sketching
Dora Miriam Norton
Detalles del libro
Vista previa del libro
Índice
Citas
Información del libro
The essential guide to rendering perspective, Freehand Perspective and Sketching uses a series of illustrated exercises and explanations to help artists master one of art's greatest challenges. Generations of art students and amateurs have found it an indispensable resource of the time-honored principles and methods that empower artists to express themselves.
More than 260 figures offer precise demonstrations in the representation of shapes, shadows, angles, and proportion. Author Dora Miriam Norton discusses how to combine these elements to create realistic-looking compositions, focusing primarily on the techniques of proportion and foreshortening. Freehand sketching, she explains, means drawing by the trained eye and judgment. This book provides a foundation of definite knowledge that enables artists to draw items individually or in groups without needing to see actual models.
More than 260 figures offer precise demonstrations in the representation of shapes, shadows, angles, and proportion. Author Dora Miriam Norton discusses how to combine these elements to create realistic-looking compositions, focusing primarily on the techniques of proportion and foreshortening. Freehand sketching, she explains, means drawing by the trained eye and judgment. This book provides a foundation of definite knowledge that enables artists to draw items individually or in groups without needing to see actual models.
Preguntas frecuentes
¿Cómo cancelo mi suscripción?
¿Cómo descargo los libros?
Por el momento, todos nuestros libros ePub adaptables a dispositivos móviles se pueden descargar a través de la aplicación. La mayor parte de nuestros PDF también se puede descargar y ya estamos trabajando para que el resto también sea descargable. Obtén más información aquí.
¿En qué se diferencian los planes de precios?
Ambos planes te permiten acceder por completo a la biblioteca y a todas las funciones de Perlego. Las únicas diferencias son el precio y el período de suscripción: con el plan anual ahorrarás en torno a un 30 % en comparación con 12 meses de un plan mensual.
¿Qué es Perlego?
Somos un servicio de suscripción de libros de texto en línea que te permite acceder a toda una biblioteca en línea por menos de lo que cuesta un libro al mes. Con más de un millón de libros sobre más de 1000 categorías, ¡tenemos todo lo que necesitas! Obtén más información aquí.
¿Perlego ofrece la función de texto a voz?
Busca el símbolo de lectura en voz alta en tu próximo libro para ver si puedes escucharlo. La herramienta de lectura en voz alta lee el texto en voz alta por ti, resaltando el texto a medida que se lee. Puedes pausarla, acelerarla y ralentizarla. Obtén más información aquí.
¿Es Freehand Perspective and Sketching un PDF/ePUB en línea?
Sí, puedes acceder a Freehand Perspective and Sketching de Dora Miriam Norton en formato PDF o ePUB, así como a otros libros populares de Art y Techniques d'art. Tenemos más de un millón de libros disponibles en nuestro catálogo para que explores.
Información
Categoría
ArtCategoría
Techniques d'artChapter I
GENERAL DIRECTIONS
MATERIALS. — Any paper having a fine and fairly soft texture can be used. It should produce an even grain in both vertical and horizontal pencil strokes. Pencil exercises such as those reproduced in this book are usually drawn on paper of quarter imperial size (11” x 15”), on which at least an inch and a half of margin is allowed. This is a good size for the student’s drawings, whether copied from these exercises or drawn from objects. Have two pencils, one fairly soft (as No. 2 Faber, SM Dixon, or 2 B Koh-i-noor), and a harder one; also a good eraser.
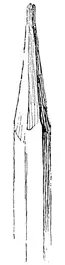
FIG. 3
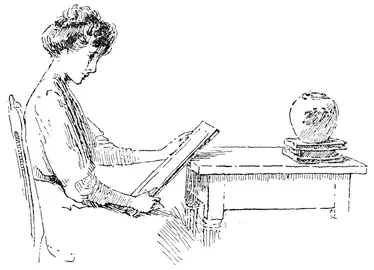
FIG. 4
Line Practice. — Cut the pencil like the illustration (Fig. 3), and rub on practice paper1 till a broad line, firm at the edges and transparent (that is, with the grain of the paper slightly showing through it) can be made. Sit erect, with the paper directly in front, and have the desk top inclined, or use a drawing board (Fig. 4), that the paper may be as nearly as possible parallel with the face. Hold the pencil almost flat, as in the illustration (Fig. 5), and as loosely as is consistent with a steady control. For horizontal lines use position A, Fig. 5, moving the pencil from left to right; for vertical lines use position B, moving from the top downward. Practice vertical, horizontal, or oblique lines persistently; moving the hand freely from the shoulder, not resting it on the wrist or elbow. If the muscles acquire an unpleasant tension, relax by dropping the hands at the sides and loosely shaking them. Unfamiliar or difficult exercises should be first carefully sketched with a thin, light line. If wrong, draw over without erasing until a satisfactory form is obtained. Erase the incorrect part, and render expressively (Ch. IV). But after the composition of the exercise is planned, such straight lines as margins, cylinder sides, and many ellipses may be drawn in full at once. And as the student gains in skill, more and more of the work should at the first touch be put on the paper as it is intended to remain. Exact knowledge is to be acquired only that artistic interpretations may be expressed with ease and certainty.
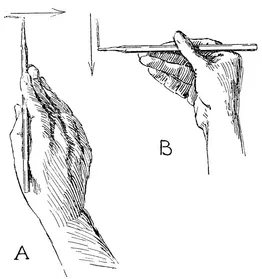
FIG. 5
Models for Work. — Objects in common use have been chosen for most of these exercises. Geometric solids are assigned only as needed for the clearer elucidation of perspective truths. Necessary models, as the cylinder, the cube, and others, should be made by the student as directed. For forms (as the hexagonal frame) too complicated to be easily made, the well-known wooden models have been used. But after thorough mastery of the simpler forms, most of the later lessons can be understood without models.
Placing of Models. — All objects for study should be placed so as to present their vertical surfaces in nearly their true shape to the student. Thus if the model is to be near, as on the table at which the student sits, it is better to raise it a few inches (Fig. 4). This will not be necessary if it can be placed four or five feet distant. If the study is seen too much from the top, the perspective will be unpleasantly violent, as in a photograph where the camera has been pointed too much downward.
The Table Line. — To indicate a supporting surface under the objects a horizontal line (A, B in Fig. 6) is used. It stands for the back edge of the table or other horizontal supporting surface, and is called the Table Line. It should be represented as further back than any portion of the study. As will be observed later, it need not be used if the supporting surface is otherwise suggested, as by a cast shadow (Fig. 34).
FIG. 6
All Work Freehand. — All work is to be done freehand, that is, with no ruling, and no measuring other than by the eye and pencil.
Chapter II
PENCIL MEASUREMENT AND THE PICTURE PLANE
PENCIL Measurement. — Before studying the exercises which follow, the beginner should become familiar with Pencil Measurement. Place a book upright directly in front of the eye. With one eye shut and the arm at full length (to ensure a uniform distance from the eye) measure on the pencil held horizontally the apparent width of the book. Then turning the pen-cil, compare this distance with its height (Fig. 7). (It is better to take the smaller distance first, and to measure it into the larger.) Compare the proportions so found with those obtained by actual measurement of the book. But always get the pencil measurement first, for this compels the eye to do all that it can unaided before showing by actual measurement how much better it can learn to do.
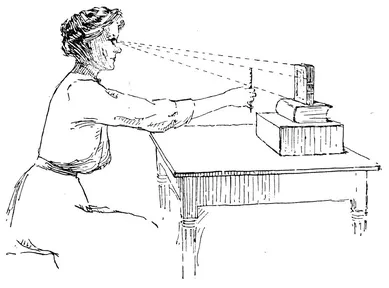
FIG. 7
Now turn the book away a little, and compare this new appearance of the width with the height (Fig. 12).
The Picture Plane. — Here we must learn to keep the pencil parallel with the face in order that the pencil measurement may be reliable. For this, go to the window, and stand facing the glass, so the face is parallel with it. Choose some object seen through the window, as another house, and resting the pencil against the glass measure its width and compare that with its height (Fig. 8).
Observe that if the outline of the house could be traced by the pencil on the glass it would form correctly the apparent shape of that house.

FIG. 8
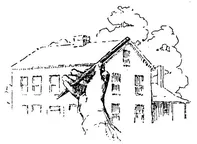
FIG. 9
This leads us to see that all perspective drawing may be regarded as placing on paper the equivalent of such a tracing on the glass. It will therefore be apparent at once that pencil measurement, to be correct, must be taken with the pencil held as if laid on such a pane of glass; or in other words, on a plane parallel with and in front of the face. This imaginary transparent plane is called the Picture Plane, and is a most important factor in all freehand drawing. Thus, by turning or revolving the pencil on the glass in front of the face, that is, by revolving the pencil in the picture plane, it can be made to cover the appearance of any possible line or direction. For example, the sloping gable edge of the outside house, though retreating from the eye and therefore foreshortened, can be covered by the revolving pencil (Fig. 9), thus giving the appearance or picture of its direction. Its apparent or foreshortened length can also be taken on the pencil and compared with any other dimension, as the height of the nearest corner. The essential requirement is that the pencil shall constantly lie flat on this pane of glass; that is, on the picture plane.
We have therefore, in the use of pencil measurement on the picture plane, a ready and accurate means of ascertaining any direction or any proportionate dimension seen by the eye. It cannot give us actual sizes, as the length of the gable in feet; but it will tell us how long the slanting line representing the gable must be drawn in proportion to other parts of the house. In this case, for instance, the sloping edge appears three-fourths of the gable width. The difficulty in using this ...