
eBook - ePub
Curved-Folding Origami Design
Jun Mitani
This is a test
Compartir libro
- 102 páginas
- English
- ePUB (apto para móviles)
- Disponible en iOS y Android
eBook - ePub
Curved-Folding Origami Design
Jun Mitani
Detalles del libro
Vista previa del libro
Índice
Citas
Información del libro
The origami introduced in this book is based on simple techniques. Some were previously known by origami artists and some were discovered by the author. Curved-Folding Origami Design shows a way to explore new area of origami composed of curved folds. Each technique is introduced in a step-by-step fashion, followed by some beautiful artwork examples. A commentary explaining the theory behind the technique is placed at the end of each chapter.
Features
-
- Explains the techniques for designing curved-folding origami in seven chapters
-
- Contains many illustrations and photos (over 140 figures), with simple instructions
-
- Contains photos of 24 beautiful origami artworks, as well as their crease patterns
-
- Some basic theories behind the techniques are introduced
Preguntas frecuentes
¿Cómo cancelo mi suscripción?
¿Cómo descargo los libros?
Por el momento, todos nuestros libros ePub adaptables a dispositivos móviles se pueden descargar a través de la aplicación. La mayor parte de nuestros PDF también se puede descargar y ya estamos trabajando para que el resto también sea descargable. Obtén más información aquí.
¿En qué se diferencian los planes de precios?
Ambos planes te permiten acceder por completo a la biblioteca y a todas las funciones de Perlego. Las únicas diferencias son el precio y el período de suscripción: con el plan anual ahorrarás en torno a un 30 % en comparación con 12 meses de un plan mensual.
¿Qué es Perlego?
Somos un servicio de suscripción de libros de texto en línea que te permite acceder a toda una biblioteca en línea por menos de lo que cuesta un libro al mes. Con más de un millón de libros sobre más de 1000 categorías, ¡tenemos todo lo que necesitas! Obtén más información aquí.
¿Perlego ofrece la función de texto a voz?
Busca el símbolo de lectura en voz alta en tu próximo libro para ver si puedes escucharlo. La herramienta de lectura en voz alta lee el texto en voz alta por ti, resaltando el texto a medida que se lee. Puedes pausarla, acelerarla y ralentizarla. Obtén más información aquí.
¿Es Curved-Folding Origami Design un PDF/ePUB en línea?
Sí, puedes acceder a Curved-Folding Origami Design de Jun Mitani en formato PDF o ePUB, así como a otros libros populares de Mathematics y Mathematics General. Tenemos más de un millón de libros disponibles en nuestro catálogo para que explores.
Información
Chapter 1
Fold a Curve
For the first step, fold a single curve and see the shape you get. If this is the first time ever for you folding a curved line, then I’m pretty sure it will be a whole new entertaining experience. You will be surprised at the shape variations produced by a single curve.
1.1 Folding a Simple Curve
First, let’s fold a simple curved line. A simple curve runs in one direction, like a parenthesis “(”. It does not turn to a different direction halfway like the letter “S”. Now, let’s draw a curve on the paper, as in Figure 1.1, and fold along it. Draw the curve with a hard-pointed tool to pre-crease. A curve ruler helps draw a smooth curve, but freehand will do at first.
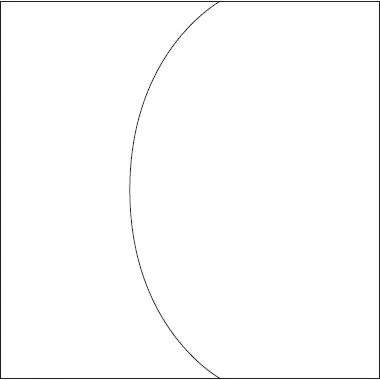
Figure 1.1 Crease pattern with a simple curve.
Figure 1.1 shows the paper contour in a thick solid line and the curve to be folded in a thin solid line. The solid line is folded as a mountain. You may want to fold it as a valley, but, as a practice for understanding crease patterns, mountain-fold it as per the figure.
Start with holding up the paper, not placing it on the desktop, and bending the entire piece. Make a crease as you bend the paper with both hands, as shown in Figure 1.2. Be careful not to press flat, otherwise the resulting folded line becomes straight. If pre-creased firmly, the line should fold beautifully. Avoid wrinkles and undesired folds. Once folded successfully, the paper becomes a shape with one side raised and another recessed across the fold line. Once you made the shape, as in Figure 1.3, hold the workpiece against a light at various angles. The curved surface produces beautiful gradual shading varying with the angle of illumination.
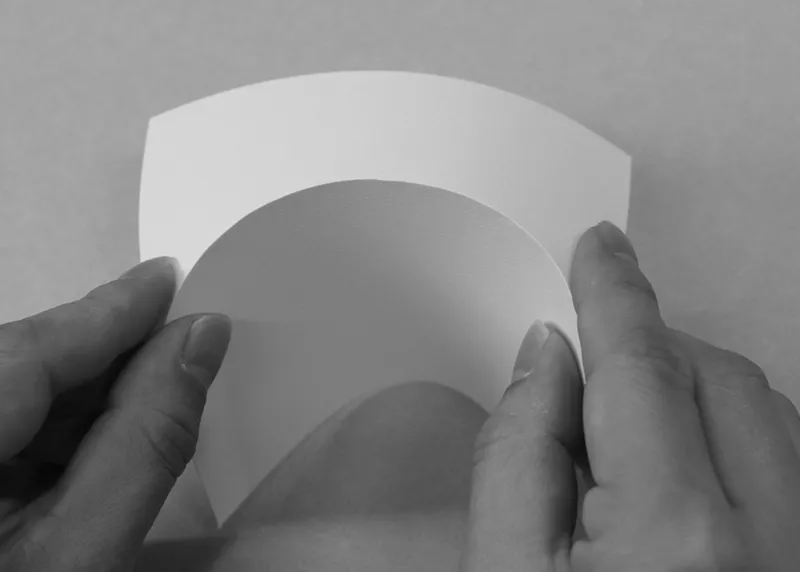
Figure 1.2 Folding a curve while bending the entire piece.
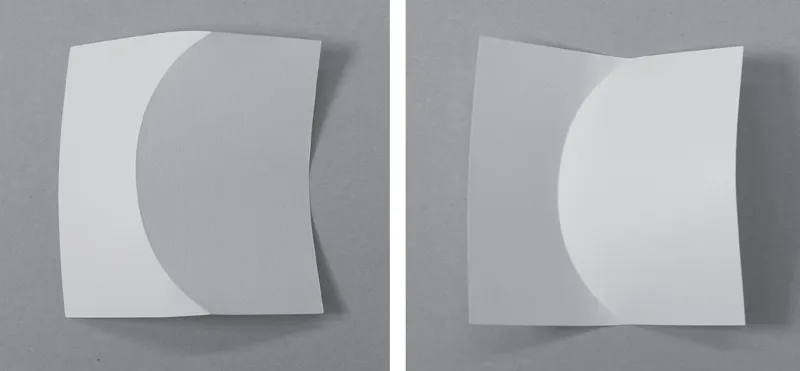
Figure 1.3 Figure 1.1 crease pattern folded (right: backside).
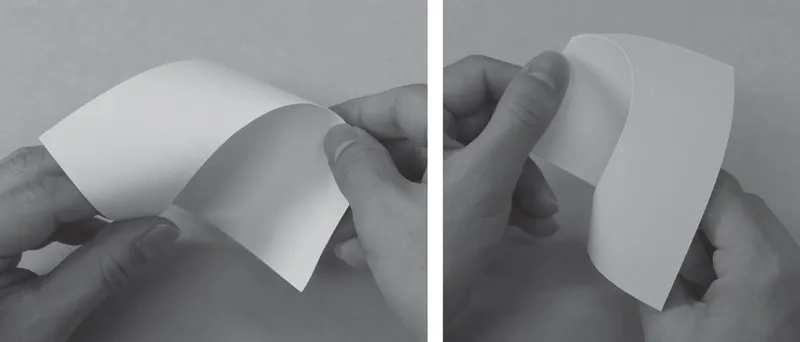
Figure 1.4 Workpiece entirely twisted into another shape.
Next, pinch the fold line at both ends and twist the workpiece freely, as in Figure 1.4. Paper is re-shapable, even after curve-folding. Avoid excessive force, otherwise wrinkles form. Twisting the entire piece spirals the fold line, producing an unexpected shape. The entire shape is changeable while remaining smooth. When you release your hands, the workpiece settles at the balance between the paper’s forces to return to its original state and those of the folded line. You can see the workpiece’s fold line settling on a plane.
By folding the line more sharply and bending the entire workpiece, the resulting shape becomes more three-dimensional. Partly fix the workpiece, instead of releasing your hands, to allow it to stabilise at the state seen in Figure 1.5 which shows cylinders with a larger bend and glued edges. The folded back portion opens outward. Figure 1.6 shows cone-like shapes with one end of the cylinder tapered. The right photo looks like a witch hat. It’s just folding a curve. But it makes all kinds of lovely shapes depending on how the whole piece is bended at whichever degree.
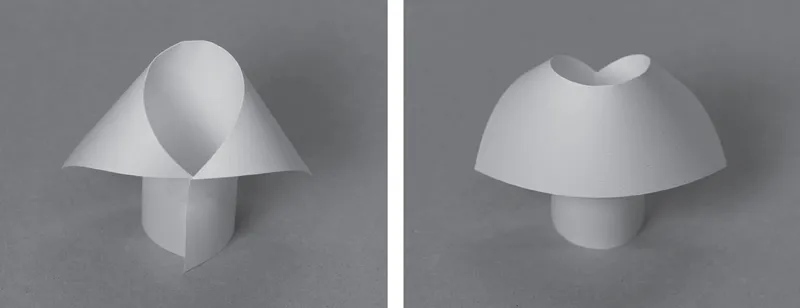
Figure 1.5 Bent largely to make a cylinder.
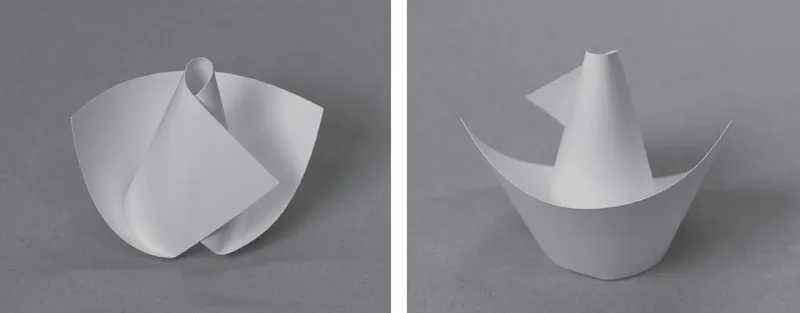
Figure 1.6 Bent largely to make a cone.

Figure 1.7 Rightmost piece folded at the largest angle.
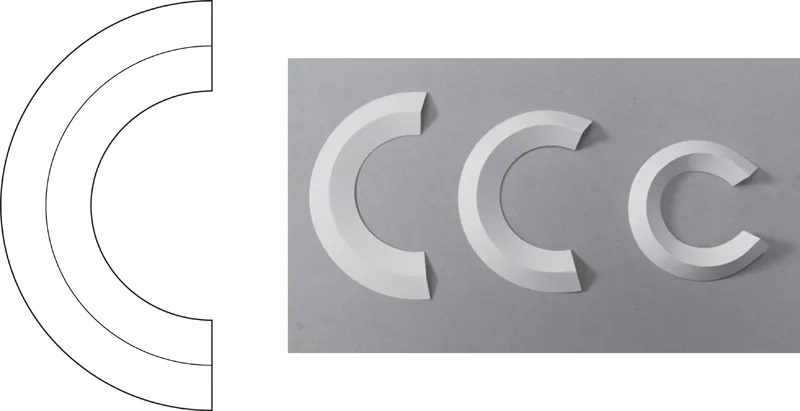
Figure 1.8 Shape varies by degree of fold. Larger fold angle bends more, resulting in a smaller shape.
The greater the fold angle is, as arrowed in Figure 1.7, the larger the fold bends, distorting it into a smaller shape. The crease pattern of Figure 1.8 with a semicircle fold line will make different shapes due to the fold angle. The fold angle becomes larger from left to right on the photo. The rightmost piece is sharply bent into a smaller size. The same crease pattern produces different finishes depending on the way the paper is bent and the folding angle. Try with different combinations.
1.2 Folding a Winding Curve
Now, let’s fold a winding line that changes the direction halfway (like an “S”), as in Figure 1.9. When testing, the curve may not necessarily be exactly identical to the one illustrated. Draw a smooth unjagged curve. Give it a try. You’ll find it not easy to fold neatly because you have to bend the paper wavily. Avoid forcing the fold. Instead, twist the entire paper to allow it to fold itself. Hold the paper with both hands, as in Figure 1.10. Apply proper force as you carefully watch the paper bending. The folded result should look like Figure 1.11. The paper has two wavy curved surfaces across the fold. One side is raised, and the opposite side crossing the fold is recessed.
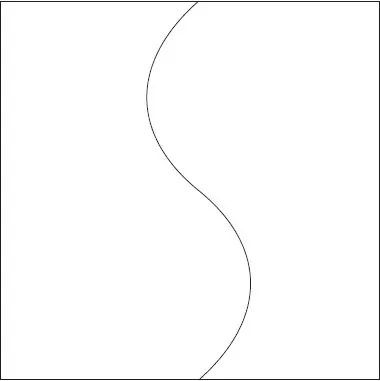
Figure 1.9 Crease pattern containing a winding curve.
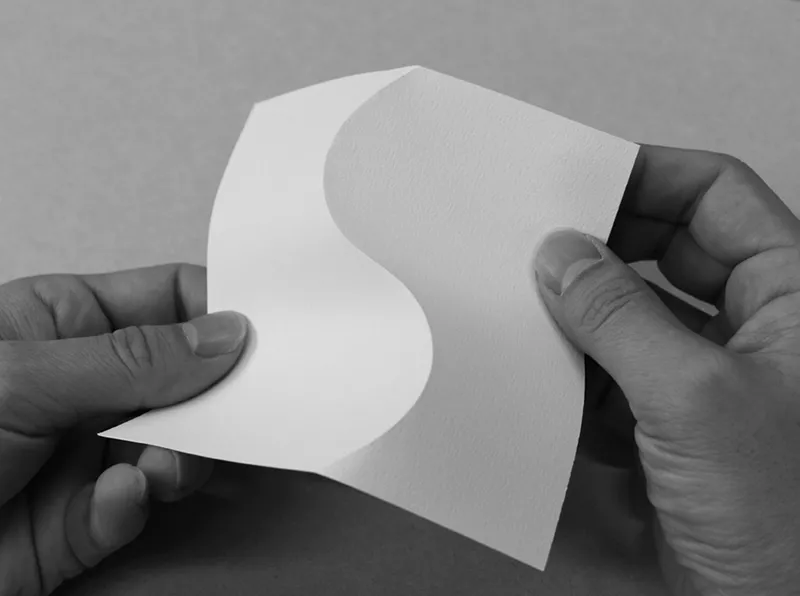
Figure 1.10 Folding Figure 1.9 crease pattern.
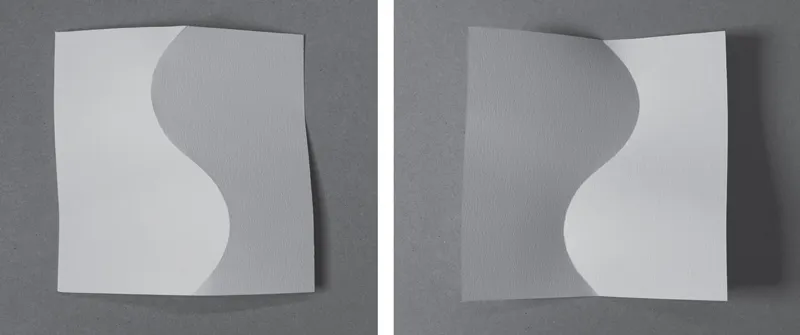
Figure 1.11 Figure 1.9 crease pattern folded (right: backside).
Try...