Quick Start Guide to Azure Data Factory, Azure Data Lake Server, and Azure Data Warehouse
eBook - ePub

Quick Start Guide to Azure Data Factory, Azure Data Lake Server, and Azure Data Warehouse

Mark Beckner

Compartir libro
  1. 116 páginas
  2. English
  3. ePUB (apto para móviles)
  4. Disponible en iOS y Android
eBook - ePub

Quick Start Guide to Azure Data Factory, Azure Data Lake Server, and Azure Data Warehouse

Mark Beckner

Detalles del libro
Vista previa del libro
Índice
Citas

Información del libro

With constantly expanding options such as Azure Data Lake Server (ADLS) and Azure SQL Data Warehouse (ADW), how can developers learn the process and components required to successfully move this data? Quick Start Guide to Azure Data Factory, Azure Data Lake Server, and Azure Data Warehouse teaches you the basics of moving data between Azure SQL solutions using Azure Data Factory. Discover how to build and deploy each of the components needed to integrate data in the cloud with local SQL databases.

Mark Beckner's step by step instructions on how to build each component, how to test processes and debug, and how to track and audit the movement of data, will help you to build your own solutions instantly and efficiently. This book includes information on configuration, development, and administration of a fully functional solution and outlines all of the components required for moving data from a local SQL instance through to a fully functional data warehouse with facts and dimensions.

Preguntas frecuentes

¿Cómo cancelo mi suscripción?
Simplemente, dirígete a la sección ajustes de la cuenta y haz clic en «Cancelar suscripción». Así de sencillo. Después de cancelar tu suscripción, esta permanecerá activa el tiempo restante que hayas pagado. Obtén más información aquí.
¿Cómo descargo los libros?
Por el momento, todos nuestros libros ePub adaptables a dispositivos móviles se pueden descargar a través de la aplicación. La mayor parte de nuestros PDF también se puede descargar y ya estamos trabajando para que el resto también sea descargable. Obtén más información aquí.
¿En qué se diferencian los planes de precios?
Ambos planes te permiten acceder por completo a la biblioteca y a todas las funciones de Perlego. Las únicas diferencias son el precio y el período de suscripción: con el plan anual ahorrarás en torno a un 30 % en comparación con 12 meses de un plan mensual.
¿Qué es Perlego?
Somos un servicio de suscripción de libros de texto en línea que te permite acceder a toda una biblioteca en línea por menos de lo que cuesta un libro al mes. Con más de un millón de libros sobre más de 1000 categorías, ¡tenemos todo lo que necesitas! Obtén más información aquí.
¿Perlego ofrece la función de texto a voz?
Busca el símbolo de lectura en voz alta en tu próximo libro para ver si puedes escucharlo. La herramienta de lectura en voz alta lee el texto en voz alta por ti, resaltando el texto a medida que se lee. Puedes pausarla, acelerarla y ralentizarla. Obtén más información aquí.
¿Es Quick Start Guide to Azure Data Factory, Azure Data Lake Server, and Azure Data Warehouse un PDF/ePUB en línea?
Sí, puedes acceder a Quick Start Guide to Azure Data Factory, Azure Data Lake Server, and Azure Data Warehouse de Mark Beckner en formato PDF o ePUB, así como a otros libros populares de Computer Science y Cloud Computing. Tenemos más de un millón de libros disponibles en nuestro catálogo para que explores.

Información

Editorial
De|G Press
Año
2018
ISBN
9781547401291
Edición
1
Categoría
Cloud Computing

Chapter 1
Copying Data to Azure SQL Using Azure Data Factory

In this chapter we’ll build out several components to illustrate how data can be copied between data sources using Azure Data Factory (ADF). The easiest way to illustrate this is by using a simple on-premise local SQL instance with data that will be copied to a cloud-based Azure SQL instance. We’ll create an ADF pipeline that uses an integration runtime component to acquire the connection with the local SQL database. A simple map will be created within the pipeline to show how the columns in the local table map to the Azure table. The full flow of this model is shown in Figure 1.1.
Figure 1.1: Components and flow of data being built in this chapter

Creating a Local SQL Instance

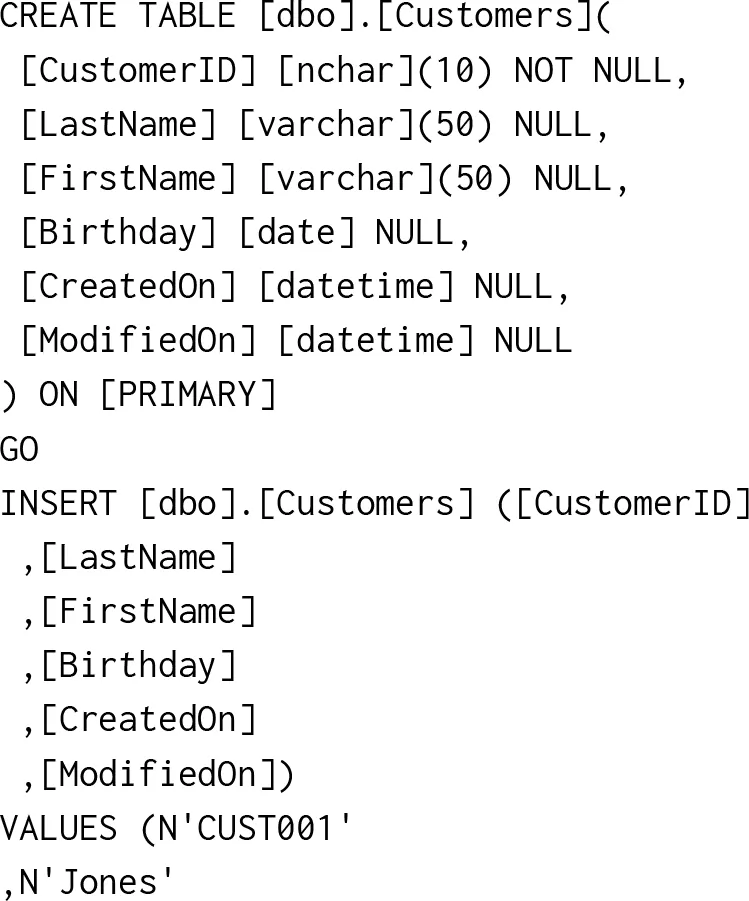
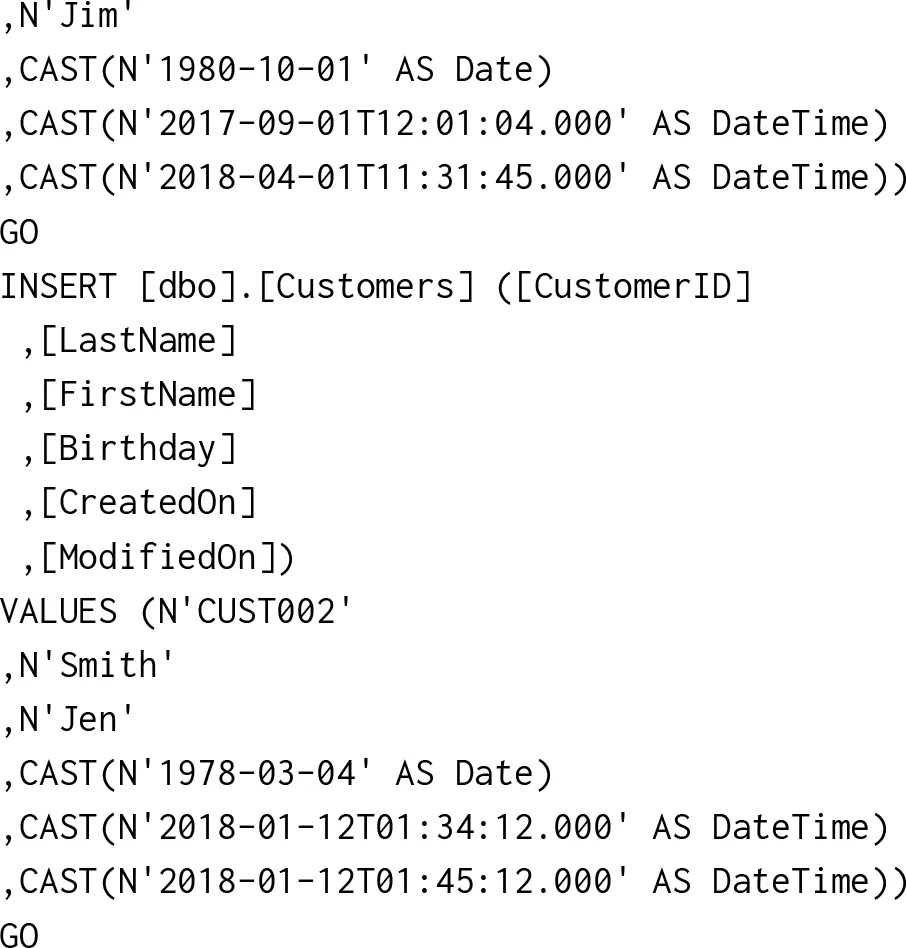
To build this simple architecture, a local SQL instance will need to be in place. We’ll create a single table called Customers. By putting a few records into the table, we can then use it as the base to load data into the new Azure SQL instance you create in the next section of this chapter. The table script and the script to load records into this table are shown in Listing 1.1. A screenshot of the local SQL Server instance is shown in Figure 1.2.
Figure 1.2: Creating a table on a local SQL Server instance
Listing 1.1: Listing 1.1. The Local SQL Customers Table with Data

Creating an Azure SQL Database

Now we’ll create an Azure SQL database. It will contain a single table that will be called Contacts. To begin with, this Contacts table will contain its own record, separate from data in any other location, but will eventually be populated with the copied data from the local SQL database. To create the Azure database, you’ll need to log into portal.azure.com. Once you’ve successfully logged in, on the left you’ll see a list of actions that can be taken in the left-hand navigation toolbar. To create the database, click on the SQL databases menu item and then click the Add button, as shown in Figure 1.3.
Figure 1.3: Adding a new Azure SQL database
You can now enter in the information that pertains to your new database. You can get more information on these properties by clicking the icon next to each label. Some additional details on several of these properties are noted as follows:
  1. Database name—the database name will be referenced in a variety of locations, so name it just like you would a local database (in this case, we’ll refer to it as InotekDemo).
  2. Subscription—you’ll have several potential options here, based on what you have purchased. Figure 1.3 shows Visual Studio Enterprise, as that is the MSDN subscription that is available. Your options will look different depending on licensing.
  3. Select source—go with a new blank database for this exercise, but you could base it on an existing template or backup if there was one available that matched your needs.
  4. Server—this is the name of the database server you will connect to and where your new database will live. You can use the default or you can create your own (see Figure 1.4). A database server will allow you to separate your databases and business functions from one another. This server will be called “Demoserverinotek” with serveradmin as the login name.
  5. Pricing Tier—pricing in Azure is a little overwhelming, and you’ll want to think about costs across all components before you decide. For now, we’ll select the basic model, which allows for up to 2 gigs of data.
Figure 1.4: Configuring the new Azure SQL Server where the database will reside
When you’re ready, click the Create a new server button and the deployment process in Azure will begin. You’ll see a notification on your toolbar (see Figure 1.5) that shows the status of this deployment. After a minute or two your database deployment will be completed and you’ll be able to click on the new database and see information about it.
Figure 1.5: Notification of the deployment in process
There are several ways to connect to this new server. You can use the Azure tools or you can connect from a local SQL tool like SQL Server Enterprise Manager. Using Enterprise Manager requires that you enter information about the SQL Server you are trying to connect to. To connect to your Azure server, click on the Connection strings property of your database in Azure. You’ll want to grab the server name from here and enter it into your server connection window (shown in Figure 1.6).
Figure 1.6: Connecting to the new Azure SQL Server from a local Enterprise Manager connection window
Next, you’ll type in the login and password and click Connect. If you haven’t connected to an Azure SQL instance before, you will be asked to log into Azure. If this occurs, click the Sign in button and enter the credentials that you used to connect to the Azure portal (see Figure 1.7). Once authenticated, you’ll be able to select whether to add the specific IP you’re on or add the full subnet. You’ll be required to do this each time you connect to your SQL instance from a new IP.
Figure 1.7: The first time you connect from Enterprise Manager on a new computer, you will be required to enter this information
With the credentials entered a...

Índice