
Maya Visual Effects The Innovator's Guide
Autodesk Official Press
Eric Keller
- English
- ePUB (adapté aux mobiles)
- Disponible sur iOS et Android
Maya Visual Effects The Innovator's Guide
Autodesk Official Press
Eric Keller
À propos de ce livre
Create innovative CG solutions with Maya and this creative guide
Professional Maya artists have to think on their feet. It's nothing for them to receive just vague sketches or incomplete ideas of what the studio wants and have to come up with something brilliant. If you're an intermediate to advanced Maya user, Maya Visual Effects: The Innovator's Guide, Second Edition is what you need to meet the challenge. Professional Maya artist Eric Keller offers inspired solutions and hands-on projects, as well as numerous practical shortcuts and deadlines, so you learn to produce innovative CG assets from scratch, using Maya, on a deadline.
- Shows intermediate to advanced Maya users new solutions, workarounds, and shortcuts for creating Maya visual effects on deadline
- Gives readers plenty of hands-on projects, so they come up with solutions that they can add to their Maya toolsets
- Offers workable ideas that can be applied, no matter which version of Maya software is being used
- Presents projects in an engaging style, with pages of full-color imagery to illustrate concepts
Create amazing effects with the creative insights and fresh advice in this new edition of Maya Visual Effects: The Innovator's Guide.
Foire aux questions
Informations

Chapter 1
Texture Effects
- Create Animated Lighting Effects with a Ramp Texture
- Use Ambient Occlusion for Holographic Effects
- Use Creative Text Effects
Create Animated Effects with a Ramp Texture
Create the Sign Geometry
- 1. The project files for this chapter can be downloaded from from the book’s support site. Use your web browser to navigate to www.sybex.com/go/mayavisualeffects2e and download the
Chapter01_project. Once the files have been downloaded, unzip them to your local drive. Open Maya and use the File menu to set the Project toChapter01_project. Then open the signSTart.ma file located in the Scenes directory of theChapter01_projectfile directory. Once the scene is open, switch to the Persp camera using the View menu in the main viewport. - 2. In the Outliner, expand the vacancy_sign group, and select the curve node named vacancyNeonCurve (see Figure 1-2).
 Figure 1-2: Select the vacancyNeonCurve node in the Outliner.
 - 3. Switch to the Rendering menu set, and choose Paint Effects ⇒ Curve Utilities ⇒ Attach Brush To Curves (see Figure 1-3). The default stroke, which is a thick black line, is applied to the curve.
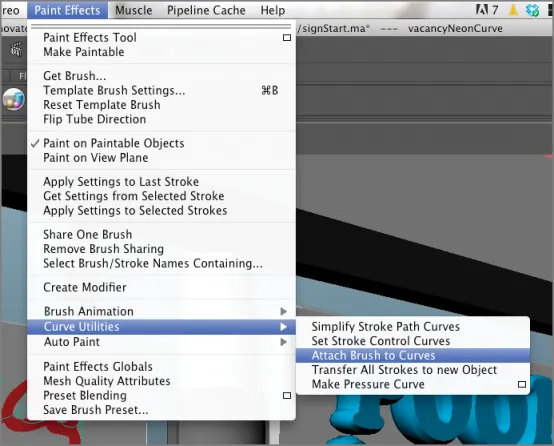 Figure 1-3: Use the Paint Effects menu to attach the default brush stroke to the curve.
 - 4. Select the Stroke1 node in the Outliner, and open the Attribute Editor.
- 5. To convert the stroke into geometry, choose Modify ⇒ Convert ⇒ Paint Effects To Polygons ⇒ Options; in the options, turn on Quad Output and Hide Strokes.
- 6. Maya creates a new node for the converted geometry and places it in a group called brush2MeshGroup. Expand this group, and select the brush2Main node. Press Shift+P to unparent the mesh, which moves it out of the group brush2MeshGroup.
- 7. Double-click the brush2Main node in the Outliner so it becomes highlighted, and rename the brush2Main node to vacancyNeonGeo. You can select and delete the brush2MeshGroup node (see Figure 1-4).
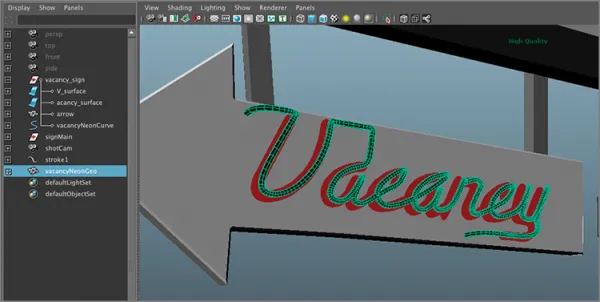 Figure 1-4: Conve...