![]()
PART 1
Electrophysiology Concepts
![]()
CHAPTER 1
Procedural issues for electrophysiologic studies: vascular access, cardiac chamber access, and catheters
Before we can discuss the relationship between electrograms and ECGs and use this information to unravel the mechanisms for arrhythmias and to design therapies, it is important to understand how procedures are performed in the electrophysiology laboratory. In general there are two types of electrophysiologic procedures: (1) electrophysiologic studies and ablation that use temporarily placed catheters to evaluate and treat arrhythmias, and (2) implantation of “permanent” cardiac rhythm devices. This book focuses on electrophysiology procedures, and our discussion of implantable devices will be limited to basic electrograms and ECGs associated with pacing therapy.
The electrophysiologic test combines standard ECG recording and electrical signals acquired from within the heart (electrograms). Electrograms are acquired using specialized thin plastic catheters that have exposed metal electrodes at the tip, connected via insulated wires to plugs that in turn can be connected to a recording device on which the signal is displayed for analysis. The catheters are placed in different cardiac chambers, and electrical signals are recorded from direct contact with the myocardium. Since electrophysiologic testing is invasive and requires vascular access, it is usually performed in a specialized cardiac suite that has fluoroscopic equipment.
Vascular access
Electrophysiologic testing and ablation procedures usually require several points for venous access, depending on operator preference, arrhythmia complexity, and patient-specific considerations. At our institution two to five separate venous sheaths are placed, depending on the case, to allow independent movement of multiple catheters. More complex arrhythmias require more simultaneous mapping points and either more venous access points or catheters with more electrodes. Smaller adults and children provide less opportunity for placing multiple sheaths safely within a single vein. Requirement for equipment such as intracardiac echocardiography necessitates additional vascular access sites.
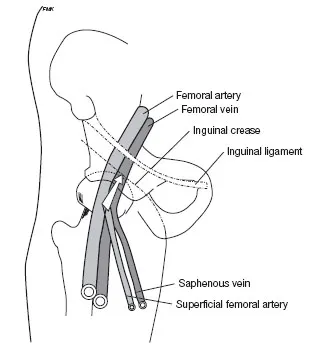
The most commonly used sites for venous access are the femoral veins (Fig. 1.1). Cannulation of the femoral vein is performed by first identifying the inguinal ligament that travels from the iliac crest to the pubis. Fluoroscopically it is usually at the head of the femur. The vein should be cannulated below this landmark. The arterial pulse is palpated and a thin-wall needle is inserted at a 40° angle relative to the skin approximately 1 cm medial to the pulse. When the vein is cannulated, there will be free venous return with slight aspiration on the syringe. The syringe is removed and a guidewire is threaded through the hub of the needle into the vein. With the wire acting as a stable support, an intravascular sheath is threaded into the vein. In an adult the femoral vein can support up to three intravascular sheaths safely with minimal complications. If multiple sheaths are placed within the same femoral vein, the insertion sites are usually separated by 3–5 mm, with guidewires placed for all of the necessary access points before placing the sheaths.
Specialized long sheaths with specific shapes are often used in the electro-physiology laboratory to provide additional support and “directionality” to electrode catheters, particularly those used for ablation. At our laboratory, standard-length smaller sheaths are placed (6 French, 10 cm) and are exchanged for longer sheaths as the case unfolds. In this way, specific sheath shapes can be chosen depending on the arrhythmia type and the patient’s specific anatomic characteristics.
Access from “above” has also been traditionally used in some laboratories, via the interval jugular vein or the subclavian vein. The right internal jugular vein provides a “straight line” down the superior vena cava and the right atrium. Although many laboratories still use these vascular access sites, because of patient comfort and the small but definite risk for pneumothorax, superior access sites are now generally used less frequently.
Chamber access
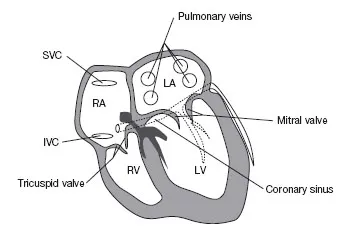
Correlation between fluoroscopic images and recorded electrograms is discussed in detail in Chapter 2. However, it is instructive at this time to discuss how different cardiac chambers and large veins can be reached during electrophysiologic testing. The right atrium is the easiest chamber to access, since venous return from both the inferior vena cava and superior vena cava feed directly into this chamber (Fig. 1.2). From the right atrium, catheters can be directed through the tricuspid valve to obtain recordings from the right ventricle.
Recording from the left atrium can be achieved by placing a catheter within the coronary sinus (Fig. 1.2). The coronary sinus travels near the mitral annulus and provides stable electrical signals from adjacent left atrial tissue and left ventricular tissue. Oftentimes access to the left atrium itself is required to allow recording of electrical signals from other areas of the left atrium away from the mitral annulus
Obtaining vascular access to the left atrium is performed by puncturing a small hole through the interatrial septum. Many techniques have been developed for safe access to the left atrium, but all are a variation of the technique developed by Brockenbrough in the late 1950s. The following paragraphs describe in detail the technique used by the author for accessing the left atrium.
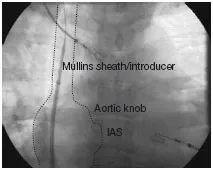
The Mullins sheath/introducer combination is placed in the superior vena cava at the level of the innominate vein (Fig. 1.3). After the introducer is flushed, the Brockenbrough needle is carefully inserted through the introducer. As the needle is advanced it will make two turns, one at the level of the iliac veins and the other at the level of the renal veins. The needle is advanced to a point 4–5 cm from the hub of the introducer with the inner stylet in place to prevent “snowplowing” of plastic within the lumen of the sheath. The stylet is removed and the needle is attached to a manifold that allows pressure monitoring, saline flush, and contrast injection. The Brockenbrough needle has a “pointer” that is in the same plane and direction as the needle curve. Depending on anatomy the “pointer” will be directed in the range of 4:30 to 5:30 o’clock, using a vertical clockface as a reference (Fig. 1.4). However, depending on the orientation of the heart within the body, if the interatrial septum is directed more posteriorly an orientation of 6:00 or even 8:00 is sometimes required, and if the interatrial septum is directed more anteriorly an orientation of 3:00 is required. The whole assembly (both the Mullins sheath/introducer set and the Brockenbrough needle) is slowly pulled back under fluoroscopic giuidance in the AP projection. The sheath/needle assembly will make two leftward “jumps,” once at the superior vena cava/right atrium junction and then again as it falls into the fossa ovalis (Figs. 1.5, 1.6, 1.7).
At our laboratory access to the left atrium is always performed with the aid of intracardiac echocardiography using a “point and shoot” technique. Intracardiac echocardiography provides real-time information that supplements standard fluoroscopy and allows for safer entry into the left atrium. The tip of the intracardiac echocardiography catheter is placed at the fossa ovalis and the region is explored with gentle maneuvering, and frequently a patent foramen ovale will be noted as the intracardiac echocardiography catheter is advanced into the left atrium. The superior and posterior portion of the fossa ovalis is the most common region to be probe-patent. If the fossa ovalis is not patent, or if the operator wishes to access the left atrium at a different site than the patent foramen ovale (which can sometimes be too superior and posterior to allow for maneuvering the catheter), then puncture of the interatrial septum with the needle will be required. The tip of the intracardiac echocardiography catheter can be used as a guide for the exact point the needle should be placed (Figs. 1.8, 1.9). When the needle and echocardiography catheter a...