
eBook - ePub
Draw Manga
Step-by-Steps, Character Construction, and Projects from the Masters
This is a test
Partager le livre
- 250 pages
- English
- ePUB (adapté aux mobiles)
- Disponible sur iOS et Android
eBook - ePub
Draw Manga
Step-by-Steps, Character Construction, and Projects from the Masters
Détails du livre
Aperçu du livre
Table des matières
Citations
À propos de ce livre
This easy, step-by-step art course for beginners teaches the creative techniques behind the popular Japanese manga comic style. Professional manga artists reveal their secrets for drawing individual character elements and creating an effective manga character.
Foire aux questions
Comment puis-je résilier mon abonnement ?
Il vous suffit de vous rendre dans la section compte dans paramètres et de cliquer sur « Résilier l’abonnement ». C’est aussi simple que cela ! Une fois que vous aurez résilié votre abonnement, il restera actif pour le reste de la période pour laquelle vous avez payé. Découvrez-en plus ici.
Puis-je / comment puis-je télécharger des livres ?
Pour le moment, tous nos livres en format ePub adaptés aux mobiles peuvent être téléchargés via l’application. La plupart de nos PDF sont également disponibles en téléchargement et les autres seront téléchargeables très prochainement. Découvrez-en plus ici.
Quelle est la différence entre les formules tarifaires ?
Les deux abonnements vous donnent un accès complet à la bibliothèque et à toutes les fonctionnalités de Perlego. Les seules différences sont les tarifs ainsi que la période d’abonnement : avec l’abonnement annuel, vous économiserez environ 30 % par rapport à 12 mois d’abonnement mensuel.
Qu’est-ce que Perlego ?
Nous sommes un service d’abonnement à des ouvrages universitaires en ligne, où vous pouvez accéder à toute une bibliothèque pour un prix inférieur à celui d’un seul livre par mois. Avec plus d’un million de livres sur plus de 1 000 sujets, nous avons ce qu’il vous faut ! Découvrez-en plus ici.
Prenez-vous en charge la synthèse vocale ?
Recherchez le symbole Écouter sur votre prochain livre pour voir si vous pouvez l’écouter. L’outil Écouter lit le texte à haute voix pour vous, en surlignant le passage qui est en cours de lecture. Vous pouvez le mettre sur pause, l’accélérer ou le ralentir. Découvrez-en plus ici.
Est-ce que Draw Manga est un PDF/ePUB en ligne ?
Oui, vous pouvez accéder à Draw Manga par en format PDF et/ou ePUB ainsi qu’à d’autres livres populaires dans Kunst et Kunsttechniken. Nous disposons de plus d’un million d’ouvrages à découvrir dans notre catalogue.
Informations
Sujet
KunstSous-sujet
KunsttechnikenPART 1
TUTORIALS

HEAD
Although manga is a very distinct form of artwork, it is based on the fundamental skills of basic figure-drawing and knowledge of anatomy. Too often many beginners launch straight into the more famous aspects of the manga style, such as the exaggerated facial features and the lustrous hair, and upon completing their drawing realize that something does not look quite right. It is very important to have some knowledge about how the overall head of a character is put together, as it forms the “canvas” for the face, allowing you to place facial features accurately. Knowing how to construct a head from first principles will mean that you can effectively portray a character from almost any angle. The human head comes in many different sizes and shapes. However, all heads are formed from a skull, which can essentially be represented by a sphere with a lower jaw.
BUILDING BLOCKS
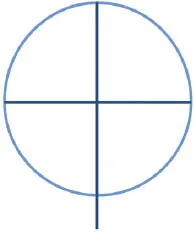
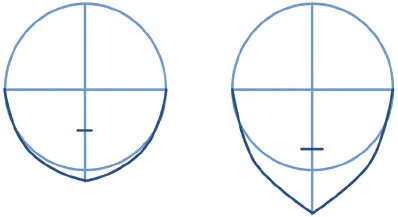
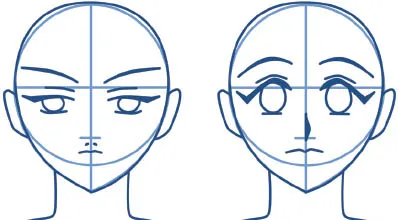
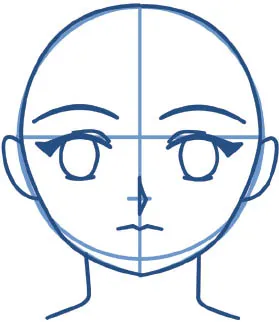
1. Draw a circle for the upper part of the head. Draw a cross over it, splitting the circle into quarters. The vertical line represents the center line of the head and face. The horizontal line represents the upper eye socket line.
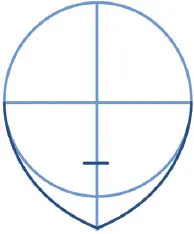
2. Draw curved lines from the sides of the face to the bottom of the vertical line. These lines map out the chin and jaw. Draw another horizontal line in between the eyeline and the point of the chin, roughly equidistant from the two. This helps place the nose.
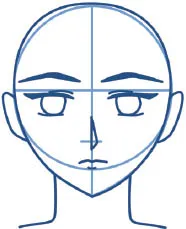
3. Using these lines as a rough guide for the placement of features, add in the details of the eyes, nose, ears, mouth, and neck. The ears are at a similar level to the eyes and are spaced evenly on the sides of the head. The mouth is approximately halfway between the bottom of the nose and the chin.
USEFUL TIPS
Note that the strength and length of the curve can vary for different faces, depending on how far you extend the vertical center line.
These guidelines are intended as a rough way of placing facial features. Depending on the type of character you are drawing, their features can extend beyond these lines.

For a male face, make the neck thicker, the eyes narrower, the nose longer, and the jawline more angular. Don’t forget the Adam’s apple!
When drawing a child, the lower half of the head is more compact, making all the facial features much closer together. Draw a small, short nose and mouth, but keep the eyes large, as in real life. This conveys a sense of cuteness.
DIFFERENT VIEWS

To draw a side view, start with the forehead, then dip in slightly before drawing the nose. Below the nose, draw another dip into the lips, then chin. Note how the lips and chin are not far from the face’s center line. Also observe the placing of the ear, slightly closer to the back of the head than exactly halfway.
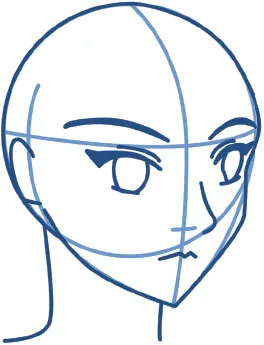
Three-quarter views benefit most from guidelines – think in three dimensions when drawing the center line and eyeline. Take care with the side of the face – draw a slight dip below the temple, rounding out to the cheekbone. The jawline can then be round, sunken, muscular, etc., as appropriate.
OVER TO YOU!
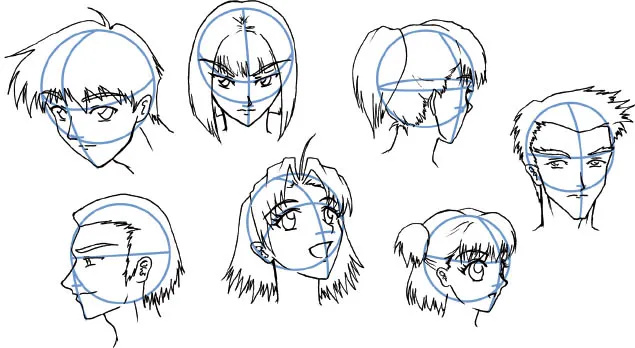
Here are various examples of different characters’ heads from several viewpoints. These characters do not have the same facial proportions, as they range from male to female, young to old. By using the basic model you can ensure all of their features are realistically placed at every angle the head is viewed from.
EYES
Large eyes are the most iconic feature of the manga aesthetic. However, there are many different approaches to drawing manga-style eyes, and each approach can radically change the way in which a character is perceived. Manga is all about individuality, so use the following guidance as stepping stones to developing your own unique style.
BUILDING BLOCKS
On the two-dimensional plane, an eye is made up of three sections: the upper line, the ball and the lower line. These three simple parts can be molded into an infinite number of unique styles. Two very different examples are shown below.
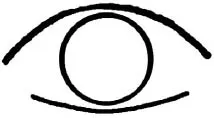
1. The upper and lower lines are elongated and flattened. An outside corner has been added and the two lines are almost touching, closing-in the eye. The ball is partly obscured by the upper line, suggesting a hooded or glazed expression.
2. The upper lashes are curving down into the eye rather than upward as expected. This closes the eye in further.
3. A double line has been added inside the lower line for a three-dimensional perspective. A couple of extra lines added above the eye show the eyelid and even the start of the bridge of the nose.
4. Finally, a light source is added to increase the glazed look. The overall impression is of a closed and mysterious character.
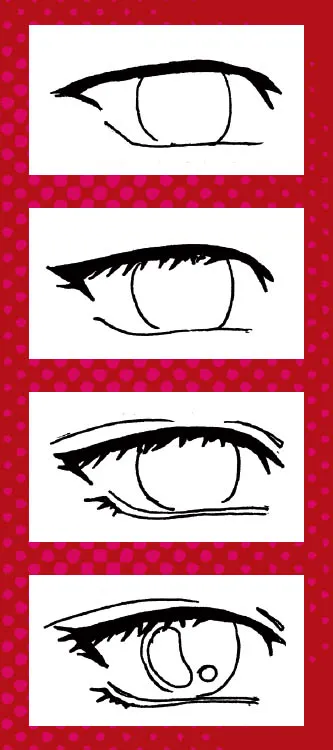
1. The upper line is arched rather than flattened and the lower line shortened. There is still an outside corner, but this time the two lines are further apart. The ball has been expanded upward and is fully visible.
2. A large and simple lash has been added to this eye, rather than the complex lashes of the first example.
3. The double lines are still in place.
4. This time two simple light spots have been chosen. The impre...