
eBook - ePub
Great Book of Woodworking Tips
Over 650 Ingenious Workshop Tips, Techniques, and Secrets from the Experts at American Woodworker
Randy Johnson
This is a test
Partager le livre
- 250 pages
- English
- ePUB (adapté aux mobiles)
- Disponible sur iOS et Android
eBook - ePub
Great Book of Woodworking Tips
Over 650 Ingenious Workshop Tips, Techniques, and Secrets from the Experts at American Woodworker
Randy Johnson
Détails du livre
Aperçu du livre
Table des matières
Citations
À propos de ce livre
World's biggest collection of reader-written, shop-tested, photo-illustrated woodworking tips and techniques. One, two or three to a page. 730 total, more available in recent issues.
Foire aux questions
Comment puis-je résilier mon abonnement ?
Il vous suffit de vous rendre dans la section compte dans paramètres et de cliquer sur « Résilier l’abonnement ». C’est aussi simple que cela ! Une fois que vous aurez résilié votre abonnement, il restera actif pour le reste de la période pour laquelle vous avez payé. Découvrez-en plus ici.
Puis-je / comment puis-je télécharger des livres ?
Pour le moment, tous nos livres en format ePub adaptés aux mobiles peuvent être téléchargés via l’application. La plupart de nos PDF sont également disponibles en téléchargement et les autres seront téléchargeables très prochainement. Découvrez-en plus ici.
Quelle est la différence entre les formules tarifaires ?
Les deux abonnements vous donnent un accès complet à la bibliothèque et à toutes les fonctionnalités de Perlego. Les seules différences sont les tarifs ainsi que la période d’abonnement : avec l’abonnement annuel, vous économiserez environ 30 % par rapport à 12 mois d’abonnement mensuel.
Qu’est-ce que Perlego ?
Nous sommes un service d’abonnement à des ouvrages universitaires en ligne, où vous pouvez accéder à toute une bibliothèque pour un prix inférieur à celui d’un seul livre par mois. Avec plus d’un million de livres sur plus de 1 000 sujets, nous avons ce qu’il vous faut ! Découvrez-en plus ici.
Prenez-vous en charge la synthèse vocale ?
Recherchez le symbole Écouter sur votre prochain livre pour voir si vous pouvez l’écouter. L’outil Écouter lit le texte à haute voix pour vous, en surlignant le passage qui est en cours de lecture. Vous pouvez le mettre sur pause, l’accélérer ou le ralentir. Découvrez-en plus ici.
Est-ce que Great Book of Woodworking Tips est un PDF/ePUB en ligne ?
Oui, vous pouvez accéder à Great Book of Woodworking Tips par Randy Johnson en format PDF et/ou ePUB ainsi qu’à d’autres livres populaires dans Tecnologia e ingegneria et Commercio tecnico e manifatturiero. Nous disposons de plus d’un million d’ouvrages à découvrir dans notre catalogue.
Informations
Sous-sujet
Commercio tecnico e manifatturieroTablesaw
Tablesaw Tapering Jig
I recently built a pair of garden benches that required several identical parts that were tapered on both sides. To make the job easier, I built this jig that worked for both angles. The two screws make setting the angles quick and precise. On the first cut, the edge of the board rests against the first screw head with the end of the board resting on the second screw. For the second cut, I just flip over the board and move it to the second screw (as shown in the photo), and rest the end of the board against the wood stop block. The toggle clamp holds the board in place during sawing. Once the screws are set you can cut perfect angles all day long.

Caution: Upper guard removed for photo clarity. Use yours!
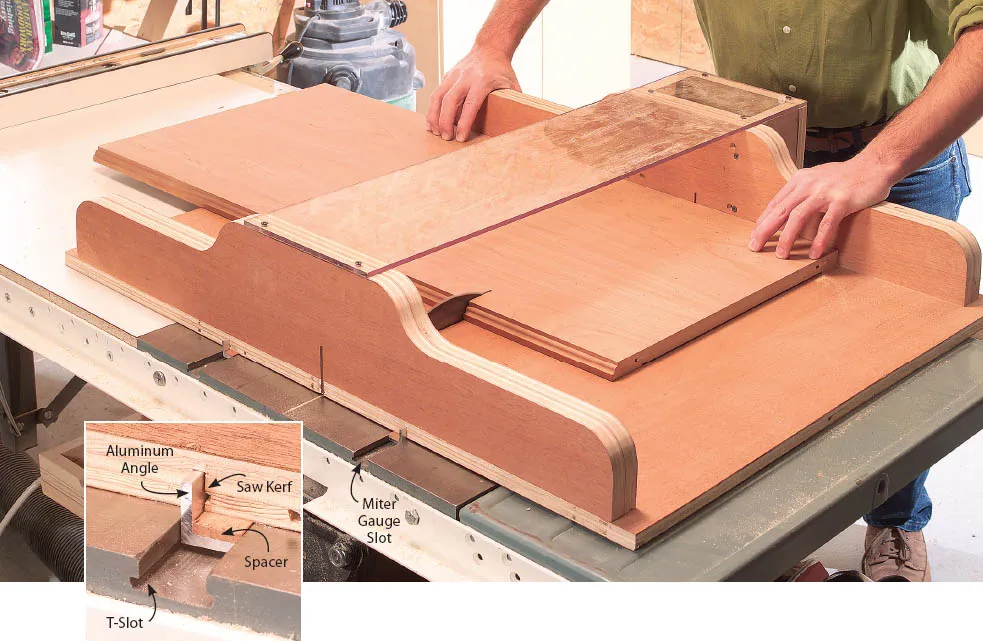
Aluminum Angle Sled Runners
If you’ve had a problem with the wood runners on your tablesaw sled shrinking or swelling, make new runners from ⅛ in. x ¾-in. aluminum angle. These runners will fit most miter slots and will not shrink or swell like wood.
Here’s how I built mine: First I fit the angle to the miter gauge slot in my tablesaw. You may need to file the angle a little to get a good fit. The angle should glide smoothly in the miter gauge slot without binding, with minimum side to side play.
Next I cut a saw kerf in the bottom of the sled base. The kerf makes runner alignment automatic. Turn the sled over and fasten the first angle to the base with a ¼-in.-thick spacer. You may have to adjust the thickness of this spacer. You want the angle to ride above the T-slot in the miter gauge. If your miter gauge slot does not have a T-slot, use a thicker wood spacer. Just leave a little clearance between the bottom of the miter slot and the bottom of the angle.
Now I set the sled on the tablesaw with the first runner in a miter slot. I pulled the sled back a bit and put another piece of angle in the second miter slot, carefully marking the location for the saw kerf. I cut the kerf and attached the second runner. I’ve used my sled for years with perfect alignment and smooth action year round.
Compact Crosscut Sled
I don’t get perfectly square cuts with my saw’s miter gauge. Is there another way?
Make a small crosscut sled. It’s a reliable substitute for your miter gauge because it’s dedicated to one operation: making perfect 90-degree cuts. Unlike your miter gauge, a sled tracks in both miter slots, so it won’t wiggle when you cut. A compact sled is ideal for cutting stiles, rails and legs to length, and is easier to store than a large sled.
Make the sled about 12 in. deep and 24 in. wide. Use ½ in. Baltic birch for the base and thick pieces of maple, 2½ in. wide, for the fences. Make a dust shield from ¼ in. clear acrylic.
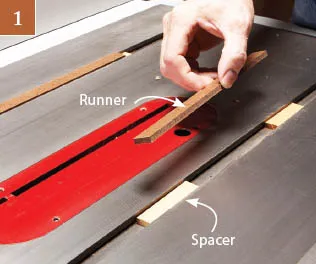
To build the sled, rip two 12-in.- long runners that fit tight in the saw’s miter slots (Photo 1). Not too tight, though—they must be loose enough to slide. Hardboard works well because it won’t shrink or swell with changes in humidity. Cut the base and glue it to the runners (Photo 2). When the glue is dry, remove the spacers.
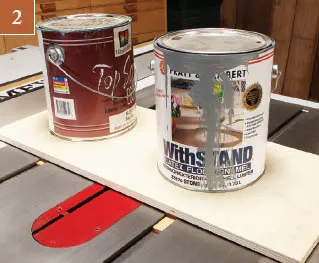
Glue and screw the rear fence to the base. Attach the front fence with a single screw, located at the fence’s right end. Screw a block to the base, from below, at the base’s left end (Photo 3). Place shims between the block and the fence, clamp the fence to the block and make a test cut. Add or subtract shims until the sled cuts exactly 90 degrees, then screw the fence to the base and remove the block. Add the shield to deflect sawdust.
Make runners for the sled from ¼-in. hardboard. Raise the runners above the saw’s top by placing them on ¼-in. thick spacers.
Glue the sled’s base to the runners. Align the base with the saw’s fence, then place weights on it.
Pivot the front fence on a single screw. Clamp the fence’s other end to a temporary block that’s screwed to the base, then add shims to adjust the fence until it is square to the blade.
Crosscut Sled Cam Clamp
I use a sled for crosscutting ¾-in. melamine and plywood panels up to 24 inches wide. These panels can be hard to hold in position while making a cut, so I installed a cam lever that securely locks the panel to the bed. The radius of the cam increases from 1⅛-in to 1⅜-in. Now I can keep both hands on the sled and concentrate on making smooth cuts.
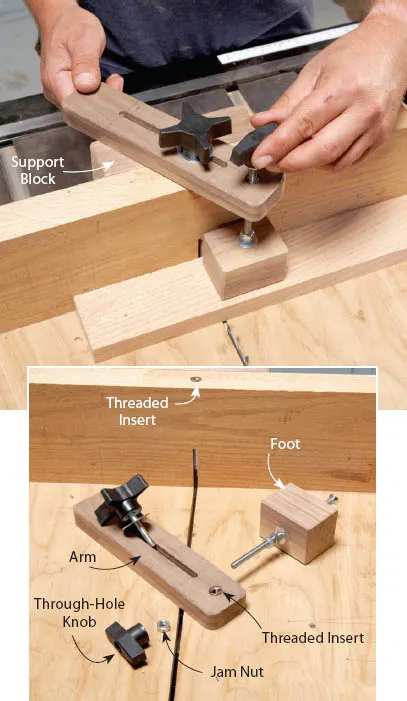
Crosscut Sled Upgrade
Adding a hold-down to my shop-made crosscut sled makes the sled easier and safer to use. My parts don’t slip and my fingers are far from the blade because I don’t have to hold the workpiece. The hold-down swivels so I can place it on either side of the blade.
To build the hold-down, you’ll need three hardwood blocks (the arm, the foot and a support block), two ¼-20 threaded inserts, two ¼-20 jig knobs (one with a through hole and one with a 1" stud), a ¼-20 flathead machine screw, two ¼" washers, and three ¼-20 nuts. Make the arm ¾" x 2" x 8". The foot is 2" x 2" x 2½" and the support block is 2" x 2" x 6". Glue the support block to the sled’s fence, flush to the top.
Rout a ¼" x 4" slot in the arm and install a threaded insert in one end of the arm. Install another threaded insert in the fence’s top, in line with the blade slot. Drill a ¼" hole through the foot, countersink the bottom end of the hole and insert a ¼-20 machine screw through the hole. Slip a washer onto the screw, then thread two nuts onto the screw all the way down to the foot. Tighten the nuts against each other, leaving the foot free to swivel.
Thread the machine screw through the arm’s insert. Install a jam nut about ½" down from the end of the screw. Thread a through-hole jig knob onto the screw, then tighten the jam nut against the knob.
To use the hold-down, slide the arm over the piece to be cut. Tighten the arm, then tighten the foot.
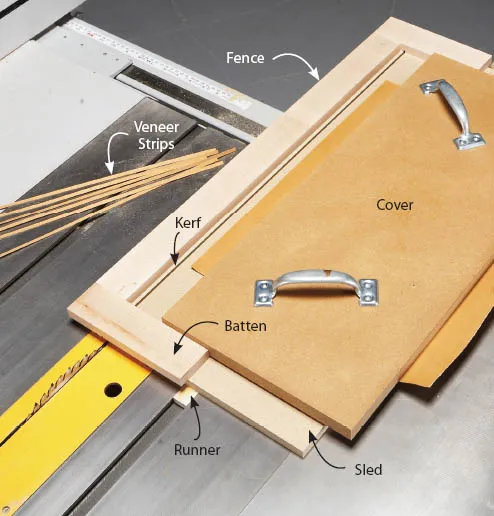
Cutting Sled for Inlay Strips
This sled allows me to cut the ⅛-in.-wide strips of veneer that I often use for inlays. I can cut strips all day without having to measure or reposition the saw’s fence. The sled consists of a 13-in. by 24-in. piece of ½-in. MDF with a hardwood runner attached to the bottom. Battens and a fence are glued to the top. The fence is parallel to a saw kerf that runs the length of the sled.
After attaching the runner and the ½-in.-thick battens, I made a cut with the blade height set at ⅝-in., to create the kerf without sawing through the battens. Then I attached the fence ⅛-in. from the kerf.
To use the sled, I set the blade at ⅝-in. and install the sled’s runner in the miter slot. I position a piece of veneer flush against the fence, secure it with a ¾-in. MDF cover and make the cut.
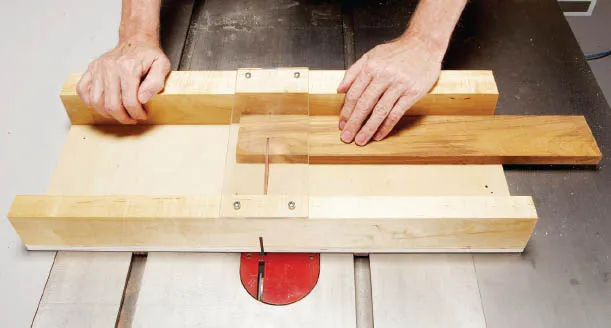
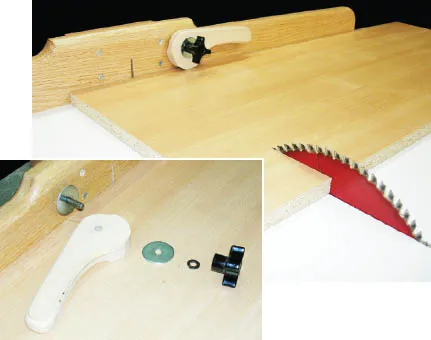
Long Tenoning Sled
Here’s a tablesaw-tenoning jig that combines the light weight of a miter gauge with the support of a wide tablesaw sled. I made this sled for use on the right side of my blade so my saw’s right-side table supports the sled. I also added an auxiliary wood fen...