
eBook - ePub
An Introduction to Digital Photomicrography
Brian Matsumoto, Carol Roullard
This is a test
Partager le livre
- 112 pages
- English
- ePUB (adapté aux mobiles)
- Disponible sur iOS et Android
eBook - ePub
An Introduction to Digital Photomicrography
Brian Matsumoto, Carol Roullard
Détails du livre
Aperçu du livre
Table des matières
Citations
À propos de ce livre
An Introduction to Digital Photomicrography is written for the hobbyist and the neophyte who wants to take pictures through the microscope. The book includes a description of the parts of the microscope; how to use adjust lighting; types of digital cameras; controls for adjusting digital cameras; choosing a video camera and controls for videography.An introductory guide for the hobbyist who wants to take pictures through the microscope, fully illustrated with 88 colour photographs.
Foire aux questions
Comment puis-je résilier mon abonnement ?
Il vous suffit de vous rendre dans la section compte dans paramètres et de cliquer sur « Résilier l’abonnement ». C’est aussi simple que cela ! Une fois que vous aurez résilié votre abonnement, il restera actif pour le reste de la période pour laquelle vous avez payé. Découvrez-en plus ici.
Puis-je / comment puis-je télécharger des livres ?
Pour le moment, tous nos livres en format ePub adaptés aux mobiles peuvent être téléchargés via l’application. La plupart de nos PDF sont également disponibles en téléchargement et les autres seront téléchargeables très prochainement. Découvrez-en plus ici.
Quelle est la différence entre les formules tarifaires ?
Les deux abonnements vous donnent un accès complet à la bibliothèque et à toutes les fonctionnalités de Perlego. Les seules différences sont les tarifs ainsi que la période d’abonnement : avec l’abonnement annuel, vous économiserez environ 30 % par rapport à 12 mois d’abonnement mensuel.
Qu’est-ce que Perlego ?
Nous sommes un service d’abonnement à des ouvrages universitaires en ligne, où vous pouvez accéder à toute une bibliothèque pour un prix inférieur à celui d’un seul livre par mois. Avec plus d’un million de livres sur plus de 1 000 sujets, nous avons ce qu’il vous faut ! Découvrez-en plus ici.
Prenez-vous en charge la synthèse vocale ?
Recherchez le symbole Écouter sur votre prochain livre pour voir si vous pouvez l’écouter. L’outil Écouter lit le texte à haute voix pour vous, en surlignant le passage qui est en cours de lecture. Vous pouvez le mettre sur pause, l’accélérer ou le ralentir. Découvrez-en plus ici.
Est-ce que An Introduction to Digital Photomicrography est un PDF/ePUB en ligne ?
Oui, vous pouvez accéder à An Introduction to Digital Photomicrography par Brian Matsumoto, Carol Roullard en format PDF et/ou ePUB ainsi qu’à d’autres livres populaires dans Scienze fisiche et Storia e pratica della scienza. Nous disposons de plus d’un million d’ouvrages à découvrir dans notre catalogue.
Informations
Sujet
Scienze fisicheSous-sujet
Storia e pratica della scienzaCHAPTER ONE
INTRODUCTION TO THE MICROSCOPE
To the neophyte, using a microscope might seem intuitive. All one has to do is turn on the illuminator, place a specimen on the stage, centre it, focus, and view. Unfortunately it’s not that simple. In order to get the best results, the microscopist must know how to control his illuminator, and what type of adjustments must be made with different types of specimen. The lighting used for recording the activity of pond animals will be different from that used for viewing stained slides, and a failure to adjust the microscope to the specimen being observed would lead to less than optimum viewing.

A slide of diatoms arranged by Klaus Kemp. Photographed with a Leitz Orthoplan microscope with a colour Heine condenser, 10x objective, 2.5x eyepiece. (Image: Brian Matsumoto)
If one wishes to take good photographs, using the microscope requires a rigorous attention to details. A camera records accurately while the human eye tends to view subjectively. If the photographer does not use the right illuminator, the right filter or the right software setting on his camera, the photograph will show a colour cast.
It is essential to learn how to use the correct visual and photographic techniques. This is accomplished by making a routine for setting up the microscope. The first step is to adjust the illumination; the second step is to use the microscope controls for focusing and moving the slide about. The third and final step is to adjust the camera to take photographs. One will have to match the camera’s sensor output to the light source and adjust its exposure.
We encourage the new microscope user not to be intimidated by the expensive microscopes used by the knowledgeable hobbyist or the research scientist. With a relatively modest outlay, one can start taking quality pictures. If this is your first time trying photography through the microscope, we recommend starting with the simpler microscope stands. The so-called student stands used in colleges or grade schools can be effective for taking pictures of fascinating pond creatures. If you find this hobby absorbing, you will purchase a more advanced microscope and camera. In fact, you will find that one microscope is not enough.
This chapter introduces the microscope by describing its controls used most frequently. Chapter Two covers the parts of the microscope in greater practical and theoretical detail. Taken together, these chapters provide the basics to get immediate results. Later chapters cover more sophisticated steps and techniques to enable you to build on the basic knowledge, and to understand how to perform the new techniques successfully.
Simple Versus Compound Microscope
An understanding of light’s interaction with the specimen and the microscope will help you decide which lens to use and how much magnification is needed to discern fine structures. This chapter provides a simplified explanation of optics to help you become familiar with additional terms and principles. There will be a minimum number of equations with the emphasis on providing you with an intuitive and pragmatic approach to the workings of the microscope. This discussion is helpful in understanding objective lens and eyepiece nomenclature.
From time to time we will include titled boxes with content, called ‘sidebars’. These sidebars contain standalone discussions on subjects that are outside the regular flow within the chapter. They can be read when referred to within the chapters or at your leisure.
The simplest microscopes are magnifiers or loupes. These hand-held lenses are easily used at 10x and require to be held close to the eye. Focusing is accomplished by varying the distance between the object and the lens. The loupes are a biconvex lens.
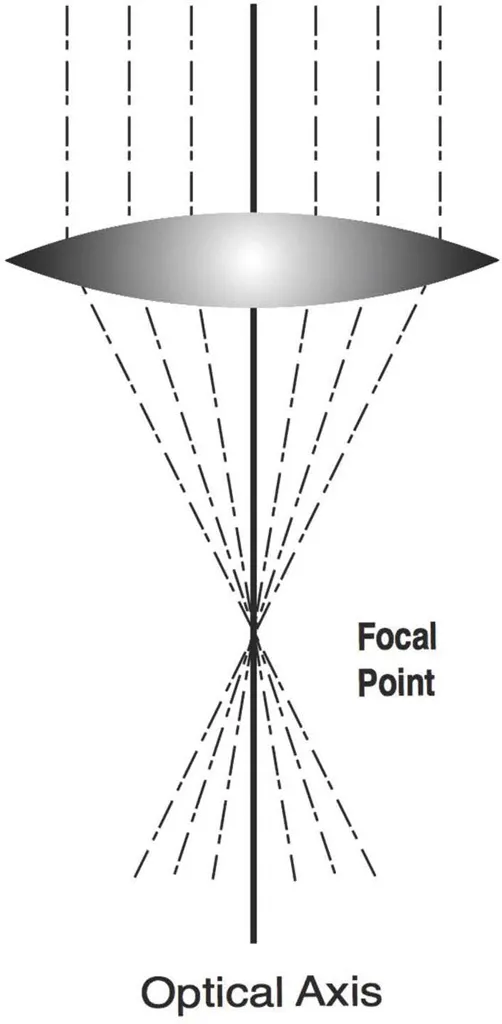
Fig. 1 Parallel light rays passing through a simple lens converge to a focal point.
A biconvex lens is an example of a simple microscope (Fig. 1). It has convex surfaces on each side and an optical axis, a line that passes through the centre of curvature of the lens. Light rays travelling parallel to this optical axis pass through the lens and converge to a point on its opposite side. This is defined as the focal point, and its distance from the lens defines its focal length.
If you take a simple biconvex lens and place it close to an object, within its focal point, you will generate an image that can be seen from the opposite side of the lens. The image is observable when the lens is placed close to the eye and the subject appears enlarged and upright. This is a virtual image because it cannot be projected on to a screen.
A lens can also form a real image, one that can be projected on to a screen or captured by a camera. This is accomplished by placing a subject on one side of the lens so that it lies outside the front focal point. A real inverted image will be projected on the opposite side of the lens and can be projected on a screen. This is how an objective lens works. By using a second lens, the real image can be viewed at higher magnification. In essence, the second lens (eyepiece) acts as a magnifier amplifying the real image. Since the real image is inverted, it retains this feature when viewed through the eyepiece. Each lens provides magnification, and the effect is multiplicative so that a 10x objective and a 10x eyepiece create an image at 100x. A compound microscope is one with an objective lens and an eyepiece. This is the instrument that most people envisage when they talk about a microscope.
Basic Microscope Parts
First, when using the microscope the typical specimen is mounted on a 25 x 75mm glass slide that is approximately 1mm thick. One might be surprised by its cost, but it should be remembered that slides are precisely ground as optical defined surfaces with their upper and lower surfaces parallel to each other. Overlying the specimen is a thin glass coverglass. For the professional, these two items are typically purchased in large volumes from a scientific supply house. However, the hobbyist can find smaller quantities of these items on eBay where the price is generally much lower. Frequently, a laboratory liquidates its unused supplies and purchasing slides, and coverglasses from such a source can be a bargain. See the ‘Microscope Slides and Coverglasses’ sidebar to learn more about the slide and coverglass specifications you should look out for.
MICROSCOPE SLIDES AND COVERGLASSES
Microscope slides should be 25 x 75mm and 1mm to 1.03mm thick. The defined thickness is needed so that the condenser from the microscope’s illumination system can focus light on the specimen.
Coverglasses can be obtained in a variety of sizes, but square coverglasses, 22mm to 14mm per side, are popular. Coverglass thickness should be #1.5 (an arbitrary nomenclature provided by the manufacturers), but if these are unavailable you should select a slightly thinner coverglass (#1 thickness) over a slightly thicker one (#2 thickness). The importance of coverglass thickness will be discussed in Chapter 2. Coverglasses with thicknesses of #2 or #3 are more robust; however, they will degrade the image when working with powers greater than 200.
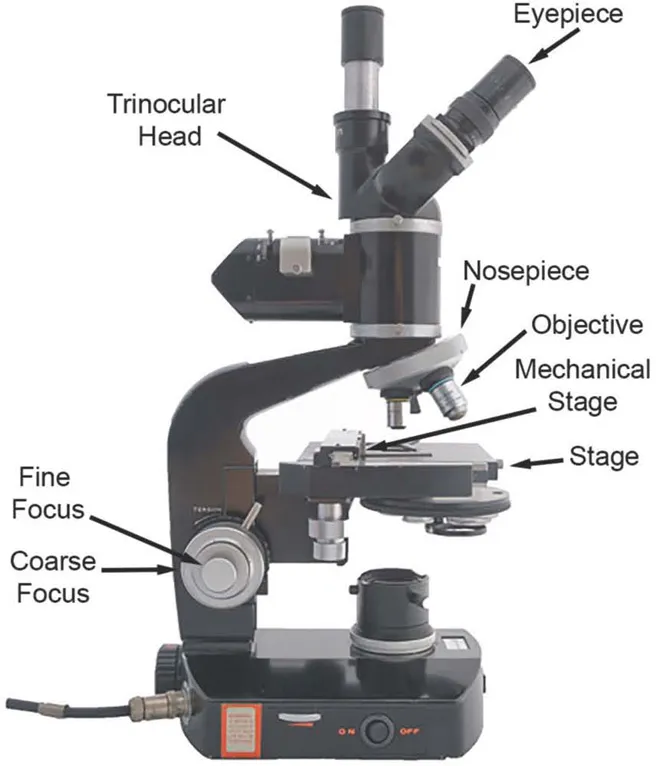
Fig. 2 Research microscope with a trinocular head designed for photomicrography.
A compound microscope has three groupings of microscope controls: the first is the stage for holding the slide with the specimen, the second comprises the focusing knobs to obtain a sharp image, and the third comprises the condenser and mirror for optimizing illumination (see Fig. 2). The complexity of these controls varies with different microscope models. For a student microscope the stage is a simple flat plate with two spring clips to hold down the microscope slide. Finger pressure is used to move the slide across the stage and to centre the subject within the field of view. For low magnification work from 40x to 200x this is adequate, and a skilled worker can manually manipulate slides at magnification as high as 400x.
While appearing simple, the stage is a precisely engineered flat plate located in the mid-region of the microscope. Its smooth surface is perpendicular to the viewing optics, and permits minute movements of the slide without any friction or sticking. The slide is laid flat on the stage with the specimen and coverglass facing the objective. An upright microscope is configured so that the objective is over the specimen, while an inverted microscope is one where the objective is beneath the specimen.
As one uses higher magnification, greater precision is needed to move the slide. Research microscopes are equipped with a mechanical stage to hold the slide. This device has two knobs for orthogonally moving the slide. The slide is placed on the stage, and two clips, one spring-loaded, grip the slide securely. Turning the knobs moves the slide along the stage’s surface. Index marks and a millimeter scale are inscribed on the mechanical stage for recording the position of the slide. A vernier allows its position to be recorded with an accuracy of 0.1mm.
The microscopist focuses the specimen by varying the distance between it and the microscope optics. In older microscopes, the objective lens and eyepiece were mounted on a single tube whose height could be varied over the stage. In this design, the slide is fixed and the viewing optics are raised or lowered. Many of these microscopes were equipped with an inclination joint for tilting the tube to position the eyepiece at a comfortable angle for viewing. For photography, the tube was set vertically so the camera could then be mounted over the eyepiece. If a camera is mounted on the microscope’s tube, it should be as light as possible because the focusing controls must lift and lower its weight while focusing. We found cameras weighing 1lb (0.45kg) or less are easily accommodated by older microscopes, and the effort to turn the coarse focusing knob was acceptable.
On modern research microscopes, the entire stage assembly is moved while the optical train is fixed. This has the advantage that the focusing gears have to drive only the weight of the stage assembly. This is desirable if one wishes to mount a heavy digital camera on to the microscope. It should be noted that the coarse focus of some microscopes, such as the Zeiss GFL or the Wild M20, lift and lower the body tube while the fine focus moves only the stage. For such microscopes, one should select lighter cameras as coarse focusing gears must lift and lower the weight of the camera as well as the microscope body.
Many readers may already own a microscope designed for photomicrography. Such stands have a trinocular head: two eyepiece tubes dedicated for visual use and the third dedicated for photography. Such stands allow the user to switch quickly and conveniently from visual observation to recording the image with a camera.
The paired visual eyepieces have adjustments for obtaining binocular vision. The two eyepieces can be moved closer together or further apart to accommodate the variations in interpupillary distance. To compensate for differences in the strength of the eyes, one of the eyepieces has a knurled control that can slightly adjust its focus. This ensures that both the left and right eyes will see a sharply focused image. The photographic tube is orientated vertically and serves to hold the digital camera. A slider on the side of the body directs the light to either of the two eyepieces or the camera.
The eyepieces, also called oculars, have an engraved magnification number followed by an x representing the power of the eyepiece. Together with the objective’s power, the user can determine the visual magnification of the microscope. The magnification equals the multiplied value of the eyepiece and the objective. For example, if the objective is 100x and the eyepiece ...