eBook - ePub
Mobile Ecommerce
How to transform your website into a mobile friendly ecommerce platform!
empreender
This is a test
Partager le livre
- 31 pages
- English
- ePUB (adapté aux mobiles)
- Disponible sur iOS et Android
eBook - ePub
Mobile Ecommerce
How to transform your website into a mobile friendly ecommerce platform!
empreender
Détails du livre
Aperçu du livre
Table des matières
Citations
À propos de ce livre
It's no surprise that there's been an overwhelming increase in the number of online shoppers making their purchases through their smartphones.And the trend is continuing to grow at a steady rate with fewer people opening their laptops, or logging onto computers in order to make their online purchases.This report will show you different ways you can get your business off the ground quickly and easily by ensuring it's mobile friendly.You will learn how to transform your website into a mobile commerce platform!
Foire aux questions
Comment puis-je résilier mon abonnement ?
Il vous suffit de vous rendre dans la section compte dans paramètres et de cliquer sur « Résilier l’abonnement ». C’est aussi simple que cela ! Une fois que vous aurez résilié votre abonnement, il restera actif pour le reste de la période pour laquelle vous avez payé. Découvrez-en plus ici.
Puis-je / comment puis-je télécharger des livres ?
Pour le moment, tous nos livres en format ePub adaptés aux mobiles peuvent être téléchargés via l’application. La plupart de nos PDF sont également disponibles en téléchargement et les autres seront téléchargeables très prochainement. Découvrez-en plus ici.
Quelle est la différence entre les formules tarifaires ?
Les deux abonnements vous donnent un accès complet à la bibliothèque et à toutes les fonctionnalités de Perlego. Les seules différences sont les tarifs ainsi que la période d’abonnement : avec l’abonnement annuel, vous économiserez environ 30 % par rapport à 12 mois d’abonnement mensuel.
Qu’est-ce que Perlego ?
Nous sommes un service d’abonnement à des ouvrages universitaires en ligne, où vous pouvez accéder à toute une bibliothèque pour un prix inférieur à celui d’un seul livre par mois. Avec plus d’un million de livres sur plus de 1 000 sujets, nous avons ce qu’il vous faut ! Découvrez-en plus ici.
Prenez-vous en charge la synthèse vocale ?
Recherchez le symbole Écouter sur votre prochain livre pour voir si vous pouvez l’écouter. L’outil Écouter lit le texte à haute voix pour vous, en surlignant le passage qui est en cours de lecture. Vous pouvez le mettre sur pause, l’accélérer ou le ralentir. Découvrez-en plus ici.
Est-ce que Mobile Ecommerce est un PDF/ePUB en ligne ?
Oui, vous pouvez accéder à Mobile Ecommerce par empreender en format PDF et/ou ePUB ainsi qu’à d’autres livres populaires dans Negocios y empresa et Comercio. Nous disposons de plus d’un million d’ouvrages à découvrir dans notre catalogue.
Informations
How to Set Up Your E- commerce Site In 24 Hours Or Less
If you’re just starting to build your e-commerce website, one of the easiest ways to get started is by creating a Shopify account, and building your e-commerce store on their platform.
Shopify is very flexible, allowing you to sell both physical and digital items, and best of all you don’t need to have experience in design, coding or development to build a mobile-friendly, full-featured e- commerce website.
Let’s go through the steps of setting up an e-commerce website using Shopify:
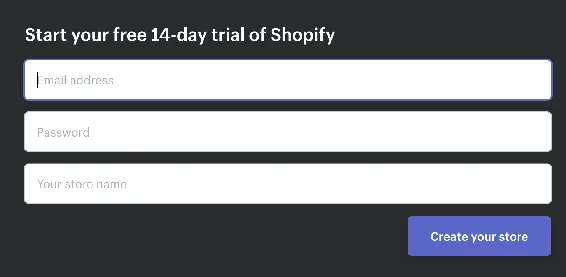
Step 1: Create your Shopify Account
Shopify offers a free 14-day trial with no need for a credit card.
To start, head over to the Shopify website at https://www.shopify.ca/
and create your account. You’ll need to enter an email address, password and choose a name for your storefront.
You’ll also be asked for a bit more information about your business, including how much you plan to sell and if you’re already selling products.
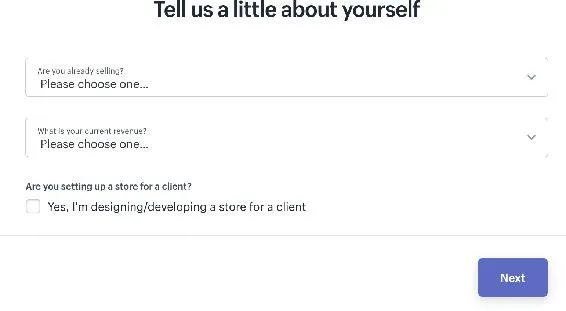
If you aren’t sure what you’re going to sell, or what your current revenue is, just choose “I’m just getting started”.
Step 2: Customize the Look of your Website
This is where you’ll want to spend some time so that you’re able to create a website that truly stands out and reflects your brand. Consider hiring a graphic designer to create a logo that defines the type of products you plan to sell.
You’ll also want to choose a theme for your website and thankfully Shopify provides hundreds of free themes that you can use as well as premium ones that offer a bit more functionality.
You can browse the theme store at: http://themes.shopify.com/
When looking for a theme that fits your website, you can filter based on premium themes or free ones as well as based on industry, popularity, most recently added and even by features.
Once you’ve selected a theme, return to your admin panel and choose “Themes” from the navigation menu. This will allow you to preview your theme live as well as further customize settings and overall appearance. Just because it’s a free theme used by others doesn’t mean you can’t make it unique!
Click on “Customize Theme” to play around with the available options and test out the different features to see what the theme is capable of and how you can make it your own.
This typically includes: adding your own logo, uploading images into a product display carousel, modifying the color scheme and utilizing different font styles to highlight product titles and descriptions. You can also choose whether you wish to feature social media buttons including twitter, Pinterest and Instagram.
Step 3: Choose A Product to Sell
If you have your own products then you can skip this step, however if you are looking for products that are in-demand, you’ll want to check out the Oberlo marketplace at: https://www.shopify.ca/oberlo
Oberlo help you quickly find and add products directly to your Shopify store, meaning you can get up and running in just a couple of hours.
Whenever you find products, you’ll never have to worry about inventory or shipping because Oberlo does all of that for you on a drop- shipping basis.
If you have your own products, you’ll be able to quickly add them to your shop just by going through the “Add Product” step-by-step guide. Enter in the product name, description and price. You’ll be able to edit your product pages any time should you wish to revise the description, or adjust the price.
One thing to keep in mind when adding products to your Shopify store is that it’s important to use keywords whenever possible in order to boost SEO. This includes product names, description and page URL’s. Include as much information as possible to inform customers about the different products available to them.
You also want to pay close attention to the product images you use. Upload high-quality images that truly highlight your products in the best possible way, including any special features or unique factors that could persuade a potential customer into purchasing your product.
Step 4: Group Your Products into Collections
To provide better navigation and to help connect customers with various products, consider creating a collection of products based on common features.
For example, if you are selling clothing you would want to create collections or groups based on sizes, colors or items on sale. Collections will help your customer find what they’re looking for quickly without having to browse through all your inventory.
Step 5: Register a Domain Name
You’ll want to register your own domain at a service like http://www.NameCheap.com or http://www.GoDaddy.com after setting up your Shopify shop so that you can direct the domain to your Shopify URL.
Having your own domain is important because it helps you build a recognized brand and makes it easier for consumers to remember where to find your storefront.
Once you have registered a domain, return to your Shopify dashboard, click on Settings and add it to your account using the “Add an existing domain” button.
Don’t forget to update your DNS with your domain registrar so that it directs people to your Shopify website. You can contact your domain registrar’s support team if you aren’t sure how to set this up.
Step 6: Choose Your Payment Processors
From within your Shopify account, click on the tab to the left of the dashboard called Payments. This area allows you to choose from dozens of available payment processors such as Paypal, Stripe and Authorize.net.
Shopify also has its own payment processor which is super easy to implement should you wish to give it a try. Simply walk through the steps to activate your payment processor so that your website can accept payments.
That’s it! You can tweak your website as needed, play around with different themes and continue to customize your website however you see fit!
Taking Advantage of the Javascript Buy SDK
One of the great things about Shopify is that you no longer need to migrate your entire website to take advantage of Shopify’s features and security. With the JavaScript Buy SDK, you can easily add e-commerce functionality to your website while still being able to host your storefront on your own server.
Selling Digital Products with Shopify:
If you plan to sell digital products through Shopify, check out SendOwl. SendOwl is a third-party application designed to protect content and deliver digital goods immediately after payment verification. Visit: https://apps.shopify.com/sendowl for details.
Final Words
I hope this guide has given you the information you need to zero in on the mobile shopping market in order to maximize sales and build a business based on long-term success.
Start off by making sure any existing websites you own are mobile friendly. Preview them on any mobile device to confirm that they expand and contract based on the size of the screen. Then, look for ways to improve engagement by developing an intuitive, user-friendly e-commerce website that appeals to mobile users.
Use clear navigation to direct and guide them through your website. Simplify the checkout process, keeping in mind that people don’t want to spend as much time filling out forms on a mobile device as they may on a computer.
And finally, expand your outreach by getting ahead of the curve and setting yourself up for ongoing success as the mobile shopper market continues to grow.
I wish you the very best of success!
Resources
Here are links to the resources found in this guide.
Shopify:
>> http://www.Shopif...