Amin Al-Ahmad, Andrea Natale, Paul J. Wang, James P. Daubert, Luigi Padeletti, Amin Al-Ahmad, Andrea Natale, Paul J. Wang, James P. Daubert, Luigi Padeletti
This is a test
This is a test
Partager le livre
English
ePUB (adapté aux mobiles)
Disponible sur iOS et Android
eBook - ePub
How-to Manual for Pacemaker and ICD Devices
Procedures and Programming
Amin Al-Ahmad, Andrea Natale, Paul J. Wang, James P. Daubert, Luigi Padeletti, Amin Al-Ahmad, Andrea Natale, Paul J. Wang, James P. Daubert, Luigi Padeletti
Détails du livre
Aperçu du livre
Table des matières
Citations
À propos de ce livre
A complete, how-to-do-it guide to planning, programming, implementing, and trouble-shooting todays pacemakers and other implantable cardiac devices
Edited by a team of leading clinician-educators this is a practical, go-to reference for trainees and clinical staff who are new to or less experienced with the programming and management of implantable devices. It distills device best-practices into a single, quick-reference volume that focuses on essential tasks, common pitfalls, and likely complications. Each chapter follows a hands-on, how-to-do-it approach that helps readers quickly master even the most challenging device-related taskssuch as programming and how to respond confidently when complications arise.
Todays pacemakers and other implantable EP devices are to earlier versions what smart phones are to rotary phones. They are not only smaller and more comfortable; they offer complex programming options that allow clinicians to adapt a device to individual patient requirements. As they continue to become smaller, smarter, and more adaptable, these devices also become more challenging for clinicians to set up, manage and monitor. This unique, quick-reference guide dramatically reduces the learning curve for mastering this essential technology by giving doctors and technicians the how-to information they need.
Focuses on tasks clinicians perform, including pre-implementation, planning, programming, management, troubleshooting, and more
Shows how expert clinicians achieve optimal outcomes in their own labs with real-world examples
Features more than 300 images, including ECGs, X-ray and fluoroscopy, images from device interrogation, intracardiac electrograms, and color electoanatomical maps
Provides eight videos on an accompanying website demonstrating key tasks and techniques
Also available in an eBook version, enhanced with instructional videos, How-to Manual for Pacemaker and ICD Devices is an indispensable tool of the trade for electrophysiologists, fellows in electrophysiology, EP nurses, technical staff, and industry professionals.
Foire aux questions
Comment puis-je résilier mon abonnement ?
Il vous suffit de vous rendre dans la section compte dans paramètres et de cliquer sur « Résilier l’abonnement ». C’est aussi simple que cela ! Une fois que vous aurez résilié votre abonnement, il restera actif pour le reste de la période pour laquelle vous avez payé. Découvrez-en plus ici.
Puis-je / comment puis-je télécharger des livres ?
Pour le moment, tous nos livres en format ePub adaptés aux mobiles peuvent être téléchargés via l’application. La plupart de nos PDF sont également disponibles en téléchargement et les autres seront téléchargeables très prochainement. Découvrez-en plus ici.
Quelle est la différence entre les formules tarifaires ?
Les deux abonnements vous donnent un accès complet à la bibliothèque et à toutes les fonctionnalités de Perlego. Les seules différences sont les tarifs ainsi que la période d’abonnement : avec l’abonnement annuel, vous économiserez environ 30 % par rapport à 12 mois d’abonnement mensuel.
Qu’est-ce que Perlego ?
Nous sommes un service d’abonnement à des ouvrages universitaires en ligne, où vous pouvez accéder à toute une bibliothèque pour un prix inférieur à celui d’un seul livre par mois. Avec plus d’un million de livres sur plus de 1 000 sujets, nous avons ce qu’il vous faut ! Découvrez-en plus ici.
Prenez-vous en charge la synthèse vocale ?
Recherchez le symbole Écouter sur votre prochain livre pour voir si vous pouvez l’écouter. L’outil Écouter lit le texte à haute voix pour vous, en surlignant le passage qui est en cours de lecture. Vous pouvez le mettre sur pause, l’accélérer ou le ralentir. Découvrez-en plus ici.
Est-ce que How-to Manual for Pacemaker and ICD Devices est un PDF/ePUB en ligne ?
Oui, vous pouvez accéder à How-to Manual for Pacemaker and ICD Devices par Amin Al-Ahmad, Andrea Natale, Paul J. Wang, James P. Daubert, Luigi Padeletti, Amin Al-Ahmad, Andrea Natale, Paul J. Wang, James P. Daubert, Luigi Padeletti en format PDF et/ou ePUB ainsi qu’à d’autres livres populaires dans Medicina et Cardiologia. Nous disposons de plus d’un million d’ouvrages à découvrir dans notre catalogue.
1 How to Access the Cephalic Vein Using a Cut-down Approach
Carola Gianni1, Pasquale Santangeli2, Andrea Natale1, and Amin Al-Ahmad1
1 Texas Cardiac Arrhythmia Institute, St. David’s Medical Center, Austin, TX, USA
2 University of Pennsylvania, Philadelphia, PA, USA
The cephalic vein has been used for access and lead placement ever since transvenous leads were developed. The cephalic vein offers relatively easy access into the central venous system with a very low risk of complications [1]. There is essentially no risk of pneumothorax with the cephalic vein cut-down compared with axillary or subclavian puncture. In addition, lead longevity with cephalic access is superior to that of other common techniques such as access via axillary or subclavian veins [2]. This is because of a more gentle angle of entry with cephalic access and a lower risk of subclavian crush to the lead when compared with subclavian access [3,4].
Some physicians use cephalic access for all device implants, while others use it only for selected patients. All physicians should become proficient with implants via cephalic access as it can be useful in patients with access challenges, such as those who have a high risk of complications such as pneumothorax, as well as patients where the longevity of the lead is of prime importance such as young patients.
In this chapter we describe the techniques to gain access into the cephalic vein as well as some of the potential challenges and pitfalls.
Procedure Description
An important aspect of the cephalic vein cut-down procedure is an understanding of the anatomy of the pectoralis and deltoid muscle areas as they relate to the location of the vein. The cephalic vein runs in the deltopectoral groove. On the skin, this is the groove where the shoulder meets the chest and is visible and palpable in most people (Figure 1.1). The incision can be made either parallel to the deltopectoral groove, or perpendicular. Care should be taken to ensure that the incision is close enough to the groove that access to the vein is unencumbered. An incision too medial will lead to a difficult dissection of the cephalic vein. An incision directly on the groove can also be uncomfortable for the patient. A typical incision is approximately 1 cm (or 1 finger’s breadth) medial to the groove, approximately 1–2 cm (or 1–2 finger’s breadths) below the clavicle. An incision that is too low can make for a challenging dissection and can be too close to the axilla in some individuals.
Figure 1.1 (a) Deltopectoral groove. (b) Venogram demonstrating the relationship between the bony landmarks and the cephalic vein. Also, the relationship to the axillary and subclavian veins can be appreciated.
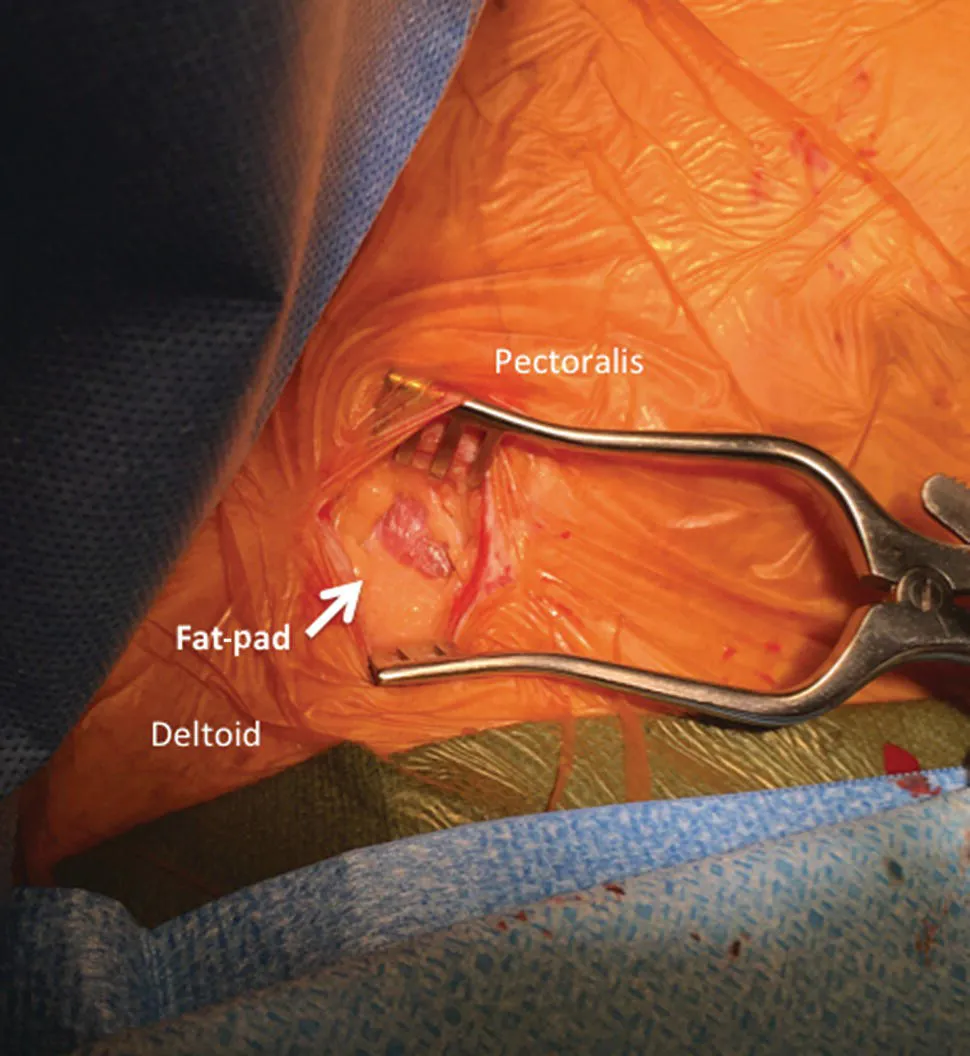
Once the incision has been made, dissection is carried through to the pectoral fascia using blunt dissection and electrocautery. A fat-pad located in the deltopectoral groove can now be easily identified in most people. The vein is located within the fat-pad (Figure 1.2). Using only blunt dissection with a small clamp (such as a “mosquito” clamp) or a pair of Metzenbaum dissecting scissors allows for removal of the fat and identification of the vein. In the fat-pad area, the use of electrocautery should generally be avoided as it can destroy the vein and render it useless for access. The vein will be thin, white, or have a blue hue in some cases. The vein may also be flat or should become flat when lifted gently. Care should be made to avoid the artery that in some cases runs adjacent to the vein. The artery can be identified as it is thicker, more rounded, and white in color. When the artery is manipulated it may constrict and pulsations can be seen during systole. Occasionally, the artery is positioned such that access into the vein is challenging; in these cases, using the clamp or pick-ups (Debakey forceps), the artery can be moved away from the vein and a small application of electrocautery in the “cautery” mode applied to the metal of the clamp will destroy the artery.
Figure 1.2 The fat-pad is located in the deltopectoral groove. The cephalic vein is within the fat-pad.
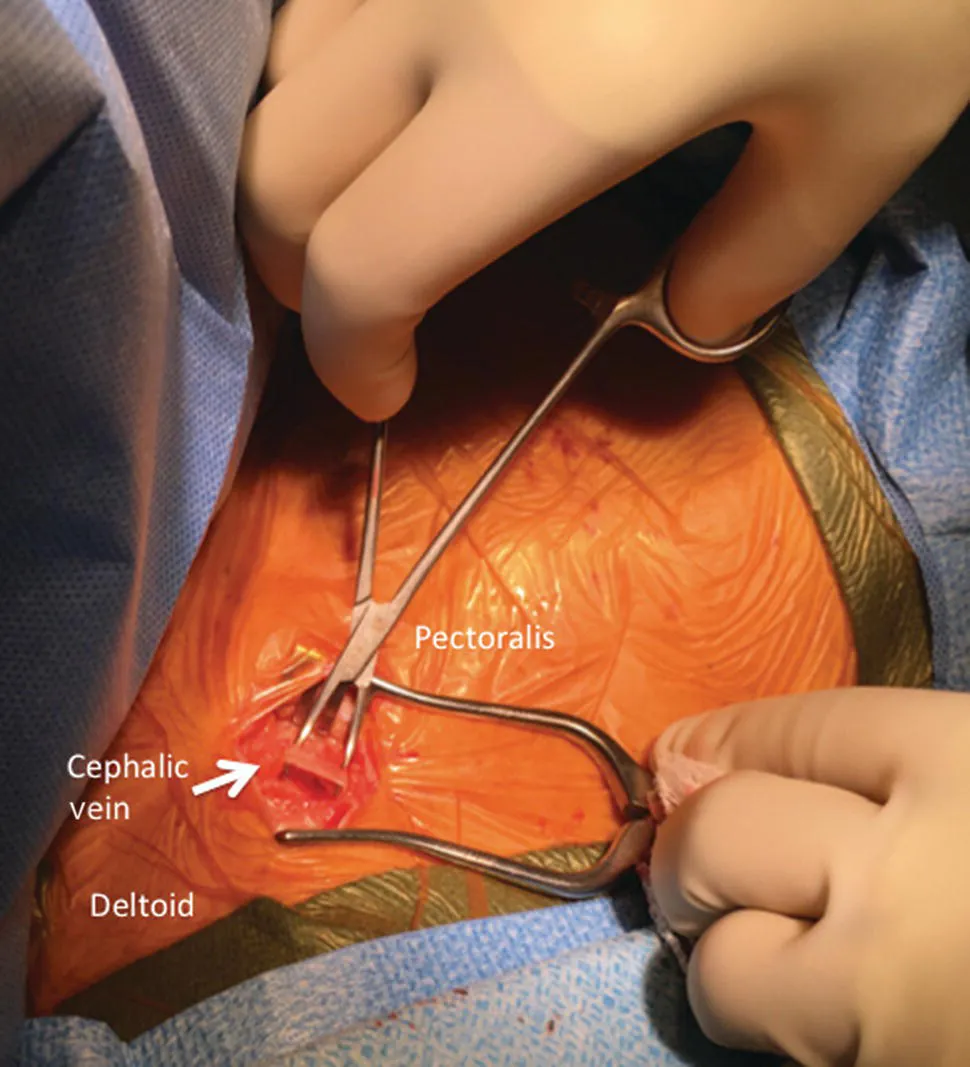
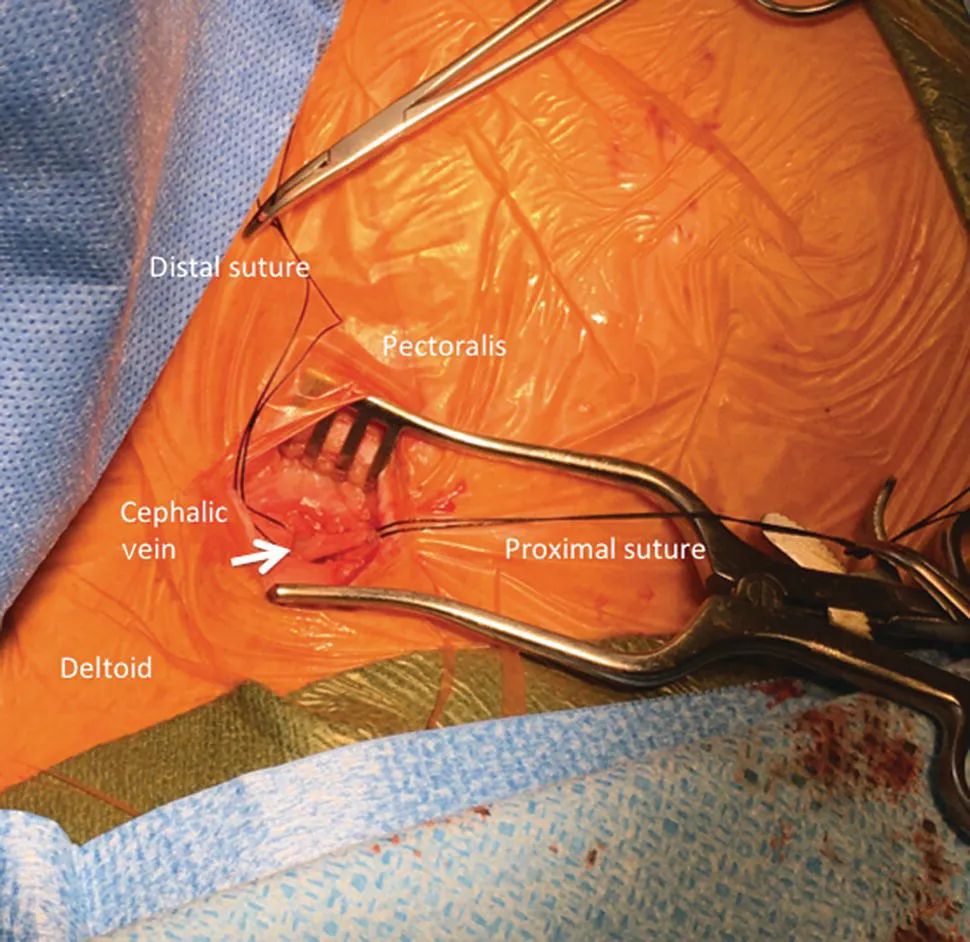
A right-angle clamp can be used to dissect around the vein to ensure that the vein can be lifted free from any tissue in the groove. At this point the vein is inspected to ensure that any adherent tissue is removed so that only the vein is manipulated (Figure 1.3). Using the right-angle clamp, two pieces (approximately 10 cm) of non-absorbable suture (0 silk or 0 Ethibond) are brought around the vein to maintain control of the distal and proximal aspects of the vein (Figure 1.4). The vein can then be manipulated and accessed.
Figure 1.3 Cephalic vein isolation using a small clamp.
Figure 1.4 Sutures loops are placed around the vein to maintain control of the proximal and distal aspects of the vein.
More than one technique can be used to access the vein. A commonly used technique utilizes a scalpel to make a small venotomy. This is best done while lifting the more distal suture gently as this reduces the amount of bleeding from the vein (Figure 1.5). The scalpel should have a straight blade (typically, number 11 blade) and should cut the vein initially placed in a horizontal position and lifted vertically once the vein has been pierced (Figure 1.6). Care should be taken not to make the venotomy too large so that the integrity of the vein is compromised. In addition, it is important to ensure that the venotomy cuts into the vein rather than only the adventitia surrounding it. Typically, a small amount of blood escapes and the lumen of the vein should be visible. Once the vein has been cut, a vein pick is placed at the lip of the incision and used to lift the lip of the incision to expose the lumen of the vein. Now, under direct visualization, a small (4 French, Fr) sheath can be advanced a small amount into the vein and a hydrophilic glide wire advanced via the sheath into the venous system under fluoroscopic guidance (Figure 1.7).
Figure 1.5 Lifting the distal suture to show the cephalic vein. This allows access either by direct venotomy or with a small Angiocath needle.
Figure 1.6 (a) Venotomy using an 11 blade with the sharp aspect of the blade pointing upwards. (b) A vein pick (yellow) is placed in the vein to maintain the opening so that a wire can be inserted.
Figure 1.7 (a) Introduction of the 4 Fr sheath. (b) The hydrophilic guide wire is placed via the 4 Fr sheath and advanced into the vein. It can be advanced into the heart under fluoroscopy.
An alternative approach to using a scalpel and vein pick is direct puncture into the vein with an Angiocath or a micropuncture needle. The Angiocath needle is commonly used to obtain peripheral percutaneous vascular access, while the micropuncture needle is used for central percutaneous vascular access. Once vascular access is obtained with the Angiocath needle, the catheter is advanced gently into the vascular space. With the micropuncture technique, after obtaining vascular access with the needle, a micropuncture wire is advanced into the vein and the micropuncture dilator (5 Fr) is advanced over the wire. Then, through the Angiocath catheter or the micropuncture dilator, a hydrophilic glide wire may be advanced into the central venous system.
Once the wire has been advanced, the small 4 French sheath or the Angiocath catheter is removed and the wire can be used to place a larger peel-away sheath for the lead delivery. This wire needs to support placement of a larger sheath, so ...