
Hands-On Penetration Testing with Python
Enhance your ethical hacking skills to build automated and intelligent systems
Furqan Khan
- 502 pagine
- English
- ePUB (disponibile sull'app)
- Disponibile su iOS e Android
Hands-On Penetration Testing with Python
Enhance your ethical hacking skills to build automated and intelligent systems
Furqan Khan
Informazioni sul libro
Implement defensive techniques in your ecosystem successfully with Python
Key Features
- Identify and expose vulnerabilities in your infrastructure with Python
- Learn custom exploit development.
- Make robust and powerful cybersecurity tools with Python
Book Description
With the current technological and infrastructural shift, penetration testing is no longer a process-oriented activity. Modern-day penetration testing demands lots of automation and innovation; the only language that dominates all its peers is Python. Given the huge number of tools written in Python, and its popularity in the penetration testing space, this language has always been the first choice for penetration testers.
Hands-On Penetration Testing with Python walks you through advanced Python programming constructs. Once you are familiar with the core concepts, you'll explore the advanced uses of Python in the domain of penetration testing and optimization. You'll then move on to understanding how Python, data science, and the cybersecurity ecosystem communicate with one another. In the concluding chapters, you'll study exploit development, reverse engineering, and cybersecurity use cases that can be automated with Python.
By the end of this book, you'll have acquired adequate skills to leverage Python as a helpful tool to pentest and secure infrastructure, while also creating your own custom exploits.
What you will learn
- Get to grips with Custom vulnerability scanner development
- Familiarize yourself with web application scanning automation and exploit development
- Walk through day-to-day cybersecurity scenarios that can be automated with Python
- Discover enterprise-or organization-specific use cases and threat-hunting automation
- Understand reverse engineering, fuzzing, buffer overflows, key-logger development, and exploit development for buffer overflows.
- Understand web scraping in Python and use it for processing web responses
- Explore Security Operations Centre (SOC) use cases
- Get to understand Data Science, Python, and cybersecurity all under one hood
Who this book is for
If you are a security consultant, developer or a cyber security enthusiast with little or no knowledge of Python and want in-depth insight into how the pen-testing ecosystem and python combine to create offensive tools, exploits, automate cyber security use-cases and much more then this book is for you. Hands-On Penetration Testing with Python guides you through the advanced uses of Python for cybersecurity and pen-testing, helping you to better understand security loopholes within your infrastructure.
Domande frequenti
Informazioni
Vulnerability Scanner Python - Part 1
- Introducing Nmap
- Building a network scanner with Python
Introducing Nmap
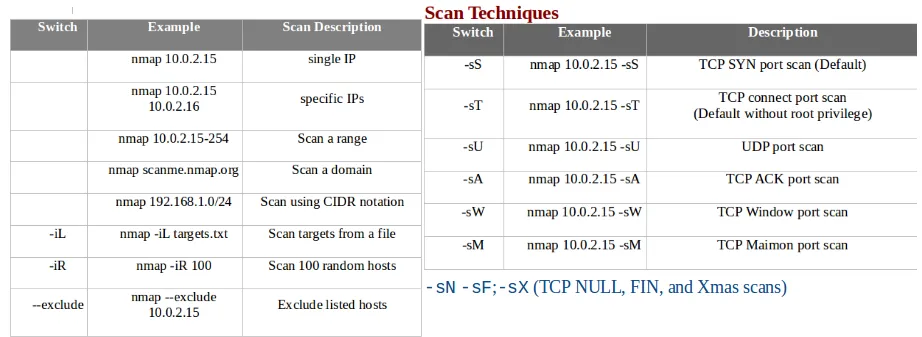
- The following screenshot shows the different scan techniques that are available with Nmap:
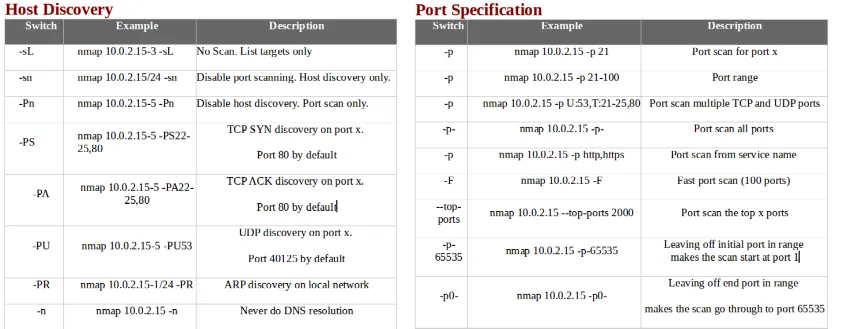
- The following screenshot shows host discovery and port specification, along with some examples:
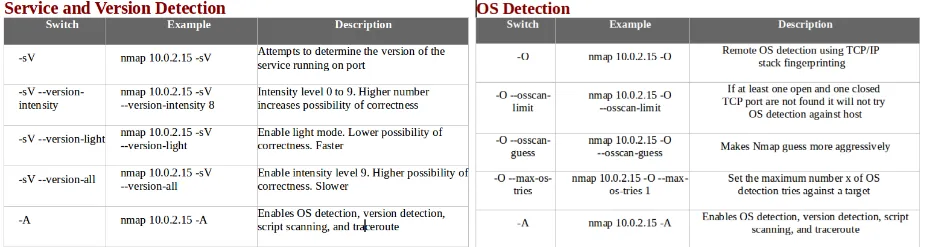
- The following screenshot shows service and version detection and OS detection, along with some examples:
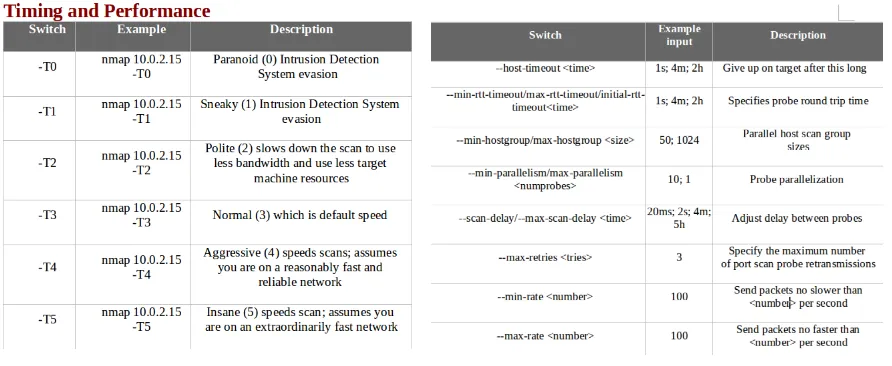
- The following screenshot shows the timing and performance, along with some examples:
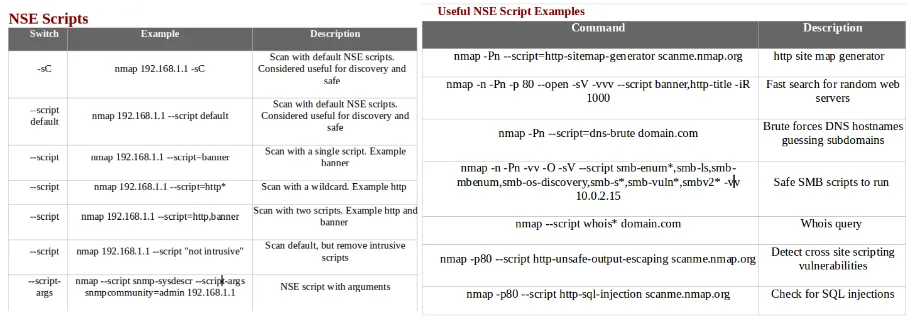
- The following screenshot shows NSE scripts, along with some examples:
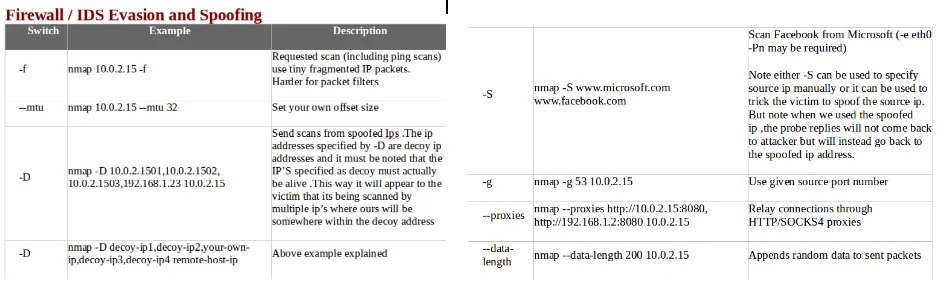
- The following screenshot shows Firewall/IDS evasion and spoofing, along with some examples:
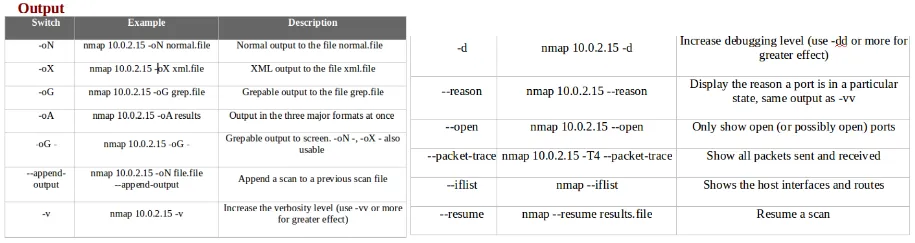
- The following screenshot shows some helpful Nmap output examples:

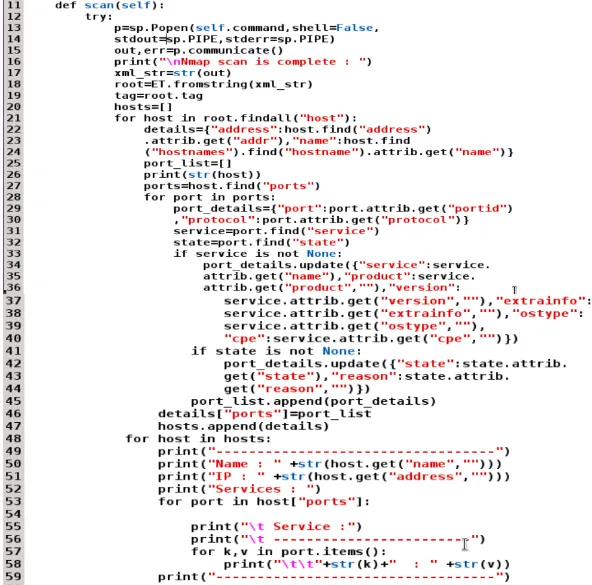
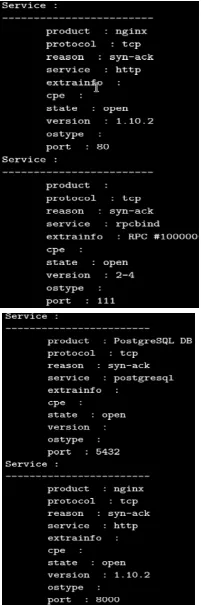
Building a network scanner with Python
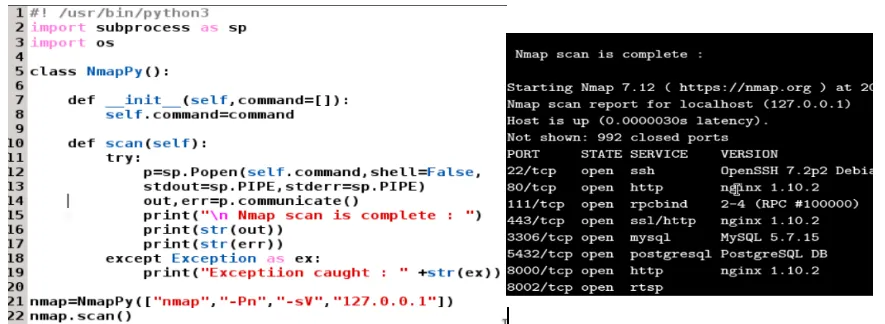
Controlling the Nmap output with the script
Nmap=NmapPy(["Nmap","-Pn","-sV","-oX","-","127.0.0.1"])
Nmap.scan()
Using the Nmap module to conduct Nmap port scanning
pip install Nmap
import Nmap # import Nmap.py module
 Nmap_obj = Nmap.PortScanner() # instantiate Nmap.PortScanner object
 Nmap_obj.scan('192.168.0.143', '1-1024') # scan host 192.1680.143, ports from 1-1024
 Nmap_obj.command_line() # get command line used for the scan : Nmap -oX - -p 1-1024 192.1680.143
 Nmap_obj.scaninfo() # get Nmap scan informations {'tcp': {'services': '1-1024', 'method': 'connect'}}
 Nmap_obj.all_hosts() # get all hosts that were scanned
 Nmap_obj['192.1680.143'].hostname() # get one hostname for host 192.1680.143, usualy the user record
 Nmap_obj['192.1680.143'].hostnames() # get list of hostnames for host 192.1680.143 as a list of dict
 # [{'name':'hostname1', 'type':'PTR'}, {'name':'hostname2', 'type':'user'}]
 Nmap_obj['192.1680.143'].hostname() # get hostname for host 192.1680.143
 Nmap_obj['192.1680.143'].state() # get state of host 192.1680.143 (up|down|unknown|skipped)
 Nmap_obj['192.1680.143'].all_protocols() # get all scanned protocols ['tcp', 'udp'] in (ip|tcp|udp|sctp)
 Nmap_obj['192.1680.143']['tcp'].keys() # get all ports for tcp protocol
 Nmap_obj['192.1680.143'].all_tcp() # get all ports for tcp protocol (sorted version)
 Nmap_obj['192.1680.143'].all_udp() # get all ports for udp protocol (sorted version)
 Nmap_obj['192.1680.143'].all_ip() # get all ports for ip protocol (sorted version)
 Nmap_obj['192.1680.143'].all_sctp() # get all ports for sctp protocol (sorted version)
 Nmap_obj['192.1680.143'].has_tcp(22) # is there any information for port 22/tcp on host 192.1680.143
 Nmap_obj['192.1680.143']['tcp'][22] # get infos about port 22 in tcp on host 192.1680.143
 Nmap_obj['192.1680.143'].tcp(22) # get infos about port 22 in tcp on host 192.1680.143
 Nmap_obj['192.1680.143']['tcp'][22]['state'] # get state of port 22/tcp on host 192.1680.143