For the first time, the more than 900 photomicrographs are available digitally in an interactive atlas on CD, offering images available for download with zoom capability. The new edition of this veterinary-specific histology atlas provides veterinary and veterinary technician students with an essential pictorial resource for interpreting histologic preparations.
- English
- ePUB (mobile friendly)
- Available on iOS & Android
eBook - ePub
Color Atlas of Veterinary Histology
About this book
Designed to provide students with a foundation in understanding and interpreting histologic and cytologic preparations, Color Atlas of Veterinary Histology is a practical benchside reference focusing on the normal histology of eight common domestic species. This Third Edition has been revised with new images, information, and updated terminology throughout. Introductory chapters have also been expanded to offer more complete coverage of the basic types of tissues, providing an even more thorough grounding in the principles of histology.
Trusted by 375,005 students
Access to over 1.5 million titles for a fair monthly price.
Study more efficiently using our study tools.
Information
1
GENERAL PRINCIPLES OF HISTOLOGY
PREPARATION OF HISTOLOGIC SECTIONS
A histologic section is a thin slice of tissue, varying, usually, from 0.5 to 10 or more micrometers (µ) thick. In preparing such a section, a piece of tissue is either infiltrated with a supporting medium or frozen and is then cut with an instrument called a microtome. Sections obtained from tissue infiltrated with plastic can be as thin as 0.5 µ and show superior detail. Excellent preparations as thin as 2 or 3 µ also can be made from tissue infiltrated with paraffin-based embedding media. Sections are affixed to microscope slides and colored with one or more stains to increase the visibility of various cellular and intercellular components.
Schematically, Figure 1.1 outlines various steps involved in producing a stained histologic slide using the paraffin procedure. After being removed from an animal, a tissue or organ is cut into pieces. These pieces are placed into a fixative such as buffered formalin or Bouin’s, which, ideally, preserves normal morphology and facilitates further processing. After fixation, the specimen is dehydrated by transferring it through a series of alcohols of increasing concentrations to 100% alcohol. Next, it is placed into a substance such as xylene or xylene substitute, which is miscible with both 100% alcohol and paraffin. This intermediate step (called clearing) is essential before infiltrating the dehydrated tissue with paraffin because alcohol and paraffin do not mix. During infiltration, melted paraffin completely replaces the xylene. This procedure is done in an oven at a temperature just above the melting point of the paraffin. When infiltration is complete, the specimen is transferred to an embedding mold of fresh paraffin, which is allowed to harden. Then the mold is removed and excess paraffin is trimmed away.
Figure 1.1. The various steps involved in producing a histologic slide using the paraffin method.
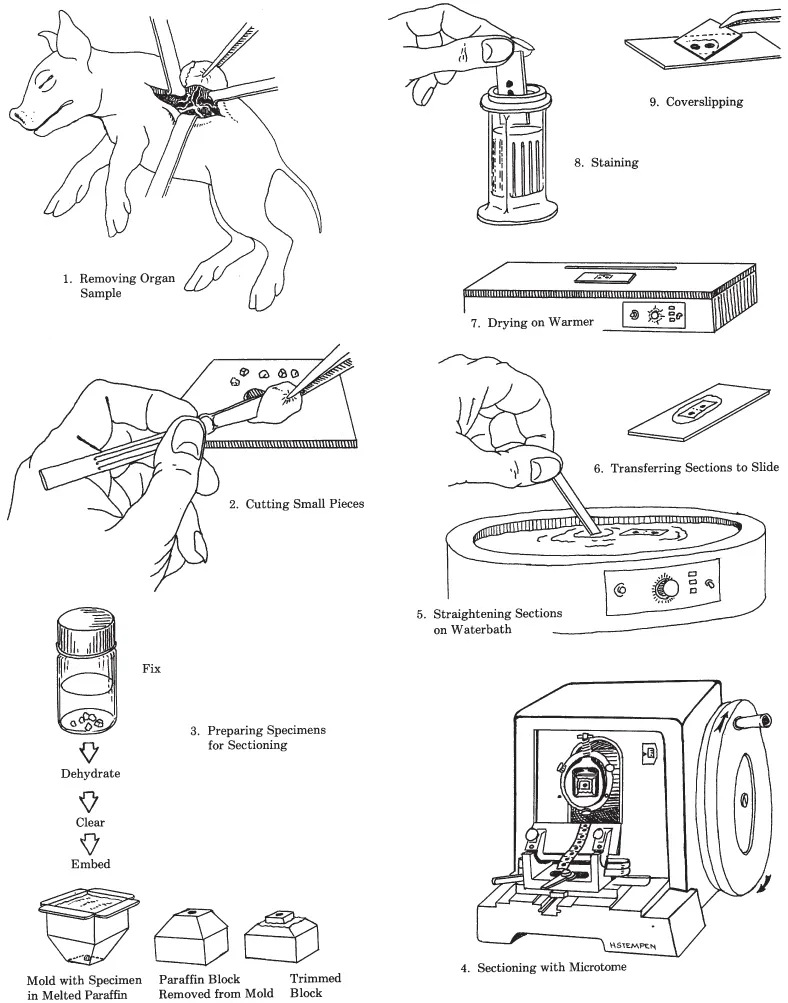
The block of paraffin is then secured to the microtome and oriented appropriately with respect to the knife. With each revolution of the microtome handle, the specimen moves through the blade and a section of the desired thickness is produced. Each successive section adheres to the preceding one, forming a continuous ribbon. Subsequently, one or more sections are carefully separated from the ribbon and transferred to the surface of warm water in a waterbath. This softens the paraffin and flattens the section, eliminating wrinkles. The flattened section is floated onto a slide, which is then placed on a warming table. As the preparation dries, the section adheres to the surface of the slide.
Next, the paraffin is removed with xylene or another appropriate solvent and the specimen is rehydrated. It is then stained, dehydrated, cleared (made transparent) with xylene, covered with a resinous mounting medium, and topped with a cover-slip.
Various stains are available to the histologist. Hematoxylin and eosin (H&E) is a frequently used combination of stains. Hematoxylin imparts a purple color to substances, but must be linked to a metallic salt called a mordant before it can function effectively. This combination, called a lake, carries a positive charge and behaves as a basic (cationic) stain. The lake combines electrostatically with negatively charged radicals such as phosphate groups of nucleoproteins. Substances that become colored by a basic stain are said to be basophilic. Methylene blue, toluidine blue, and basic fuchsin are basic stains. Unlike hematoxylin, these stains have molecules that carry a positive charge of their own and do not require a mordant. Acidic (anionic) stains carry a negative charge and color cell or tissue components that bear positive charges. Eosin is an acid stain. It imparts an orange or red color to acidophilic substances. Other commonly used acid stains are orange G, phloxine, and aniline blue.
In addition to the widely used H&E staining procedure, numerous other stain combinations and techniques are available. Some are especially useful for identifying certain tissue elements. For example, trichrome procedures such as Mallory’s and Masson’s specifically stain collagenous fibers within connective tissue. Orcein and Weigert’s resorcin fuchsin are stains used to color elastic fibers, providing a means of distinguishing them from other fibrous elements. Reticular fibers and nervous tissue components such as neurons, myelin, and cells of the neuroglia can be stained by procedures employing the use of silver. There are also special histochemical and immunohistochemical procedures that make possible the localization of various carbohydrates, lipids, and proteins found in tissue. Lastly, stains such as Wright’s and Giemsa’s (Romanovsky stains) are available for differentiating the various cells found in blood and bone marrow.
INTERPRETING SECTIONS
One must know the gross structure of an organ before a histologic section from it can be comprehended. It is also helpful to know how the section was cut, that is, whether it was a cross section (x.s.), a longitudinal section (l.s.), or an oblique slice through the organ. Was the cut made through the entire organ or only through a portion of it? Frequently, prepared slides are labeled indicating the particular orientation of the section. This is not important in an asymmetric organ such as the spleen or liver because their appearance would be unaffected by the direction of the cut. Conversely, the small intestine is radially symmetric and its appearance is affected by the direction of the cut.
The three-dimensional structure of organs and their components also must be considered when examining a histologic preparation. Cells are three-dimensional objects differing in size and shape. For example, some are long and thin, some cuboidal, and others ovoid. They may have a random or specific arrangement within an organ. How they appear depends on their shape as well as how they were cut. Imagine how the spindle-shaped and tall columnar cells shown in Figure 1.2A would look if sectioned in various planes. Note that the nucleus may or may not be included in a particular cut through a cell.
Figure 1.2. A. Slices, indicated by numbered planes, taken through two different types of cells would appear as identified by the prime numbers. Only if the plane of the cut passes through the nucleus will the latter be seen. B and C. Planes of section taken from different levels in four separate multicellular objects are illustrated. Note how the appearance of sections varies with the level of the cut.
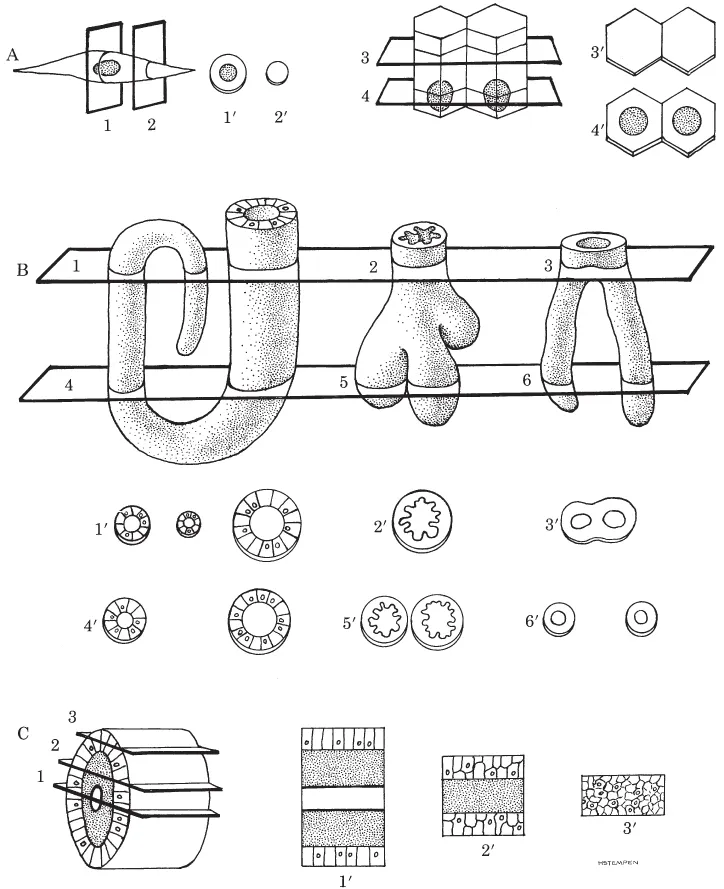
The histologist examines multicellular structures having a wide variety of shapes. Some are hollow, some branch repeatedly, some open onto surfaces, etc. Figure 1.2, B and C, and Figure 1.3 show a variety of three-dimensional structures and how they would appear if cut at different levels. Examine these carefully. They will help you to understand situations you will encounter on actual slides.
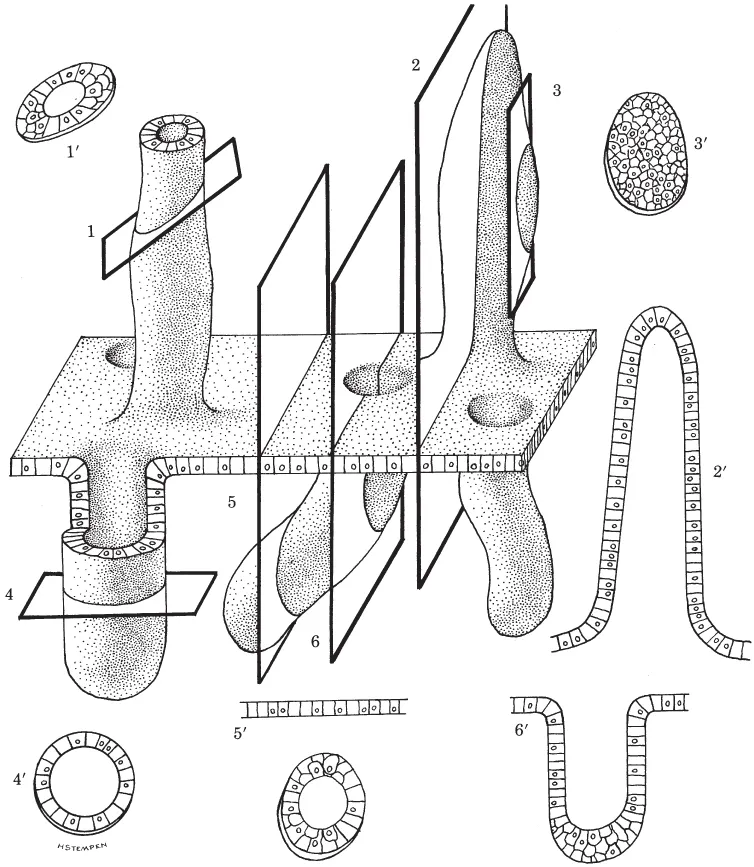
Figure 1.3. The prime numbers illustrate sections resulting from transverse (4), oblique (1), and longitudinal (2, 3, 5, 6) cuts made through a plate of cells bearing hollow projections (above plate) and invaginations (below plate). Plane 3 differs from the others because it passes only through the cellular wall of a projection, and not the lumen; therefore, section 3′ appears as a plate of cells rather than a hollow structure. You should also be aware that structures may often appear unrelated to a surface or another object, when in fact they are. Compare planes 5 and 6 with sections 5′ and 6′, where continuity of the invagination with the surface is evident only in 6 and 6′. While not apparent from a single section, such continuity would be evident if an uninterrupted series of sections through the entire invagination were made and examined.
HELPFUL HINTS
Be sure that the lenses of your microscope are clean before you begin examining slides. Use a piece of lens paper or a soft, clean cloth such as an old (but clean) linen handkerchief. If the lenses have been coated with oil or another substance, remove it using lens tissue moistened sparingly with a glass cleaner such as Windex. Slides also should be cleaned using a soft, lint-free cloth or tissue moistened with glass cleaner.
Every microscope should have a pointer in the ocular. This is usually supplied by the manufacturer, but can be made from a short piece of hair. The latter is cemented into place inside the ocular with a dab of quick-drying glue or nail polish. Without a pointer, it is not possible to accurately indicate an object in the microscope field for another observer.
Before beginning a session at the microscope, make sure that the fine-adjustment knob is near the middle of its range of rotation. If you do not, you may find that the knob is at the limit of its excursion when you are busily making observations. At that point, you must stop everything and correct it.
It is also a good habit to examine your slide with the unaided eye before placing it on the stage of your microscope. By doing so you will gain information about the gross aspects of the specimen and be more likely to center it properly over the light source. Centering is especially important for small specimens that might otherwise be difficult to locate. Also, make sure that you put the slide on the stage with the cover glass uppermost. If the slide is upside down, you will not be able to focus on it with the high-power lenses. Do not snicker. We have seen this happen often in the teaching laboratory!
It is always a good idea to start your observations using the lowest power objective available on your microscope. This is usually the 4x lens. The field of view...
Table of contents
- Cover
- Companion CD-ROM
- Title page
- Copyright page
- DEDICATION
- PREFACE TO THE THIRD EDITION
- PREFACE TO THE SECOND EDITION
- PREFACE TO THE FIRST EDITION
- ACKNOWLEDGMENTS FROM THE FIRST EDITION
- 1 GENERAL PRINCIPLES OF HISTOLOGY
- 2 EPITHELIUM
- 3 CONNECTIVE TISSUE PROPER AND EMBRYONIC CONNECTIVE TISSUE
- 4 CARTILAGE
- 5 BONE TISSUE
- 6 BLOOD
- 7 BONE MARROW
- 8 MUSCLE TISSUE
- 9 NERVOUS SYSTEM
- 10 CARDIOVASCULAR SYSTEM
- 11 LYMPHATIC SYSTEM
- 12 INTEGUMENT
- 13 DIGESTIVE SYSTEM
- 14 URINARY SYSTEM
- 15 RESPIRATORY SYSTEM
- 16 ENDOCRINE SYSTEM
- 17 MALE REPRODUCTIVE SYSTEM
- 18 FEMALE REPRODUCTIVE SYSTEM
- 19 THE EYE
- 20 THE EAR
- GLOSSARY
- BIBLIOGRAPHY
- Index
Frequently asked questions
Yes, you can cancel anytime from the Subscription tab in your account settings on the Perlego website. Your subscription will stay active until the end of your current billing period. Learn how to cancel your subscription
No, books cannot be downloaded as external files, such as PDFs, for use outside of Perlego. However, you can download books within the Perlego app for offline reading on mobile or tablet. Learn how to download books offline
Perlego offers two plans: Essential and Complete
- Essential is ideal for learners and professionals who enjoy exploring a wide range of subjects. Access the Essential Library with 800,000+ trusted titles and best-sellers across business, personal growth, and the humanities. Includes unlimited reading time and Standard Read Aloud voice.
- Complete: Perfect for advanced learners and researchers needing full, unrestricted access. Unlock 1.5M+ books across hundreds of subjects, including academic and specialized titles. The Complete Plan also includes advanced features like Premium Read Aloud and Research Assistant.
We are an online textbook subscription service, where you can get access to an entire online library for less than the price of a single book per month. With over 1.5 million books across 990+ topics, we’ve got you covered! Learn about our mission
Look out for the read-aloud symbol on your next book to see if you can listen to it. The read-aloud tool reads text aloud for you, highlighting the text as it is being read. You can pause it, speed it up and slow it down. Learn more about Read Aloud
Yes! You can use the Perlego app on both iOS and Android devices to read anytime, anywhere — even offline. Perfect for commutes or when you’re on the go.
Please note we cannot support devices running on iOS 13 and Android 7 or earlier. Learn more about using the app
Please note we cannot support devices running on iOS 13 and Android 7 or earlier. Learn more about using the app
Yes, you can access Color Atlas of Veterinary Histology by William J. Bacha Jr.,Linda M. Bacha in PDF and/or ePUB format, as well as other popular books in Medicine & Veterinary Medicine. We have over 1.5 million books available in our catalogue for you to explore.