eBook - ePub
Drawing and Rendering for Theatre
A Practical Course for Scenic, Costume, and Lighting Designers
- 288 pages
- English
- ePUB (mobile friendly)
- Available on iOS & Android
eBook - ePub
Drawing and Rendering for Theatre
A Practical Course for Scenic, Costume, and Lighting Designers
About this book
Drawing and Rendering for Theatre, A Practical Course for Scenic, Costume, and Lighting Designers is designed for those of you who are theatrical designers and want to improve your drawing and rendering skills.
This gorgeous full-color book includes many examples of student drawings, analyzed and critiqued for areas that need improvement. It also includes numerous examples of design renderings by professional theatrical designers. In addition to the general sections on drawing and painting, it includes separate chapters on costume, scenic, and lighting rendering that include information specific to these design areas.
Trusted by 375,005 students
Access to over 1.5 million titles for a fair monthly price.
Study more efficiently using our study tools.
Information
Chapter 1
The Benchmark Drawing
This chapter begins with an exercise designed to measure one’s existing drawing skills. Follow the instructions outlined in this chapter for setting up and completing the exercise, without reading ahead, so that your drawing is an accurate reflection of your current skills. The purpose of this exercise is to create a drawing that will be an assessment tool and a point of reference for later evaluation of your progress as you work through this book. After you have completed your benchmark drawing, this chapter will discuss typical behavior and results particular to the beginning, intermediate, and advanced student. As part of this discussion, procedures are outlined for analyzing one’s own drawing for specific areas that need improvement.
SETTING UP THE STILL LIFE
Set up a simple still life on a table. Cover a small cardboard box with a piece of dark colored fabric large enough so the fabric drapes in folds over the box and onto the table in front of the box. Choose several (four or five) recognizable objects for your still life. One should be a small bust of a human head or torso. The other objects can be anything—a book, a teapot, a cup and saucer, or a wine glass are classics—but choose objects that are smooth in texture and light in value. Arrange the objects on the fabric on top of and in front of the box. If possible, arrange the still life in front of a blank wall so that you can focus on the objects without background distractions. If you do not have a blank wall available, create a backdrop for your still life with a large piece of illustration board or similar material. Arrange the lighting so there is a strong top side light on the still life.
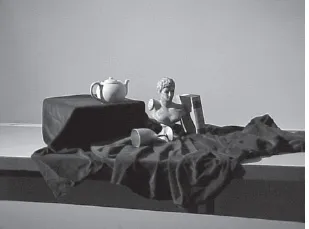
Figure 1.1 Sample still life setup for benchmark drawing.
DRAWING THE STILL LIFE
Find a position where you have an unobstructed view of the arrangement. Assume a drawing position that you feel comfortable with, either standing or sitting. Using a number two pencil and a piece of drawing paper at least as large as 11 × 14″, sketch the still life. It may be helpful to tape the paper to the table. Your primary goal in this exercise is to faithfully record what you see. Draw continuously for one hour and then stop regardless of how complete the drawing is. Date and save this drawing. This is your starting point and a point of reference for measuring your future progress.
Analysis
After reading this section, you will be able to critically examine your own drawing for specific areas of improvement. This section is broken down into three categories: the beginning, intermediate, and advanced level student. Read all three of these sections first to determine which seems most appropriate for your own current level of skill. For each skill level, one or two sample student drawings of the previously depicted still life are discussed. Use these samples to determine your skill level. Keep in mind that these are not necessarily discrete categories; for example, even if you primarily identify yourself as an intermediate student, there may also be information in the beginning or advanced sections that will be of help.
BEGINNING LEVEL
For the person who draws infrequently or who otherwise has little experience with sketching, the benchmark still life exercise is particularly important, although it can be a frustrating experience. You may have a tendency toward viewing your work as unfavorable compared with the work of others. It is important to keep in mind that this exercise is not a competition. You will progress at your own pace from your own starting place. It is not helpful to compare either your benchmark sketch or rate of progress with other students (other than to assess your current skill level), since your starting place and progress rate will be unique to you. Some will improve dramatically at the onset and then hit a plateau at which it seems no progress is discernable for quite some time. Others will be thwarted by what seems like no forward movement at first and then, suddenly, see a dramatic leap in drawing facility. Some may even think for a while that their skills have deteriorated. Consider that as long as you continue to practice drawing, your ability will develop, but that the rate of progress is not always incrementally constant.
General Description of the Beginning Student
If you are a typical beginning level student, it is likely that you rarely, if ever, draw as a part of your everyday life. Some of the possible markers of the novice might include one or more of the following: (1) you do not yet have, or have forgotten, in-depth knowledge of basic drawing techniques and conventions; (2) you may need practice in eye–hand coordination; (3) you may find every attempt at drawing to be challenging; (4) while doing your benchmark drawing, you were not sure how to begin the drawing, what size it should be, how to place it on the page, or how to finish in the time allotted; and/or (5) the most frustrating of all and yet most common, you could see with your eyes exactly what you wanted to commit to paper, but could not command your hand to create the correct shapes. Not surprisingly perhaps, almost all beginning students tend to have some or all of these same difficulties and frustrations. However, identifying behavior that leads to unsuccessful results is the first step in improving one’s skills.
Assessing Your Experience with the Benchmark Exercise: Beginning Student Behavior
In the completion of the benchmark drawing, there tends to be a standard set of behaviors that typifies the beginning, intermediate, or advanced student. If you are a beginning student, the following list suggests several possible things you did while you were drawing the benchmark exercise. Some are contradictory. To begin the assessment of your skill level, recall your experience while you were completing the exercise to determine if you identify with any of the following behavioral traits.
• It took you a long time to get started with the drawing because you were not sure of what to draw first. As a result, you did not get to finish to the extent you had intended.
• You found yourself erasing and re-drawing nearly every line.
• You started over on a new sheet of paper several times.
• You stopped drawing before the hour was up either because you were frustrated with the results, or you did not know what else to add to the drawing.
• During the exercise, you mostly concentrated on your drawing and looked briefly at the still life only occasionally to keep yourself on track.
• While you were drawing you held your pencil the same way as when you write.
Take note of any of the previous descriptions and see if you identify with any of them. In the next chapter, you will learn techniques that assist you in overcoming some of these obstacles while developing good productive drawing habits.
Although it is helpful to look at your behaviors and routines in completing the benchmark drawing, ultimately the drawing will be used to designate your initial skill level. We will now examine some typical beginning-level benchmark drawings.
Examining the Benchmark Drawing: The Beginning Level
The following is a list of typical descriptions of beginning level drawings. They are grouped into categories, each of which is discussed at length in subsequent chapters. As you read the list, refer to your benchmark drawing to determine which descriptions pertain to your effort.
Drawing What You See
• The objects you drew are identifiable, but do not look like the actual objects in the still life; rather, they appear to be generic representations of the types of objects in the still life.
• The contours of objects are not accurately drawn. For example, perhaps the opposite sides of objects are not as symmetrical as they are in real life, or one part of an object appears too large or too small.
If either of these are descriptive of your drawing, you are, to some degree, relying on your memory of what everyday objects look like, and drawing a symbol provided by your brain rather than what you are actually seeing. It will be helpful for you to refer to the section Stored Visual Memories in Chapter 2.
Perspective
• The objects you drew are not in proportion to each other. For example, the wine glass appears to be greatly oversized compared with the teapot.
• The objects look flat, not three-dimensional as if they are receding in space.
• All of the objects appear to be on the same plane in the foreground of the drawing.
• Some objects that you drew appear to be falling over and/or the plane of the tabletop appears to be tilted upward.
There are certain perspective drawing techniques that fool the eye into believing that objects drawn on a flat piece of paper appear to be three-dimensional. For example, according to the rules of perspective, to make a true circle look as if it is receding in space it must be drawn as an ellipse, or oval. Also, all verticals are true verticals but horizontal lines recede to a vanishing point on the horizon. To learn more about the rules of perspective, refer to Chapter 4.
Three-Dimensional Modeling
• The objects you drew were each uniformly dark or light in value.
• It is difficult to determine from your drawing where the light source is located.
• All the objects in your drawing have a uniform outline, such as in a graphic illustration.
The ability to reproduce the naturalistic play of light and shadow on objects in your drawing is one of the crucial elements of realistic drawing.
Each object in your drawing should have an area that is shaded dark and a corresponding lighter area opposite. For more about this technique, refer to Chapter 5.
Composition
• The drawing appears to be too small in comparison with the size of the paper and is randomly placed on the paper.
• The drawing is too big for the paper and important parts of the still life are cut off at the edges of the paper.
You may not be aware that you always draw in the same scale. Every time you draw the same type of object—for example, a human head—it is always the same size, within a fraction of an inch. Become familiar with your default scale and place your drawing on the paper accordingly. Keep in mind, the way you place your drawing on the paper has an emotional effect on the viewer. This choice of placement should become a conscious decision every time you create a drawing. For more information on drawing placement and composition, refer to Chapter 3.
Figure 1.2 is a beginning student’s benchmark drawing. The artist opted to draw only one of the objects in the still life, and the effort does not appear to represent an hour’s worth of drawing. He was probably overwhelmed by the complexity of the arrangement and restarted on a new piece of paper several times, but each time was dissatisfied with the product. Perhaps he was intimidated by the features of the bust and foreshortened handle of the teapot, but felt more confident drawing the shape of the wineglass. The composition is awkward with the glass base nearly touching the top edge of the paper.

Figure 1.2 Sample 1 of a beginning st...
Table of contents
- Cover
- Halftitle
- Title
- Copyright
- Contents
- Introduction
- Chapter 1 The Benchmark Drawing
- Chapter 2 The Sketchbook
- Chapter 3 Composition and Elements of Design
- Chapter 4 Perspective
- Chapter 5 Three-Dimensional Modeling
- Chapter 6 Figure Drawing
- Chapter 7 Drawing Exercises
- Chapter 8 Introduction to Color
- Chapter 9 Colored Pencil
- Chapter 10 Marker
- Chapter 11 Pastels
- Chapter 12 Watercolor
- Chapter 13 Gouache
- Chapter 14 Mixed Media
- Chapter 15 Designer Rendering
- Chapter 16 Digital Drawing
- Chapter 17 Digital Drawing Exercise One: Basic Digital Drawing
- Chapter 18 Digital Drawing Exercise Two: Basic Digital Painting
- Chapter 19 Digital Drawing Exercise Three: Intermediate Painting
- Chapter 20 Digital Drawing Exercise Four: Creating a Multi-Layer Photographic Image
- Chapter 21 Digital Drawing Exercise Five: Painting an Architectural Scenic Elevation From a Line Drawing
- Chapter 22 Digital Drawing Exercise Six: Painting An Existing Digital Model Rendering
- Chapter 23 Digital Drawing Exercise Seven: Painting Light Into a Scenic Sketch
- Index
Frequently asked questions
Yes, you can cancel anytime from the Subscription tab in your account settings on the Perlego website. Your subscription will stay active until the end of your current billing period. Learn how to cancel your subscription
No, books cannot be downloaded as external files, such as PDFs, for use outside of Perlego. However, you can download books within the Perlego app for offline reading on mobile or tablet. Learn how to download books offline
Perlego offers two plans: Essential and Complete
- Essential is ideal for learners and professionals who enjoy exploring a wide range of subjects. Access the Essential Library with 800,000+ trusted titles and best-sellers across business, personal growth, and the humanities. Includes unlimited reading time and Standard Read Aloud voice.
- Complete: Perfect for advanced learners and researchers needing full, unrestricted access. Unlock 1.5M+ books across hundreds of subjects, including academic and specialized titles. The Complete Plan also includes advanced features like Premium Read Aloud and Research Assistant.
We are an online textbook subscription service, where you can get access to an entire online library for less than the price of a single book per month. With over 1.5 million books across 990+ topics, we’ve got you covered! Learn about our mission
Look out for the read-aloud symbol on your next book to see if you can listen to it. The read-aloud tool reads text aloud for you, highlighting the text as it is being read. You can pause it, speed it up and slow it down. Learn more about Read Aloud
Yes! You can use the Perlego app on both iOS and Android devices to read anytime, anywhere — even offline. Perfect for commutes or when you’re on the go.
Please note we cannot support devices running on iOS 13 and Android 7 or earlier. Learn more about using the app
Please note we cannot support devices running on iOS 13 and Android 7 or earlier. Learn more about using the app
Yes, you can access Drawing and Rendering for Theatre by Clare Rowe,Clare P. Rowe in PDF and/or ePUB format, as well as other popular books in Media & Performing Arts & Theatre. We have over 1.5 million books available in our catalogue for you to explore.