Successful virtual reality (VR) applications put the player into a believable place and allow them to explore and interact with objects in the environment. In this chapter, we'll explore the creation of an interactive space and introduce some new development topics, including level design, 3D modeling, and data management, to implement an interactive space you can experience in VR. The scene is a photo art gallery where you can showcase your own photos. We'll design a simple floor plan that your visitors can move around via teleportation.
You will learn how to use ProBuilder, Unity's built-in level design package, to create an architectural space, including extruding shapes to make walls, doors, and windows. You will also learn about data management using lists, data structures, and scriptable objects. In addition, you will gain more experience with lighting, materials, interaction, and teleportation components. By the end of the chapter, you'll have built a completed interactive art gallery where your visitors can explore your favorite images.
In this chapter, we are going to discuss the following topics:
- Using ProBuilder in Unity to construct a simplistic art gallery building
- Interacting with objects and metadata
- Data structures, lists, and scriptable objects
- Using teleportation
Technical requirements
To implement the projects and exercises in this chapter, you will need the following:
- A PC or Mac with Unity 2019.4 LTS or later, an XR plugin for your device, and the XR interaction toolkit package installed
- A VR headset supported by the Unity XR platform
You can access or clone the GitHub repository for this book (https://github.com/PacktPublishing/Unity-2020-Virtual-Reality-Projects-3rd-Edition-) to optionally use assets and completed projects for this chapter, as follows:
- Asset files for you to use in this chapter are located in UVRP3Files/Chapter-10-Files.zip.
- All completed projects in this book can be found in a single Unity project atUVRP3Projects.
- The completed assets and scenes for this chapter can be found in theUVRP3Projects/Assets/_UVRP3Assets/Chapter10/folder.
Using ProBuilder and ProGrids
For this project, we're going to design an interactive art gallery. We just need a simple, small art gallery exhibit room, about 24 x 36 feet. The room is so simple, in fact, that it could easily be built within Unity using 3D cube primitives, but we'll take this opportunity to introduce you to the ProBuilder package included with Unity. If you prefer, you can skip this section and build the floor and walls using Unity cubes. Or, you could use the GalleryBuilding.obj file provided in the files for this chapter.
ProBuilder is a package of tools that allow you to build, edit, and texture geometry within Unity. It's intended to be used for in-scene level design, prototyping, and playtesting. In this project, we'll use ProBuilder just enough to get you started, along with the tools of its companion, ProGrids. Keep in mind that there's a lot more to it than will be covered in this chapter. For more information on ProBuilder, ProGrids, and Polybrush (introduced in Chapter 4, Using Gaze-Based Control), also check out the documentation and tutorials, including the following:
- ProBuilder package documentation— https://docs.unity3d.com/Packages/com.unity.probuilder@latest/manual/overview.html
- Unity at GDC—Rapid worldbuilding with ProBuilder video (March 29, 2018)—https://www.youtube.com/watch?v=7k-81UEluyg
- Unity Blog—ProBuilder joins Unity offering integrated in-editor Advanced Level Design (February 15, 2018)—https://blogs.unity3d.com/2018/02/15/probuilder-joins-unity-offering-integrated-in-editor-advanced-level-design/
In this project, we will limit our use to a few ProBuilder features, including creating shapes, extruding and moving faces, creating and bridging edges, and snapping to a grid. The first step is to install the ProBuilder and ProGrids packages using the following steps:
- Open the Package Manager window by selecting Window | Package Manager.
- Ensure the filter dropdown in the upper-left corner of the window is set to All.
- Locate the package by typing Pro in the search field.
- Install ProBuilder by selecting ProBuilder from the list of packages, and then click Install.
- Also, install the Samples package for your render pipeline. Assuming you're using Universal Render Pipeline (URP) in this project, on the Universal Render Pipeline Support item, click Import into Project.
- Install ProGrids by selecting ProGrids from the list of packages, and then click Install.
Before using the tools for our project, let's take a quick tour of the editor interface for ProGrids and ProBuilder.
Using the ProGrids editor interface
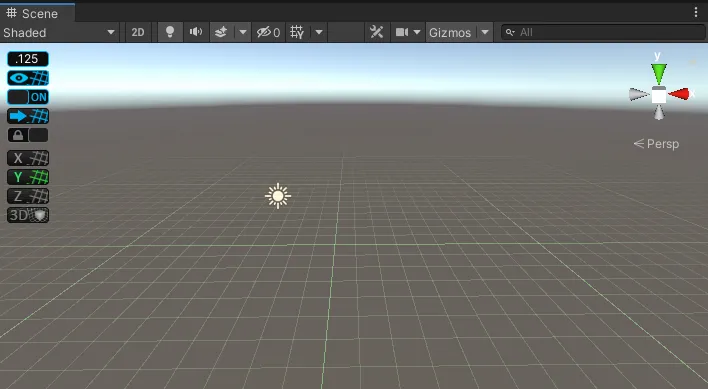
Back in Chapter 2, Understanding Unity, Content, and Scale, I introduced the Unity Scene editor window, including the use of its built-in grid-snapping tools. ProGrids is an advanced version of this feature available in a separate package. Once installed (as per the preceding instructions), open the ProGrids window using Tools | ProGrids | ProGrids Window, and a new toolbar is added to the Scene window, on the left-hand side of the window, as shown in the following screenshot:
These ProGrids interface icons, from top to bottom, perform the following functions:
- Snap Size—sets the size of the grid's snapping increment (default: 0.125 meters)
- Grid Visibility—toggles show/hide gridlines in the Scene view
- Snapping Enabled—switches on/off the snap-to-grid behavior
- Push to Grid—snaps all selected objects to the grid
- Lock Grid—locks the perspective grid in place
- Set Grid Planes—lets you choose to display grids for a single axis (X, Y, Z), or all three at once (3D).
Grid snapping operates on the transform of the objec...