![]()
APPENDIX 1
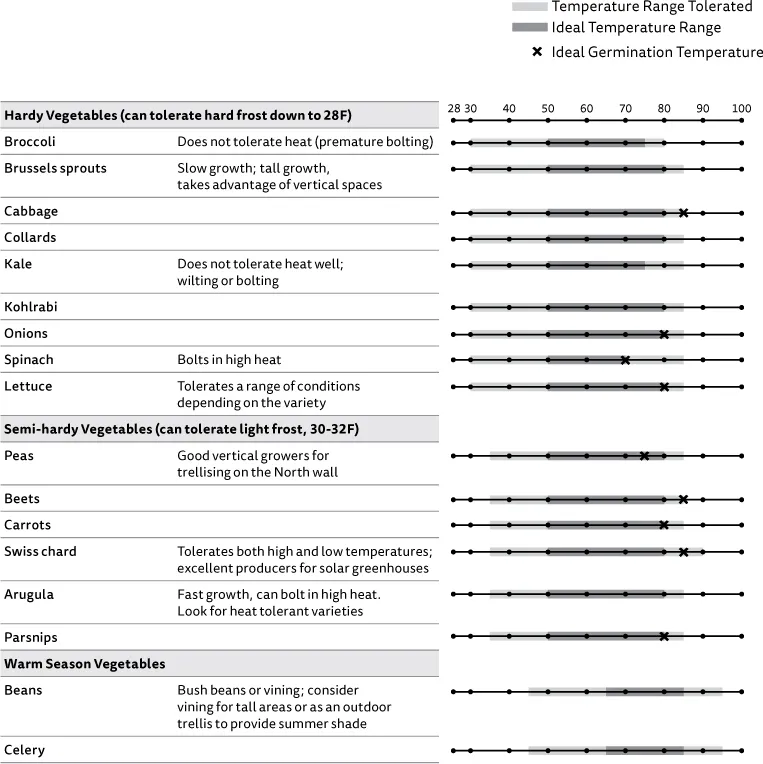
Temperature Ranges of Common Greenhouse Crops
![]()
APPENDIX 2
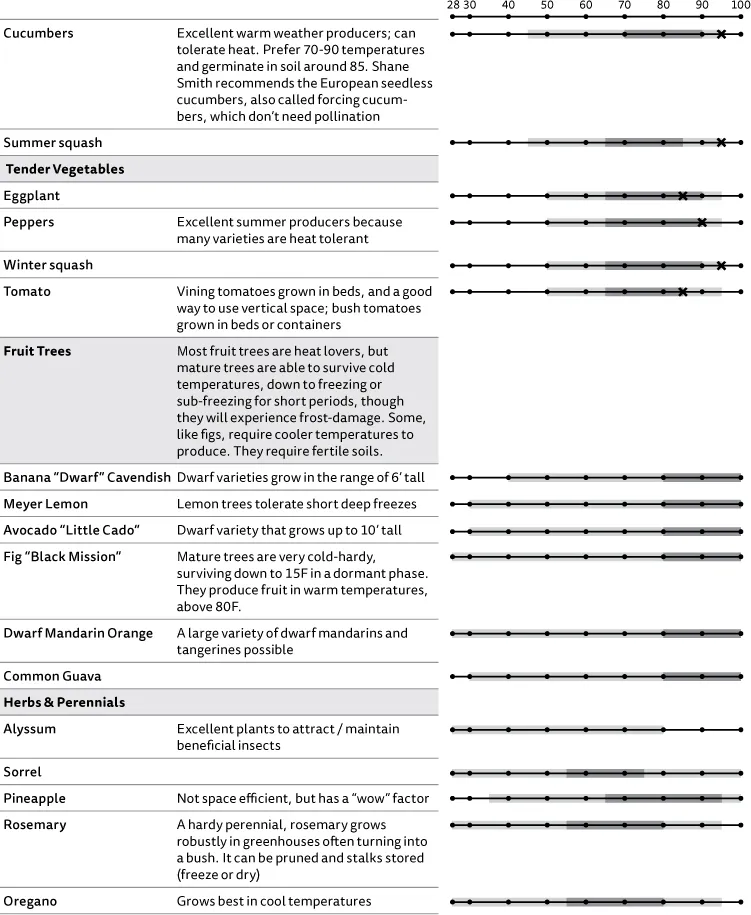
Optimizing Glazing Angles
This simple process identifies the angle of glazing (in either the walls or roof) that will maximize light transmission for a particular time of year. You can also find the range of angles that will allow for sufficient light transmission, taking into account that multiple angles yield nearly equivalent light transmission levels (per discussion in Chapter 5, “Calculating the Angle of Glazing”).
First, determine the angle of the sun during the season you want to grow. Ideally, this would be the average angle over the whole season. For instance, you may aim to maximize heat and light during the winter, rather than at winter solstice specifically. You can find the average solar altitude angle for a season by using online tools such as suncalc.org, or see the sidebar in Chapter 4, “Tools for Siting the Greenhouse.” Here we’ll use an example angle of 30 to indicate the average angle during the winter season at our greenhouse site.
1. First draw your ground plane and sketch the angle of the sun.
2. Draw a line (#1) at a right angle to the angle of the sun. This is your “perfect roof pitch,” the perpendicular plane that would receive the maximum light transmission — although it’s one that would probably be difficult to build. Keep in mind that this is a representation of a 0-degree angle of incidence, or “normal.”
3. Now, draw a second line (#2) 45 degrees from line #1. This represents how far the angle of incidence can deviate from the ideal and yet still yield sufficient light levels; this can be much more practical to build. (It is based on the fact that up to an angle of incidence of 45 degrees, there is little change in light transmission, as shown in Fig. 5.9.) Keep in mind that building to line #2 reduces the area that receives incident solar radiation (the view window) during the winter, so you would want to augment with enough vertical or near-vertical glazing on the walls of the greenhouse. Anywhere between line #1 and line #2 should be a suitable roof slope to ensure enough light during the winter.
4. Finally, you can calculate for the angle of the glazing relative to the ground simply by knowing that all the angles shown add up to 180 degrees. Since three of them are given, simply subtract the sum of the three from 180. In this case the result is 15 degrees for the minimum glazing angle, also considered the roof slope.
![]()
APPENDIX 3
Supplemental Lighting
The most common supplemental lights used for greenhouse growing — called “lamps” — are: fluorescents; HIDs (high intensity discharge); and LEDs (light-emitting diodes). They vary according to their light quality (the wavelengths they produce); light intensity (usually rated in Ft-candles); efficiency (how much light the lamp produces for every unit of energy it consumes in watts); lifespan; and upfront cost. A brief overview of each is given here.
The best use of supplemental lighting is for extending the photoperiod for plants in the winter months. Turning lamps on for a few hours in the evening gives plants a boost of light while still taking advantage of free sunlight as much as possible.
The type of lighting and the duration you use your lights depends on what you are growing. We recommend only using lights if necessary for a few (2–5) hours at the end of the day to extend the photoperiod in the winter. Many growers only use lights for starts because the lamps can be conveniently placed directly over them.
Compact Fluorescents
Compact fluorescents (CFLs) are the bulbs we typically use in our homes. As grow lights, they are typically called T5s. The T stands for tubular — they are long skinny bulbs — and the number represents the diameter of the tube. Thus, as the number increases, so does bulb size. T5s are the latest and most efficient of the fluorescent bulbs (the previous versions being T8s and T12s).
The primary advantage of fluorescents is that they are have a low upfront cost and are widely available. However, they typically have lower light intensities and lower efficiencies than other types of lighting. That makes them ok for home growers who just want to supplement some light, but they’re not viable for most commercial growers. Other downsides are the light fixtures that house them; these tend to be large, casting unwanted shade during the day in a greenhouse. This is why many growers use them only to start plants. Starts need lower light intensities and the fixtures (which also don’t produce as much heat as other types) can be placed very close to them. Finally, the bulbs decline in efficiency after a few months or a year of use, and need to be replaced, making fluorescents more expensive over the long-term.
High Intensity Discharge (HID)
As the name implies, HID lights produce very high intensities of light. They are a larger investment — typically used by commercial growers who rely on artificial lighting. HIDs can be subdivided into two categories: high pressure sodium (HPS) and metal halide. HPS lamps produce a yellow/orange light, while metal halide lights produce a broad-spectrum light (that looks bluish or white) which is less useful for photosynthesis, but easier on the eyes. For supplemental lighting, growers most commonly use HPS lamps, unless metal halide is needed (in areas meant primarily for humans to work, for example).
To put HIDs in perspective, one 400-watt HPS lamp produces the same light intensity as ten 54-watt T4 lamps. We rarely see them used by residential growers, except for certain crops that require high light levels.
HID lights come with several extra components, including a ballast to power the light, a reflector to direct light toward the plants, and a fan to reduce heat above the plants.
LEDs
Light-emitting diodes (LEDs) are the newcomers to the market. Though currently more expensive than the options above, many types offer much greater efficiencies (they use less energy to produce equivalent light intensities). There are several misconceptions about LEDs, one of which is that they are lower light intensity than HID lamps. The truth is that they can produce equivalent light intensities but typically cost much more as of this writing. Though it varies by the specific lamp type, as a category, they are more efficient than HIDs.
One drawback with LEDs is the potential for “hot-spots” — concentrations of intense light at the center of the bed. The upside is that, unlike HID lamps, they produce almost no waste heat, so there is no need for fans or vents. We recommend talking to a supplier of LEDs and requesting a lighting layout for your specific growing area. If you are trying to reduce energy consumption as much as possible in your greenhouse, evaluate the upfront cost of LEDs as well as their potential savings over the long-term. If you are considering powering the greenhouse with solar panels, this is even more important.
![]()
Index
Page numbers in italics indicate tables.
A
accessibility of site, 36–37
acrylic glazing, 50, 54
Add-On Solar Greenhouses and Sunspaces (Shapiro), 93, 154
A-frame greenhouse design, 111
agriculture. See commercial greenhouses
Agrilab Technologies, 233
air circulation, 104–105
air exchanges, 69–70, 150–153
air infiltrati...