Level up your skills with powerful texturing and lighting techniques
Advanced Maya Texturing and Lighting, Third Edition leads you through the latest advanced techniques for adding realistic detail to your models. This new edition is up-to-date with the latest Maya texturing, lighting, and rendering features, including an exploration of the Node Editor, new Maya utility nodes and expanded coverage of mental ray shaders, and render settings. The proven tutorials are culled from real-world experience and refined to give you the ultimate in practical skills. You'll learn workflow tips and tricks, the construction of custom shading networks, and the application of time-saving tools that bring your project from concept to reality. The companion website features several gigabytes of Maya scene files, texture bitmaps, and QuickTime movies that support the exercises in the book, giving you everything you need to advance your animation skillset.
This book helps you take your rendering skills to the next level with the advanced tools and techniques that take animation from good to great.
Learn the theory behind expert lighting design
Understand shadows, shading components, and texture mapping
Work with node networks, raytracing, and global illumination
Try new approaches to rendering using Maya Software and mental ray
If you're ready to take a big step forward and fine-tune your style, Advanced Maya Texturing and Lighting, Third Edition is the practical, hands-on guide you need.
Trusted by 375,005 students
Access to over 1.5 million titles for a fair monthly price.
Lighting is a cornerstone of any 3D project. Although you can easily create and position lights within a scene, an understanding of lighting theory will help you make aesthetically solid choices. The history of art and cinema is full of inspiring examples to choose from. Although 3-point lighting is a mainstay of 3D, 1-point, 2-point, and naturalistic lighting provide alternative lighting methods that better match the real world and the art traditions of the past. On the other hand, stylistic lighting can free an artist from traditional bounds and thereby place no limits on expression.
Chapter Contents
Common lighting terms
An overview of 1-, 2-, and 3-point lighting
An exploration of naturalistic and stylistic lighting
A quick review of color theory and monitor calibration
Exploring the art of lighting
Like every aspect of 3D, lighting must be created from scratch. Unfortunately, the techniques for emulating the real world are not always obvious or intuitive. Luckily, a wealth of lighting theory exists in the form of historical artwork, photography, and motion pictures.
For the sake of clarity, I’ve broken the discussion of lighting theory into the following categories: 1-point, 2-point, 3-point, naturalistic, and stylistic. The first three categories refer to the number of lights employed. The last two refer to a particular style. Before delving into 1-point lighting, however, I’ll define a few common lighting terms:
Key The most intense light in a scene. The key light’s source is generally identifiable (the sun, a lamp, and so on). The key light usually produces the strongest shadow in the scene.
Fill A secondary light that is less intense than the key. This light “fills” in the dark areas of a subject and the shadows produced by the key. Fill lights often represent light from a key that has bounced off a surface, such as a wall.
Rim An intense light source placed behind a subject that strikes the subject along the edge. Rim lights are often employed as hair lights. When a rim light strikes the side of a subject, it’s also referred to as a kicker. Note that you can refer to any light arriving from behind the subject as a backlight.
Using 1-Point Lighting
The 1-point lighting scheme is dramatic, sometimes stark, and often foreboding. The lighting involves a single, easily identifiable key light source, with no significant supplemental sources. You can find 1-point lighting in the following situations:
A man lights a cigarette in an otherwise dark alley.
A woman drives a car down a dark country road, lit only by the car’s instrument panel.
Sunbeams burst through the window of an otherwise unlit interior.
A theater audience is illuminated by the light of the movie screen (see Figure 1-1).
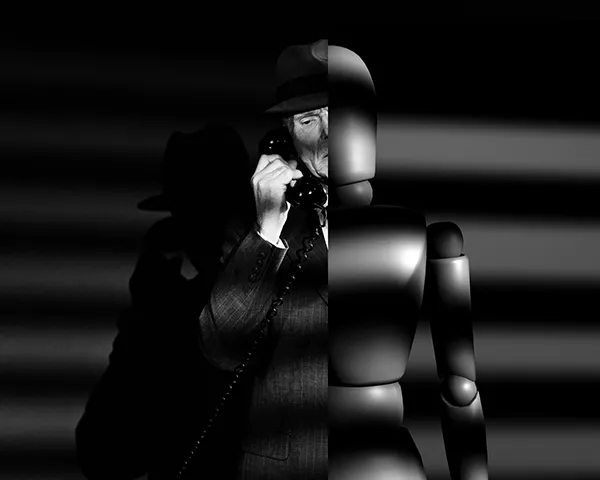
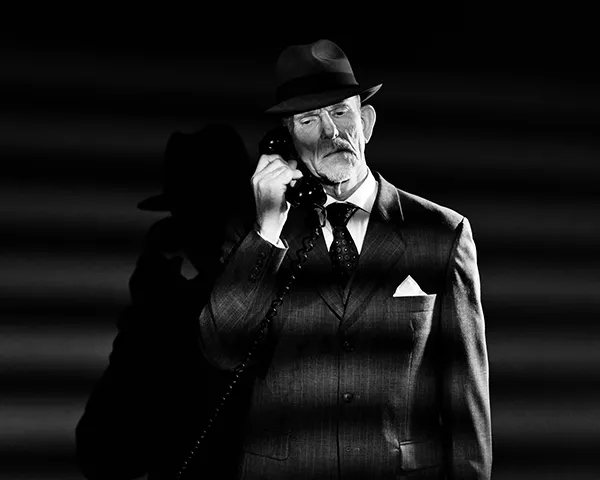
The motion picture genre that most closely emulates 1-point lighting is film noir. Film noir is a style historically associated with crime dramas of the 1940s and ’50s. The style is typified by black-and-white film stock, sparsely lit characters, and deep black shadows. Aesthetically, the lighting stemmed from stories with cynical, paranoid, or nihilistic outlooks. Technically, the stark lighting was the result of placing only a few lights on the set, in some cases because of budgetary restrictions. Although multiple lights were generally needed for any given shot for proper exposure, the result often appears as if a single light source exists. For example, in Figure 1-2 a key light strikes a man from screen right, thereby creating a dark shadow on the wall; however, the horizontal streaks of light from a set of Venetian blinds originates from a weaker fill light.
Figure 1-1: A woman is lit by a movie screen in a 1-point lighting setup.
Classic film noir films include The Maltese Falcon (1941), Double Indemnity (1944), and Touch of Evil (1958). More recent examples include Blade Runner (1982) and Sin City (2005). The lighting style employed by film noir is often referred to as low-key lighting, where there is a strong key light and little, if any, fill.
Film noir is closely related to German expressionism, which was an art movement popular in Germany from 1905 to 1925. German expressionism was dominated by the dark, sinister aspects of the human psyche. The movement is known for its bold, simplified woodcuts and its atmospheric horror cinema (for example, The Cabinet of Dr. Caligari, 1919).
The roots of expressionism can be traced to the chiaroscuro painting style of the 15th and 16th centuries in Italy and Flanders. Chiaroscuro is defined by a bold contrast between lights and darks (the word is Italian for light-dark). This is often characterized by figures in bright pools of light jutting through dark spaces. Chiaroscuro reached its pinnacle with the baroque art movement (17th and 18th centuries in Europe) and is exemplified by master painters Caravaggio (1573–1610) and Rembrandt (1606–1669).
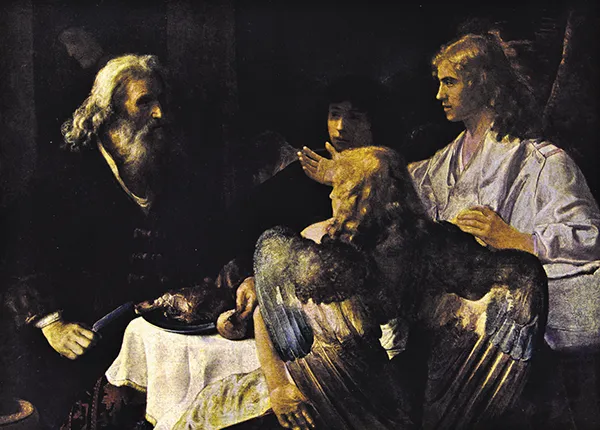
When painters push for stronger contrast, unlit areas of the scene are rarely painted with pure black. In Figure 1-3, an unidentified key light arrives from above and to the left. No other source of light is apparent. Yet, a background wall is dimly visible thanks to a faint fill. In addition, the right sides of the character faces are seen in the shadows. Hence, such paintings bridge the gap between 1- and 2-point lighting.
Figure 1-3: Rembrandt, Abraham and the Three Angels, ca. 1630–1640, oil on canvas.State Hermitage Museum, Saint Petersburg.
In comparison, true 1-point lighting is sometimes found in portraiture. For example, in Figure 1-4 there is a single light sourc...
Table of contents
Cover
Titlepage
Copyright
Credits
Dedication
Acknowledgments
About the Author
Introduction
Chapter 1: Understanding Lighting and Color
Chapter 2: Applying the Correct Maya Light Type
Chapter 3: Creating High-Quality Shadows
Chapter 4: Applying the Correct Material and 2D Texture
Chapter 5: Applying 3D Textures and Projections
Chapter 6: Creating Custom Connections and Applying Color Utilities
Chapter 7: Automating a Scene with Sampler Nodes
Chapter 8: Harnessing the Power of Math Utilities
Chapter 9: Improving Textures with Custom UV Layouts and Maps
Chapter 10: Prepping for Successful Renders
Chapter 11: Raytracing, mental ray, and Effects Rendering
Chapter 12: Working with mental ray Shaders, Global Illumination, and Final Gathering
Chapter 13: Color Management, HDR Workflow, and Render Passes
End-User License Agreement
Frequently asked questions
Yes, you can cancel anytime from the Subscription tab in your account settings on the Perlego website. Your subscription will stay active until the end of your current billing period. Learn how to cancel your subscription
No, books cannot be downloaded as external files, such as PDFs, for use outside of Perlego. However, you can download books within the Perlego app for offline reading on mobile or tablet. Learn how to download books offline
Perlego offers two plans: Essential and Complete
Essential is ideal for learners and professionals who enjoy exploring a wide range of subjects. Access the Essential Library with 800,000+ trusted titles and best-sellers across business, personal growth, and the humanities. Includes unlimited reading time and Standard Read Aloud voice.
Complete: Perfect for advanced learners and researchers needing full, unrestricted access. Unlock 1.5M+ books across hundreds of subjects, including academic and specialized titles. The Complete Plan also includes advanced features like Premium Read Aloud and Research Assistant.
Both plans are available with monthly, semester, or annual billing cycles.
We are an online textbook subscription service, where you can get access to an entire online library for less than the price of a single book per month. With over 1.5 million books across 990+ topics, we’ve got you covered! Learn about our mission
Look out for the read-aloud symbol on your next book to see if you can listen to it. The read-aloud tool reads text aloud for you, highlighting the text as it is being read. You can pause it, speed it up and slow it down. Learn more about Read Aloud
Yes! You can use the Perlego app on both iOS and Android devices to read anytime, anywhere — even offline. Perfect for commutes or when you’re on the go. Please note we cannot support devices running on iOS 13 and Android 7 or earlier. Learn more about using the app
Yes, you can access Advanced Maya Texturing and Lighting by Lee Lanier in PDF and/or ePUB format, as well as other popular books in Computer Science & Computer Graphics. We have over 1.5 million books available in our catalogue for you to explore.