Learning Robotics using Python
eBook - ePub

Learning Robotics using Python

Design, simulate, program, and prototype an autonomous mobile robot using ROS, OpenCV, PCL, and Python, 2nd Edition

Lentin Joseph

Buch teilen
  1. 280 Seiten
  2. English
  3. ePUB (handyfreundlich)
  4. Über iOS und Android verfügbar
eBook - ePub

Learning Robotics using Python

Design, simulate, program, and prototype an autonomous mobile robot using ROS, OpenCV, PCL, and Python, 2nd Edition

Lentin Joseph

Angaben zum Buch
Buchvorschau
Inhaltsverzeichnis
Quellenangaben

Über dieses Buch

Design, simulate, and program interactive robots

Key Features

  • Design, simulate, build, and program an interactive autonomous mobile robot
  • Leverage the power of ROS, Gazebo, and Python to enhance your robotic skills
  • A hands-on guide to creating an autonomous mobile robot with the help of ROS and Python

Book Description

Robot Operating System (ROS) is one of the most popular robotics software frameworks in research and industry. It has various features for implement different capabilities in a robot without implementing them from scratch.

This book starts by showing you the fundamentals of ROS so you understand the basics of differential robots. Then, you'll learn about robot modeling and how to design and simulate it using ROS. Moving on, we'll design robot hardware and interfacing actuators. Then, you'll learn to configure and program depth sensors and LIDARs using ROS. Finally, you'll create a GUI for your robot using the Qt framework.

By the end of this tutorial, you'll have a clear idea of how to integrate and assemble everything into a robot and how to bundle the software package.

What you will learn

  • Design a differential robot from scratch
  • Model a differential robot using ROS and URDF
  • Simulate a differential robot using ROS and Gazebo
  • Design robot hardware electronics
  • Interface robot actuators with embedded boards
  • Explore the interfacing of different 3D depth cameras in ROS
  • Implement autonomous navigation in ChefBot
  • Create a GUI for robot control

Who this book is for

This book is for those who are conducting research in mobile robotics and autonomous navigation. As well as the robotics research domain, this book is also for the robot hobbyist community. You're expected to have a basic understanding of Linux commands and Python.

Häufig gestellte Fragen

Wie kann ich mein Abo kündigen?
Gehe einfach zum Kontobereich in den Einstellungen und klicke auf „Abo kündigen“ – ganz einfach. Nachdem du gekündigt hast, bleibt deine Mitgliedschaft für den verbleibenden Abozeitraum, den du bereits bezahlt hast, aktiv. Mehr Informationen hier.
(Wie) Kann ich Bücher herunterladen?
Derzeit stehen all unsere auf Mobilgeräte reagierenden ePub-Bücher zum Download über die App zur Verfügung. Die meisten unserer PDFs stehen ebenfalls zum Download bereit; wir arbeiten daran, auch die übrigen PDFs zum Download anzubieten, bei denen dies aktuell noch nicht möglich ist. Weitere Informationen hier.
Welcher Unterschied besteht bei den Preisen zwischen den Aboplänen?
Mit beiden Aboplänen erhältst du vollen Zugang zur Bibliothek und allen Funktionen von Perlego. Die einzigen Unterschiede bestehen im Preis und dem Abozeitraum: Mit dem Jahresabo sparst du auf 12 Monate gerechnet im Vergleich zum Monatsabo rund 30 %.
Was ist Perlego?
Wir sind ein Online-Abodienst für Lehrbücher, bei dem du für weniger als den Preis eines einzelnen Buches pro Monat Zugang zu einer ganzen Online-Bibliothek erhältst. Mit über 1 Million Büchern zu über 1.000 verschiedenen Themen haben wir bestimmt alles, was du brauchst! Weitere Informationen hier.
Unterstützt Perlego Text-zu-Sprache?
Achte auf das Symbol zum Vorlesen in deinem nächsten Buch, um zu sehen, ob du es dir auch anhören kannst. Bei diesem Tool wird dir Text laut vorgelesen, wobei der Text beim Vorlesen auch grafisch hervorgehoben wird. Du kannst das Vorlesen jederzeit anhalten, beschleunigen und verlangsamen. Weitere Informationen hier.
Ist Learning Robotics using Python als Online-PDF/ePub verfügbar?
Ja, du hast Zugang zu Learning Robotics using Python von Lentin Joseph im PDF- und/oder ePub-Format sowie zu anderen beliebten Büchern aus Ciencia de la computación & Hardware. Aus unserem Katalog stehen dir über 1 Million Bücher zur Verfügung.

Information

Jahr
2018
ISBN
9781788629973

Interfacing Actuators and Sensors to the Robot Controller

In the previous chapter, we discussed the selection of the hardware components needed to build our robot. The important components in a robot are actuators and sensors. Actuators provide mobility to the robot and sensors provide information about the robot environment. In this chapter, we will concentrate on the different types of actuators and sensors that we are going to use in this robot and how they can be interfaced with Tiva C LaunchPad, which is a 32 bit ARM micro controller board from Texas Instruments, working at 80 MHz. We will start by discussing actuators. The actuator that we are going to discuss first is a DC-geared motor with an encoder. A DC-geared motor works using direct current and has gear reduction to reduce the shaft speed and increase the torque of the final shaft. These kinds of motors are very economical and satisfy our robot design requirement. We will use this motor in our robot prototype.
In the first section of this chapter, we will deal with the design of our robot drive system. The drive system of our robot is a differential drive and consists of two DC-geared motors with encoders and a motor driver. The motor driver is controlled by Tiva C LaunchPad. We will look at the interfacing of the motor driver and quadrature encoder with Tiva C Launchpad. After that, we will look at some of the latest actuators that can replace the existing DC-geared motor with an encoder. If the desired robot needs more payload and accuracy, we have to switch to these kinds of actuators. Finally, we will look at some different sensors that are commonly used for robots.
In this chapter, we will cover:
  • Interfacing a DC-geared motor with Tiva C LaunchPad
  • Interfacing a quadrature encoder with Tiva C LaunchPad
  • An explanation of interfacing code
  • Interfacing Dynamixel actuators
  • Interfacing ultrasonic sensors and IR proximity sensors
  • Interfacing inertial measurement units (IMUs)

Technical requirements

You will need the necessary robot hardware component and Energia IDE set up in Ubuntu 16.04 LTS.

Interfacing DC geared motor to Tiva C LaunchPad

In the previous chapter, we selected a DC-geared motor with an encoder from Pololu and an embedded board from Texas Instruments, called Tiva C LaunchPad. We need the following components to interface the motor with LaunchPad:
  • Two Pololu metal gear motors, 37Dx73L mm with 64 counts per revolution encoder
  • Pololu wheel, 90x10 mm and a matching hub
  • Pololu dual VNH2SP30 motor driver carrier, MD03A
  • A sealed lead acid/lithium ion battery of 12V
  • A logic level convertor of 3.3V to 5V; visit https://www.sparkfun.com/products/11978.
  • A Tiva C LaunchPad and its compatible interfacing wires
The following diagram shows the interfacing circuit of two motors using Pololu H-Bridge:
Motor interfacing circuit
To interface with Launchpad, we have to connect a level shifter board in between these two motors. The motor driver works in 5V but the Launchpad works in 3.3V, so we have to connect a level shifter, as shown in the following diagram:
Level shifter circuit
The two geared DC motors are connected to OUT1A, OUT1B, and OUT2A, OUT2B of the motor driver. VIN (+) and GND (-) are the supply voltage of the motor. These DC motors can work with a 12V supply, so we give 12V as the input voltage. The motor driver will support an input voltage ranging from 5.5V to 16V.
The control signals/input pins of the motor drivers are on the left side of the driver. The first pin is 1DIAG/EN; in most cases, we leave this pin disconnected. These pins are externally pulled high in the driver board itself. The main use of this pin is to enable or disable the H-bridge chip. It is also used to monitor the faulty condition of the H-Bridge IC. Pins 1INA and 1INB control the direction of the rotation of the motor. The 1PWM pin will switch the motor to the ON and OFF state. We achieve speed control using PWM pins. The CS pin will sense the output current. It will output 0.13V per Ampere of the output current. The VIN and GND pins give the same input voltage that we supplied for the motor. We are not using these pins here. The +5V(IN) and GND pins are the supply for the motor driver IC. The supply to the motor driver and motors are different.
The following table shows the truth table of the input and output combinations:
INA
INB
DIAGA/ENA
DIAGB/ENB
OUTA
OUTB
CS
Operating mode
1
1
1
1
H
H
High Imp
Brake to Vcc
1
0
1
1
H
L
Isense = Iout / K
Clockwise (CW)
0
1
1
1
L
H
Isense = Iout / K
Counterclockwise (CCW)
0
0
1
1
L
L
High Imp
Breaker to GND
The value DIAG/EN pins are always high because these pins are externally pulled high in the driver board itself. Using the aforementioned signal combinations, we can move the robot in any direction and by adjusting the PWM signal, we can adjust the speed of the motor too. This is the basic logic behind controlling a DC motor using an H-Bridge circuit.
While interfacing motors to Launchpad, we may require a level shifter. This is because the output pins of Launchpad can only supply 3.3V but the motor driver needs 5V to trigger; so, we have to connect 3.3V to the 5V logic level convertor to start working.
The two motors work in a differential drive mechanism. The following section discusses the differential drive and its operation.

Differential wheeled robot

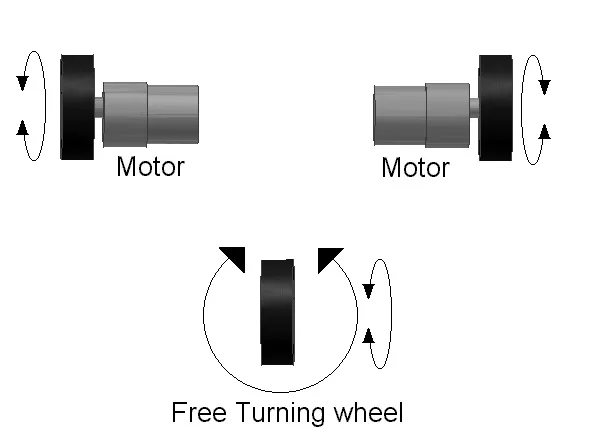
The robot we have designed is a differential wheeled/drive robot. In a differential wheeled robot, the movement is based on two separately driven wheels placed on either side of the robot's body. It can change its direction by changing the relative rate of rotation of its wheels, and hence, doesn't require additional steering motion. To balance the robot, a free turning wheel or caster wheels may be added. The following diagram shows a typical representation of a differential drive:
Differential wheeled robot
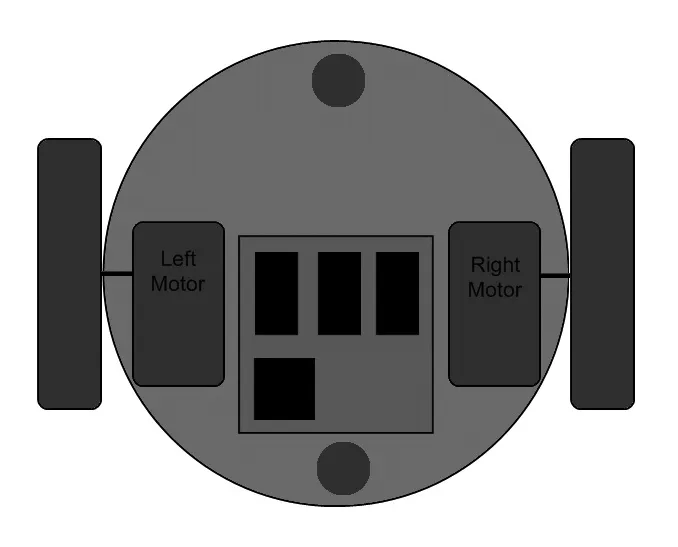
If the two motors are in the same direction, the robot will move forward or backward. If one motor has more speed than the other, then the robot turns to the slower motor side; so, to turn left, stop the left motor and move the right motor. The following diagram shows how we connect the two motors in our robot. The two motors are mounted on the opposite sides of the base plate and we put two casters in the front and back of the robot for balancing:
Top view of robot base
Next, we can program the motor controller using Launchpad according to the truth table data. Programming is done using an IDE called Energia (http://energia.nu/). We are programming Launchpad using the C++ language, very simila...

Inhaltsverzeichnis