
eBook - ePub
Scroll Saw Workbook, 3rd Edition
Learn to Master Your Scroll Saw in 25 Skill-Building Chapters
John A. Nelson
This is a test
Partager le livre
- 250 pages
- English
- ePUB (adapté aux mobiles)
- Disponible sur iOS et Android
eBook - ePub
Scroll Saw Workbook, 3rd Edition
Learn to Master Your Scroll Saw in 25 Skill-Building Chapters
John A. Nelson
Détails du livre
Aperçu du livre
Table des matières
Citations
À propos de ce livre
The ultimate scroll saw beginner's guide to hone your scrolling skills to perfection. Practice a specific technique in each of 25 skill-building chapters, and then use that skill to make an attractive project. As you progress, each chapter builds upon the previous skills you've already learned. By the time you've completed the book, you'll be ready to tackle any scroll saw project with experience and confidence. This new third edition provides an objective guide to all of the new scroll saw models available in today's market, updated to include information on new scroll saw manufacturers.
Foire aux questions
Comment puis-je résilier mon abonnement ?
Il vous suffit de vous rendre dans la section compte dans paramètres et de cliquer sur « Résilier l’abonnement ». C’est aussi simple que cela ! Une fois que vous aurez résilié votre abonnement, il restera actif pour le reste de la période pour laquelle vous avez payé. Découvrez-en plus ici.
Puis-je / comment puis-je télécharger des livres ?
Pour le moment, tous nos livres en format ePub adaptés aux mobiles peuvent être téléchargés via l’application. La plupart de nos PDF sont également disponibles en téléchargement et les autres seront téléchargeables très prochainement. Découvrez-en plus ici.
Quelle est la différence entre les formules tarifaires ?
Les deux abonnements vous donnent un accès complet à la bibliothèque et à toutes les fonctionnalités de Perlego. Les seules différences sont les tarifs ainsi que la période d’abonnement : avec l’abonnement annuel, vous économiserez environ 30 % par rapport à 12 mois d’abonnement mensuel.
Qu’est-ce que Perlego ?
Nous sommes un service d’abonnement à des ouvrages universitaires en ligne, où vous pouvez accéder à toute une bibliothèque pour un prix inférieur à celui d’un seul livre par mois. Avec plus d’un million de livres sur plus de 1 000 sujets, nous avons ce qu’il vous faut ! Découvrez-en plus ici.
Prenez-vous en charge la synthèse vocale ?
Recherchez le symbole Écouter sur votre prochain livre pour voir si vous pouvez l’écouter. L’outil Écouter lit le texte à haute voix pour vous, en surlignant le passage qui est en cours de lecture. Vous pouvez le mettre sur pause, l’accélérer ou le ralentir. Découvrez-en plus ici.
Est-ce que Scroll Saw Workbook, 3rd Edition est un PDF/ePUB en ligne ?
Oui, vous pouvez accéder à Scroll Saw Workbook, 3rd Edition par John A. Nelson en format PDF et/ou ePUB ainsi qu’à d’autres livres populaires dans Technology & Engineering et Technical & Manufacturing Trades. Nous disposons de plus d’un million d’ouvrages à découvrir dans notre catalogue.
Informations
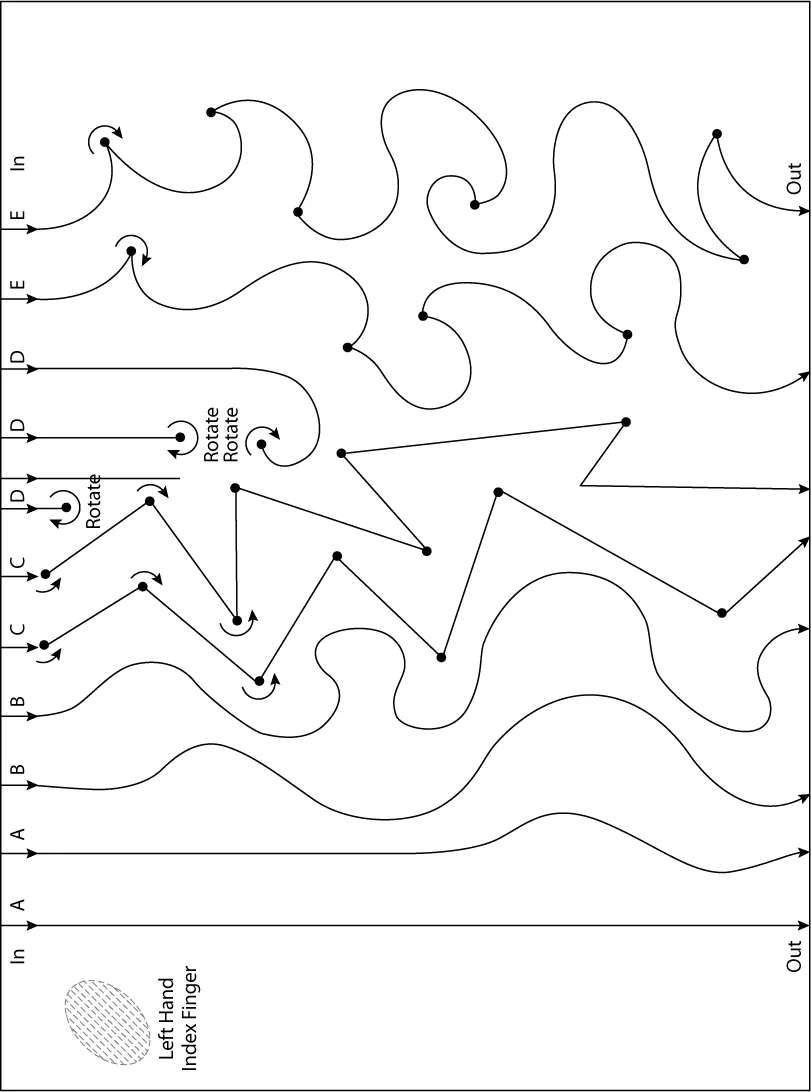
Exercise 1
Objective: Practice following straight lines, wavy lines, making sharp corners and turning in place.
Materials needed:
(1) ¾" x 5 ½"–7 ¼" long piece of wood
#5 skip-tooth blade
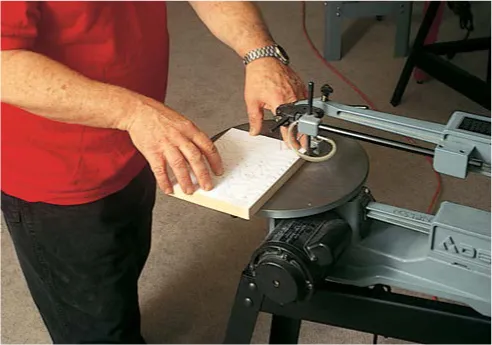
Step 1: Make a copy of Exercise 1 and attach it to a knot-free piece of pine or similar wood.
Step 2: Review the four “Getting Started” steps here.
Step 3: Stand or sit directly in front of the saw. Relax and take a deep breath.
Step 4: Hold your fingers as if you were working on a computer keyboard-use the tips of your fingers. If you are right-handed, use your left hand to lightly hold down the wood. Place your left index finger about 1" directly to the left of the blade. This index finger will help you rotate the wood when you make turns. Use your right hand to steer the wood along the straight line. (If you are left-handed, reverse the instructions.) Remember: Use your finger tips, not your hands and body, to hold and steer the wood, as if you were driving a car along a road.
Step 5: To make a straight cut: Align the blade with the end of the pattern and wood at “A.” Take a deep breath and relax. Lightly push the wood into the blade; let the blade do the cutting. Again, relax. I cannot stress this enough! Be sure your left hand is lightly holding the wood down. Keep in mind, the teeth of the scroll saw blade are in front of the blade facing you. This is where the blade cuts, not on the side or back of the blade. Many people do not realize this their first time using a scroll saw. Complete the straight line cut. If you get off the line, slowly turn the wood to get back on the line. Do not push the blade sideways. Try one more straight line at “A.”
Step 6: To make a curved, wavy line: Follow the same steps as in #5. Practice cutting wavy lines along the two lines marked “B.”
Step 7: To make sharp turns: Start cutting in at “C.” When you reach each large dot on the pattern, stop pushing the wood—relax—and back off slightly. With your left index finger about 1" to the left of the blade, rotate the wood to line up with the direction of the line. Continue cutting. Each time you get to a dot follow the instructions above.
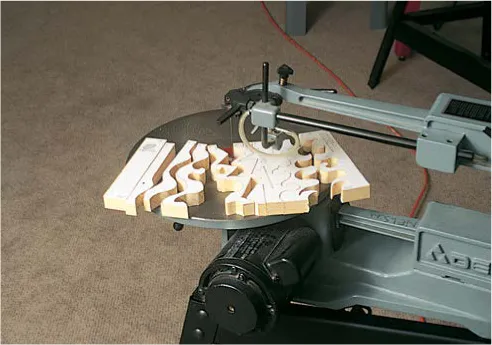
Step 8: To make turns in place: Cut in at “D.” With your left index finger 1" to the left of the blade, rotate the wood at the dot and cut your way back out along the existing saw kerf you just made. Do not back out. Practice at the other “D” lines.
Step 9: Practice making waves, curves and sharp turns at “E.” Again, stop at each dot, relax, back off slightly, turn, and cut.
Step 10: If you still have problems and need more practice, make another copy of Practice Exercise 1 and repeat steps 2 through 9.
Exercise 1
¾" x 5½"–7¼"
#5 Skip-Tooth Blade
¾" x 5½"–7¼"
#5 Skip-Tooth Blade
Exercise 2
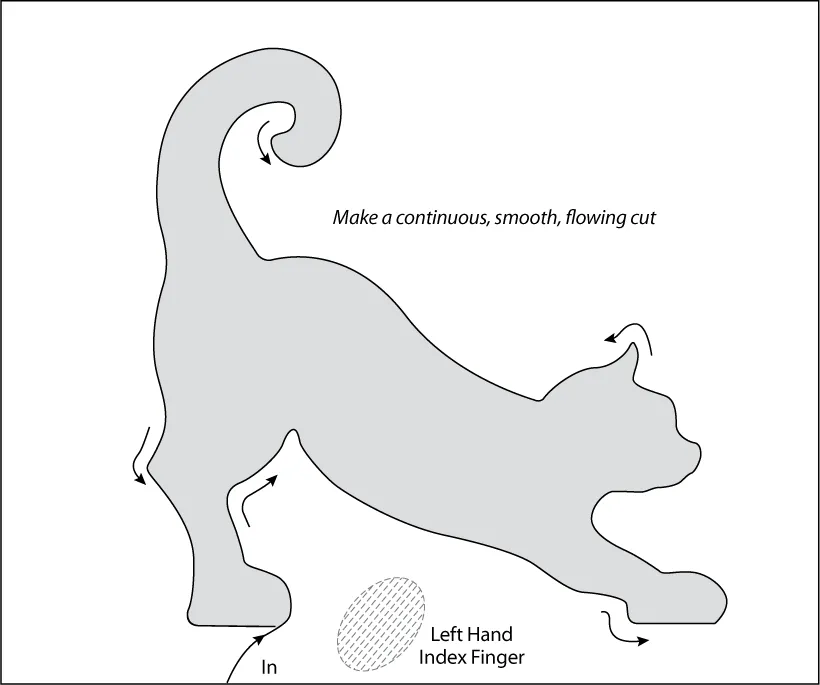
Objective: To cut out a simple object, following lines to produce a smooth, continuous, flowing cut.
Materials needed:
(1) ¾" x 4 ½"–5 ½" long piece of wood
#5 skip-tooth blade

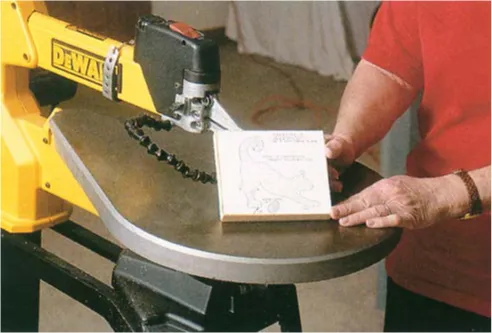
Step 1: Make a copy of Exercise 2 and attach it to a knot-free piece of pine or similar wood.
Step 2: Review the four “Getting Started” steps here.
Step 3: Stand or sit directly in front of the saw. Relax and take a deep breath.
Step 4: Using only your fingertips and a light touch, cut in as indicated. Make a smooth, continuous, flowing cut all the way around without stopping.
Note: If you wander off the cutting line outside of the pattern, stop and back up to where you wandered off. Continue cutting out your pattern (see figure 1). If you wander off the cutting line inside of the pattern, keep cutting slowly and smoothly back to the pattern line (see figure 2). Remember, after you remove the pattern from the wood, no one will know you were off the line.
Step 5: When you have the project all cut out, check the edges. You should have a continuous, smooth surface all around. If not, make another copy of the pattern and repeat Steps 1 through 4 with a new piece of wood until it is perfect. PRACTICE MAKES PERFECT!
Exercise 2
¾" x 4½"–5½"
#5 Skip-Tooth Blade
¾" x 4½"–5½"
#5 Skip-Tooth Blade
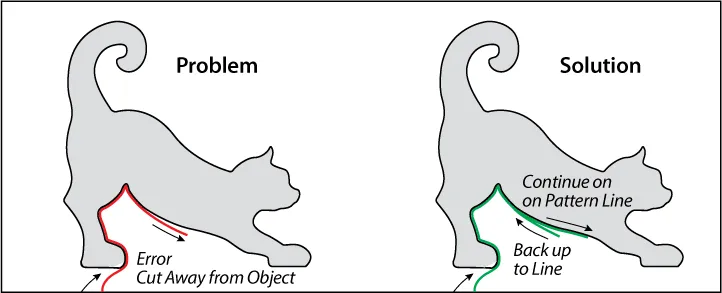
Figure 1
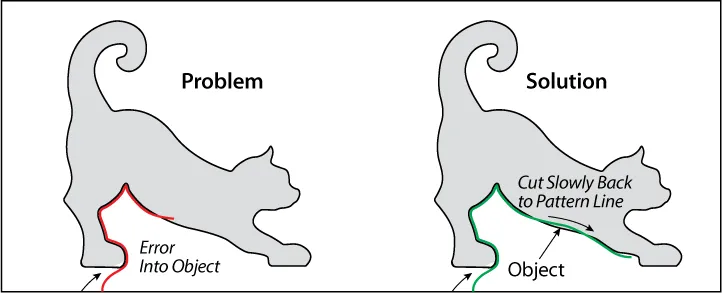
Figure 2
Exercise 3
Objective: To cut out a simple object, fo...