Programming and Interfacing with Arduino
eBook - ePub

Programming and Interfacing with Arduino

Yogesh Misra

Condividi libro
  1. 304 pagine
  2. English
  3. ePUB (disponibile sull'app)
  4. Disponibile su iOS e Android
eBook - ePub

Programming and Interfacing with Arduino

Yogesh Misra

Dettagli del libro
Anteprima del libro
Indice dei contenuti
Citazioni

Informazioni sul libro

Programming and Interfacing with Arduino provides an in-depth understanding of the Arduino UNO board. It covers programming concepts, working and interfacing of sensors, input/output devices, communication modules, and actuators with Arduino UNO board. This book contains a large number of programming examples along with the description and interfacing details of hardware with Arduino UNO board.

It discusses important topics, including SPI communication protocol, I2C communication protocol, light-emitting diode, potentiometer, analog-to-digital converter, pulse width modulation, temperature sensor LM35, humidity and temperature sensor DHT11, motor driver L293D, LED interfacing and programming, and push-button interfacing and programming.

Aimed at senior undergraduate students and professionals in areas such as electrical engineering, electronics, and communication engineering, this text:

  • Discusses construction and working of sensors, including ultrasonic sensor, temperature sensor, and optical sensor.


  • Covers construction, working, programming, and interfacing of IO devices.


  • Discusses programming, interfacing construction, and working of relay with the Arduino board for controlling high-voltage devices.


  • Covers interfacing diagram of devices with the Arduino board.


  • Provides videos demonstrating the implementation of programs on the Arduino board.


Domande frequenti

Come faccio ad annullare l'abbonamento?
È semplicissimo: basta accedere alla sezione Account nelle Impostazioni e cliccare su "Annulla abbonamento". Dopo la cancellazione, l'abbonamento rimarrà attivo per il periodo rimanente già pagato. Per maggiori informazioni, clicca qui
È possibile scaricare libri? Se sì, come?
Al momento è possibile scaricare tramite l'app tutti i nostri libri ePub mobile-friendly. Anche la maggior parte dei nostri PDF è scaricabile e stiamo lavorando per rendere disponibile quanto prima il download di tutti gli altri file. Per maggiori informazioni, clicca qui
Che differenza c'è tra i piani?
Entrambi i piani ti danno accesso illimitato alla libreria e a tutte le funzionalità di Perlego. Le uniche differenze sono il prezzo e il periodo di abbonamento: con il piano annuale risparmierai circa il 30% rispetto a 12 rate con quello mensile.
Cos'è Perlego?
Perlego è un servizio di abbonamento a testi accademici, che ti permette di accedere a un'intera libreria online a un prezzo inferiore rispetto a quello che pagheresti per acquistare un singolo libro al mese. Con oltre 1 milione di testi suddivisi in più di 1.000 categorie, troverai sicuramente ciò che fa per te! Per maggiori informazioni, clicca qui.
Perlego supporta la sintesi vocale?
Cerca l'icona Sintesi vocale nel prossimo libro che leggerai per verificare se è possibile riprodurre l'audio. Questo strumento permette di leggere il testo a voce alta, evidenziandolo man mano che la lettura procede. Puoi aumentare o diminuire la velocità della sintesi vocale, oppure sospendere la riproduzione. Per maggiori informazioni, clicca qui.
Programming and Interfacing with Arduino è disponibile online in formato PDF/ePub?
Sì, puoi accedere a Programming and Interfacing with Arduino di Yogesh Misra in formato PDF e/o ePub, così come ad altri libri molto apprezzati nelle sezioni relative a Technology & Engineering e Electrical Engineering & Telecommunications. Scopri oltre 1 milione di libri disponibili nel nostro catalogo.

Informazioni

Editore
CRC Press
Anno
2021
ISBN
9781000431698

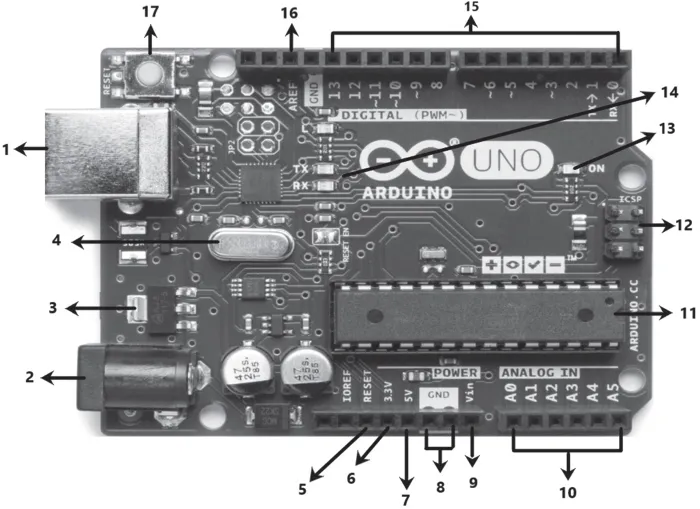
1 Introduction to Arduino UNO Board

Learning Outcomes

After completing this chapter, learners will be able to:
  1. Understand various hardware features of the Arduino UNO board.
  2. Understand various features of Integrated Development Environment (IDE) used for the development of software.
  3. Understand how to download and use the Arduino IDE for the development of software.
  4. Understand pin configuration and features of ATmega 328 microcontroller, which is the Arduino UNO board’s main brain.
  5. Understand Serial Peripheral Interface (SPI) and Inter-Integrated Circuit (I2C) serial communication protocols.

1.1 Features of Arduino UNO Board

Arduino is open-source hardware that can be used to develop embedded systems with open-source software. Arduino has gained massive popularity among students and hobbyists for making a working model. The reasons behind the popularity of Arduino are its low cost, availability of software, and easy-to-interface possibility. This book has used the Arduino UNO board’s code because it is the most popular board in the Arduino family. The Arduino UNO is a microcontroller-based board having an ATmega328 microcontroller from ATmega (now MicrochipTM). Most of the Arduino boards have the majority of components, as shown in Figure 1.1. The input voltage range required for the Arduino UNO board’s operation is 6–20 V, but the recommended input voltage range is 7–12 V. If the input voltage is less than 7 V, the digital output pins may supply less than 5 V, and the board may be unstable. The output current from each pin of Arduino UNO is 40 mA.
The components mounted on the Arduino UNO board are labeled from 1 to 17.
FIGURE 1.1 Arduino UNO board. (Courtesy Arduino.)
Power USB (Label 1): Arduino board can be powered on by connecting it to the computer at the USB socket using USB cable as shown in Label 1.
Power Connector (Label 2): Arduino board can be powered on by connecting it to 220 V AC by an adapter at Power Connector as shown as Label 2.
Voltage Regulator (Label 3): The voltage regulator shown in Label 3 is used to regulate the Arduino board’s DC voltage.
Crystal Oscillator (Label 4): A crystal oscillator of 16 MHz is used in the Arduino UNO board to synchronize the microcontroller’s various operations of ATmega 328 and Arduino UNO board.
Reset (Label 5): Sometimes, a program may be stuck at some instruction. In such cases, we have to reset our Arduino board so that the program’s execution should start from the beginning. If a 0 V is applied at the reset pin as shown in Label 5, the Arduino board will reset. An alternate way to reset the Arduino board is by pressing the reset button, as shown in Label 17.
3.3 V (Label 6): The 3.3V output is available at the pin as shown in Label 6.
5 V (Label 7): The 5V output is available at the pin as shown in Label 7.
GND (Label 8): In the Arduino board, three GND (ground) pins are available. Users can use any available ground pin while building their circuit. The two GND (ground) pins are available at the pins, as shown in Label 8. The third GND (ground) pin is available at the right-side pin, as shown in Label 16.
Vin (Label 9): Arduino board can be powered on by connecting a DC voltage in the range of 7–20 V at Vin pin, as shown in Label 9.
Analog Input (Label 10): The Arduino UNO board contains six analog pins named A0, A1, A2, A3, A4, and A5. Internally, these analog pins are connected to a six-channel 10-bit analog-to-digital converter. The allowable analog input voltage range at each analog input pin is 0–5 V. Since each analog input pin is connected to a 10-bit analog-to-digital converter, 0–5 V is divided into 1,024 steps ranging from 0 to 1,023. The six analog pins are shown in Label 10.
ATmega328 (Label 11): The ATmega328 microcontroller is used to perform various arithmetic and logical operations. The ATmega328 microcontroller is manufactured by Atmel Company and shown in Label 11.
ICSP (Label 12): It is a small programming header for the Arduino consisting of MOSI (Master Output Slave Input), MISO (Master Input Slave Output), SCLK (System Clock), RESET, VCC, and GND.
Power LED (Label 13): When the Arduino board is power on, the power LED turns on. The Power LED is shown in Label 13.
Tx and Rx LEDs (Label 14): When the Arduino board transmits data serially from the Arduino board through Pin 1 of the Arduino board, Tx (Transmit) LED blinks.
When the Arduino board receives data serially through Pin 0 of the Arduino board, Rx (Receive) LED blinks. The Tx and Rx LEDs are shown in Label 14.
Digital I/O (Label 15): The Arduino UNO board has 14 digital I/O (input/output) pins. Each of these pins can be c...

Indice dei contenuti