![]()
START YOUR ENGINES
In this chapter you’ll explore the Toon Boom interface and learn how to perform basic program actions.Traditionally, a software book might spend a few pages, or a chapter, going into detail about the directory structure, video codec, aspect ratio and file formats. That stuff is definitely good to know but first and foremost, this book is a practical guide for artists and animators to start creating great animation as soon as possible.
1.1
OPENING THE PROGRAM
Now to crack open the software and look around. A reminder that we’ll start with the core features at the Animate level, with later chapters dedicated to advanced features.
Start Animate, Animate Pro or Harmony now and you’ll briefly see the splash screen.
NOTE
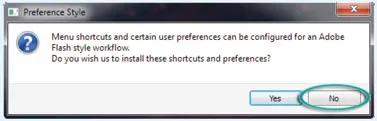
After you install and run Toon Boom Animate for the first time, you’ll get a popup message asking if you’d like to use Adobe Flash style shortcuts (see Figure 1.2). I strongly recommend you click ‘No’ here. First, because I believe it’s better to learn Toon Boom as a new program, rather than try to make it conform to your Flash workflow and second, because throughout the book I’ll list the Toon Boom shortcuts alongside each tool and function.
1.2
If you clicked ‘Yes’, don’t panic. It’s not that important right now and just ahead, on page 18, I’ll show you how to change it back.
Assuming you have already activated the licence (see Appendix B), when the program opens, whichever one you’re using, we should all now be seeing pretty much the same thing.
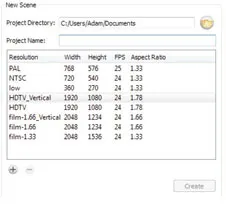
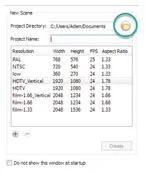
The Create button at the bottom is greyed out, making it impossible to start without first specifying a few parameters. Even if you check the ‘Do not show this window at startup’ checkbox, you’ll be unable to start working in Toon Boom until you’ve completed this preliminary setup.
1.3
SETTING UP A PROJECT
Our very first step is to set up project directories so that Toon Boom knows whereto save our work. Throughout the book, we’ll be doing a lot of short, quick exercises – scenes in which we can make an absolute mess and not worry about being careful or even saving. So in the first exercise below we’ll set up one of those ‘throwaway scenes’ for use in this chapter.
> EXERCISE 1.1
CREATING A PROJECT FOLDER AND SCENE FILES
The first input field on the left is labelled Project Directory and it specifies where your file will be saved. By default, this should show a path to your documents folder.
1.4
> 1. Click ‘Choose’ – or if you’re using Harmony, the browse folder icon.
> 2. Choose your Desktop and click ‘OK’.
The next field is your Project Name. You can also think of this as a scene title, which can beany name you want to call that scene. I recommend using numbers in the title, so that as your movie comes together, you have your scene folders listed in a sensible order. For example, the third scene in my project might be ‘Scene_3’ or ‘Sc_3’ or simply ‘3’.
As this is just a scene for experimentation, we don’t need to worry about numbering.
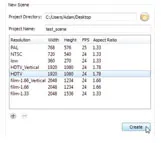
> 3. In the Project Name field, type test scene.
NOTE
Note that as you type this, the space is replaced by an underscore, so you end up with test_scene. The reason is because this will become a folder name; generally in the uptight world of file and folder naming conventions, spaces are considered sloppy practice, so this merely autocorrects it for you.
Almost done. Now Toon Boom knows the name and location of your project. Unless you’re using Harmony 10, the Create button here is still greyed out, so a final piece of setup required is to specify your movie’s resolution and framerate. You can see a list of useful resolution presets.
For simple projects or throwaway exercises, you can choose whichever resolution you like. No need to concern yourself with it too much, as you can easily change at any time throughout your project (even right at the end) and everything in your movie will resize itself to fit. I normally use the HDTV (1920 × 1080) preset. We’ll talk more about frame rates later.
1.5
If you’re using Harmony, the HDTV_Vertical (1920 × 1080) resolution is selected...