
eBook - ePub
Powerpoint Tips & Tricks
John Hales
This is a test
Condividi libro
- 44 pagine
- English
- ePUB (disponibile sull'app)
- Disponibile su iOS e Android
eBook - ePub
Powerpoint Tips & Tricks
John Hales
Dettagli del libro
Anteprima del libro
Indice dei contenuti
Citazioni
Informazioni sul libro
A handy resource for beginning, intermediate, or advanced PowerPoint users, this three-panel guide features helpful time-saving hints so that you can get the most out of Microsoft's dynamic presentation software. Written to follow PowerPoint 2010 (and compatible with PowerPoint 2007), this guide includes helpful screen captures and icons, as well as clear and concise instructions.
Domande frequenti
Come faccio ad annullare l'abbonamento?
È semplicissimo: basta accedere alla sezione Account nelle Impostazioni e cliccare su "Annulla abbonamento". Dopo la cancellazione, l'abbonamento rimarrà attivo per il periodo rimanente già pagato. Per maggiori informazioni, clicca qui
È possibile scaricare libri? Se sì, come?
Al momento è possibile scaricare tramite l'app tutti i nostri libri ePub mobile-friendly. Anche la maggior parte dei nostri PDF è scaricabile e stiamo lavorando per rendere disponibile quanto prima il download di tutti gli altri file. Per maggiori informazioni, clicca qui
Che differenza c'è tra i piani?
Entrambi i piani ti danno accesso illimitato alla libreria e a tutte le funzionalità di Perlego. Le uniche differenze sono il prezzo e il periodo di abbonamento: con il piano annuale risparmierai circa il 30% rispetto a 12 rate con quello mensile.
Cos'è Perlego?
Perlego è un servizio di abbonamento a testi accademici, che ti permette di accedere a un'intera libreria online a un prezzo inferiore rispetto a quello che pagheresti per acquistare un singolo libro al mese. Con oltre 1 milione di testi suddivisi in più di 1.000 categorie, troverai sicuramente ciò che fa per te! Per maggiori informazioni, clicca qui.
Perlego supporta la sintesi vocale?
Cerca l'icona Sintesi vocale nel prossimo libro che leggerai per verificare se è possibile riprodurre l'audio. Questo strumento permette di leggere il testo a voce alta, evidenziandolo man mano che la lettura procede. Puoi aumentare o diminuire la velocità della sintesi vocale, oppure sospendere la riproduzione. Per maggiori informazioni, clicca qui.
Powerpoint Tips & Tricks è disponibile online in formato PDF/ePub?
Sì, puoi accedere a Powerpoint Tips & Tricks di John Hales in formato PDF e/o ePub, così come ad altri libri molto apprezzati nelle sezioni relative a Computer Science e Computer Science General. Scopri oltre 1 milione di libri disponibili nel nostro catalogo.
Informazioni
Argomento
Computer ScienceCategoria
Computer Science General
Layout & Design
Using Layers
Every object on a slide will have its own layer. To better understand layers, imagine that every object is on a transparency the size of the slide and you can see through all areas that do not have objects. What you would see on the slide is the same as if you stacked all the transparencies together and looked down on them from above. With layers, objects can hide behind others or be moved to the front or anywhere in between. Utilizing layers effectively will allow you to manipulate what is seen and what is hidden, making for cleaner, sharper images and slides.
To view the layers:
- On the Home tab, click Arrange . This will bring up a drop-down list.

- Click Selection Pane . The Selection and Visibility pane will appear. This tool has three primary functions: showing visibility, renaming objects, and reordering objects on the slide.

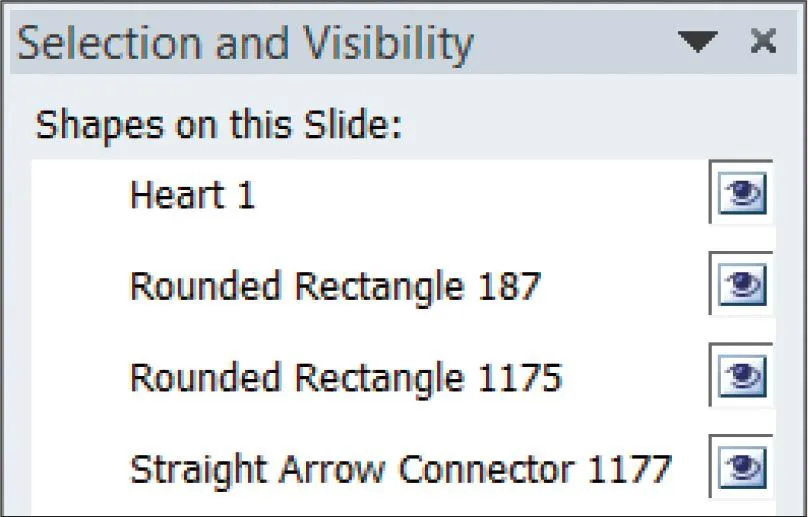
Notice how much information is presented in this screen shot. The eye represents visibility. Observe the names for the heart, rectangles, and arrow—these are typical names that you would see when working with layers or animations. For the rectangles, only the numbers are different. When there are many similar shapes, this can be confusing. This is where changing the names of the objects in the Selection and Visibility pane will be of great benefit (see To rename an object).
Changing Visibility
An object is visible by default. As mentioned previously, objects can be layered. This is especially true if you are using animations where some objects disappear or reappear. Other objects may be in the same place on the slide and thus may be over or under other objects. If you want to change a property (e.g., the size or color) of an object but it is under another positioned object that you don’t want to move, you can hide the object above it so that you can work on the one underneath.
To hide an object:
- Make sure the Selection and Visibility pane is open (see To view the layers).
- Click the eye of the object to hide. To unhide an object:

- Click the empty rectangular box of the object to unhide. The eye will reappear, as will the object on the slide.

Renaming Layers
The more objects that are on the slide, the more confusing it can be to arrange the layers. The Selection and Visibility pane allows for renaming of objects, which will assist in layering as well as animating.
To rename an object:
- In the Selection and Visibility pane, click any object. The object will be selected on the slide and in the pane.
- Click the object again and type in the new name for the object. To save the name, press <Enter> or click anywhere in the presentation.
Reordering Layers
It is important to know how to reorder the layers so that the slide will appear as you wish. This can be done with or without the Selection and Visibility pane, although with it, you will know where the layer fits in with all of the other layers.
To reorder layers through the Selection and Visibility pane:
- On the Home tab, click Arrange . This will bring up a drop-down list.

- Click Selection Pane .

- Click the name of the layer or the object on the slide.
- Click the up or down
 arrow at the bottom of the pane. You can see the objects on the slide change as they are being rearranged.
To reorder layers without using the Selection and Visibility pane:
- Click on an object.
- On the Home tab, click Arrange . This will bring up a drop-down menu.

- Click any of the following: Bring to Front, Send to Back, Bring Forward, or Send Backward. NOTE: Bring Forward and Send Backward will move the object either forward or backward one layer for each click.
Grouping Objects
There may be times when yo...