
eBook - ePub
Powerpoint Tips & Tricks
John Hales
This is a test
Partager le livre
- 44 pages
- English
- ePUB (adapté aux mobiles)
- Disponible sur iOS et Android
eBook - ePub
Powerpoint Tips & Tricks
John Hales
Détails du livre
Aperçu du livre
Table des matières
Citations
À propos de ce livre
A handy resource for beginning, intermediate, or advanced PowerPoint users, this three-panel guide features helpful time-saving hints so that you can get the most out of Microsoft's dynamic presentation software. Written to follow PowerPoint 2010 (and compatible with PowerPoint 2007), this guide includes helpful screen captures and icons, as well as clear and concise instructions.
Foire aux questions
Comment puis-je résilier mon abonnement ?
Il vous suffit de vous rendre dans la section compte dans paramètres et de cliquer sur « Résilier l’abonnement ». C’est aussi simple que cela ! Une fois que vous aurez résilié votre abonnement, il restera actif pour le reste de la période pour laquelle vous avez payé. Découvrez-en plus ici.
Puis-je / comment puis-je télécharger des livres ?
Pour le moment, tous nos livres en format ePub adaptés aux mobiles peuvent être téléchargés via l’application. La plupart de nos PDF sont également disponibles en téléchargement et les autres seront téléchargeables très prochainement. Découvrez-en plus ici.
Quelle est la différence entre les formules tarifaires ?
Les deux abonnements vous donnent un accès complet à la bibliothèque et à toutes les fonctionnalités de Perlego. Les seules différences sont les tarifs ainsi que la période d’abonnement : avec l’abonnement annuel, vous économiserez environ 30 % par rapport à 12 mois d’abonnement mensuel.
Qu’est-ce que Perlego ?
Nous sommes un service d’abonnement à des ouvrages universitaires en ligne, où vous pouvez accéder à toute une bibliothèque pour un prix inférieur à celui d’un seul livre par mois. Avec plus d’un million de livres sur plus de 1 000 sujets, nous avons ce qu’il vous faut ! Découvrez-en plus ici.
Prenez-vous en charge la synthèse vocale ?
Recherchez le symbole Écouter sur votre prochain livre pour voir si vous pouvez l’écouter. L’outil Écouter lit le texte à haute voix pour vous, en surlignant le passage qui est en cours de lecture. Vous pouvez le mettre sur pause, l’accélérer ou le ralentir. Découvrez-en plus ici.
Est-ce que Powerpoint Tips & Tricks est un PDF/ePUB en ligne ?
Oui, vous pouvez accéder à Powerpoint Tips & Tricks par John Hales en format PDF et/ou ePUB ainsi qu’à d’autres livres populaires dans Computer Science et Computer Science General. Nous disposons de plus d’un million d’ouvrages à découvrir dans notre catalogue.
Informations
Sujet
Computer ScienceSous-sujet
Computer Science General
Layout & Design
Using Layers
Every object on a slide will have its own layer. To better understand layers, imagine that every object is on a transparency the size of the slide and you can see through all areas that do not have objects. What you would see on the slide is the same as if you stacked all the transparencies together and looked down on them from above. With layers, objects can hide behind others or be moved to the front or anywhere in between. Utilizing layers effectively will allow you to manipulate what is seen and what is hidden, making for cleaner, sharper images and slides.
To view the layers:
- On the Home tab, click Arrange . This will bring up a drop-down list.

- Click Selection Pane . The Selection and Visibility pane will appear. This tool has three primary functions: showing visibility, renaming objects, and reordering objects on the slide.

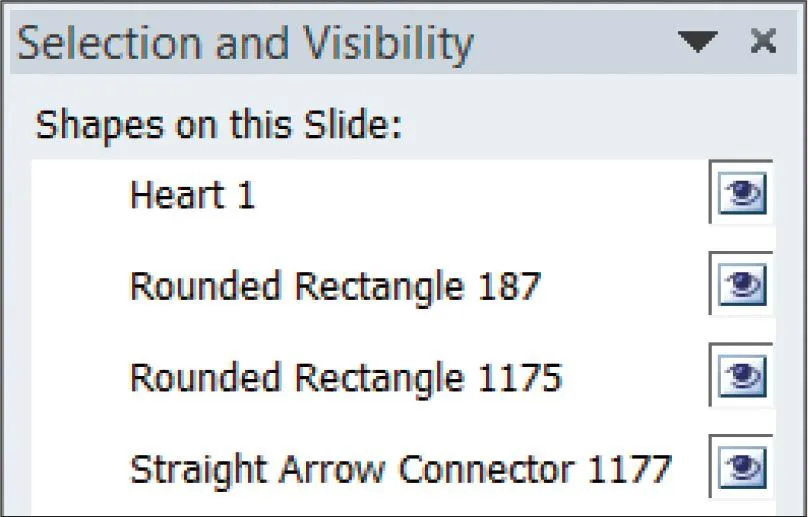
Notice how much information is presented in this screen shot. The eye represents visibility. Observe the names for the heart, rectangles, and arrow—these are typical names that you would see when working with layers or animations. For the rectangles, only the numbers are different. When there are many similar shapes, this can be confusing. This is where changing the names of the objects in the Selection and Visibility pane will be of great benefit (see To rename an object).
Changing Visibility
An object is visible by default. As mentioned previously, objects can be layered. This is especially true if you are using animations where some objects disappear or reappear. Other objects may be in the same place on the slide and thus may be over or under other objects. If you want to change a property (e.g., the size or color) of an object but it is under another positioned object that you don’t want to move, you can hide the object above it so that you can work on the one underneath.
To hide an object:
- Make sure the Selection and Visibility pane is open (see To view the layers).
- Click the eye of the object to hide. To unhide an object:

- Click the empty rectangular box of the object to unhide. The eye will reappear, as will the object on the slide.

Renaming Layers
The more objects that are on the slide, the more confusing it can be to arrange the layers. The Selection and Visibility pane allows for renaming of objects, which will assist in layering as well as animating.
To rename an object:
- In the Selection and Visibility pane, click any object. The object will be selected on the slide and in the pane.
- Click the object again and type in the new name for the object. To save the name, press <Enter> or click anywhere in the presentation.
Reordering Layers
It is important to know how to reorder the layers so that the slide will appear as you wish. This can be done with or without the Selection and Visibility pane, although with it, you will know where the layer fits in with all of the other layers.
To reorder layers through the Selection and Visibility pane:
- On the Home tab, click Arrange . This will bring up a drop-down list.

- Click Selection Pane .

- Click the name of the layer or the object on the slide.
- Click the up or down
 arrow at the bottom of the pane. You can see the objects on the slide change as they are being rearranged.
To reorder layers without using the Selection and Visibility pane:
- Click on an object.
- On the Home tab, click Arrange . This will bring up a drop-down menu.

- Click any of the following: Bring to Front, Send to Back, Bring Forward, or Send Backward. NOTE: Bring Forward and Send Backward will move the object either forward or backward one layer for each click.
Grouping Objects
There may be times when yo...