
eBook - ePub
Powerpoint Tips & Tricks
John Hales
This is a test
Buch teilen
- 44 Seiten
- English
- ePUB (handyfreundlich)
- Über iOS und Android verfügbar
eBook - ePub
Powerpoint Tips & Tricks
John Hales
Angaben zum Buch
Buchvorschau
Inhaltsverzeichnis
Quellenangaben
Über dieses Buch
A handy resource for beginning, intermediate, or advanced PowerPoint users, this three-panel guide features helpful time-saving hints so that you can get the most out of Microsoft's dynamic presentation software. Written to follow PowerPoint 2010 (and compatible with PowerPoint 2007), this guide includes helpful screen captures and icons, as well as clear and concise instructions.
Häufig gestellte Fragen
Wie kann ich mein Abo kündigen?
Gehe einfach zum Kontobereich in den Einstellungen und klicke auf „Abo kündigen“ – ganz einfach. Nachdem du gekündigt hast, bleibt deine Mitgliedschaft für den verbleibenden Abozeitraum, den du bereits bezahlt hast, aktiv. Mehr Informationen hier.
(Wie) Kann ich Bücher herunterladen?
Derzeit stehen all unsere auf Mobilgeräte reagierenden ePub-Bücher zum Download über die App zur Verfügung. Die meisten unserer PDFs stehen ebenfalls zum Download bereit; wir arbeiten daran, auch die übrigen PDFs zum Download anzubieten, bei denen dies aktuell noch nicht möglich ist. Weitere Informationen hier.
Welcher Unterschied besteht bei den Preisen zwischen den Aboplänen?
Mit beiden Aboplänen erhältst du vollen Zugang zur Bibliothek und allen Funktionen von Perlego. Die einzigen Unterschiede bestehen im Preis und dem Abozeitraum: Mit dem Jahresabo sparst du auf 12 Monate gerechnet im Vergleich zum Monatsabo rund 30 %.
Was ist Perlego?
Wir sind ein Online-Abodienst für Lehrbücher, bei dem du für weniger als den Preis eines einzelnen Buches pro Monat Zugang zu einer ganzen Online-Bibliothek erhältst. Mit über 1 Million Büchern zu über 1.000 verschiedenen Themen haben wir bestimmt alles, was du brauchst! Weitere Informationen hier.
Unterstützt Perlego Text-zu-Sprache?
Achte auf das Symbol zum Vorlesen in deinem nächsten Buch, um zu sehen, ob du es dir auch anhören kannst. Bei diesem Tool wird dir Text laut vorgelesen, wobei der Text beim Vorlesen auch grafisch hervorgehoben wird. Du kannst das Vorlesen jederzeit anhalten, beschleunigen und verlangsamen. Weitere Informationen hier.
Ist Powerpoint Tips & Tricks als Online-PDF/ePub verfügbar?
Ja, du hast Zugang zu Powerpoint Tips & Tricks von John Hales im PDF- und/oder ePub-Format sowie zu anderen beliebten Büchern aus Computer Science & Computer Science General. Aus unserem Katalog stehen dir über 1 Million Bücher zur Verfügung.
Information
Thema
Computer Science
Layout & Design
Using Layers
Every object on a slide will have its own layer. To better understand layers, imagine that every object is on a transparency the size of the slide and you can see through all areas that do not have objects. What you would see on the slide is the same as if you stacked all the transparencies together and looked down on them from above. With layers, objects can hide behind others or be moved to the front or anywhere in between. Utilizing layers effectively will allow you to manipulate what is seen and what is hidden, making for cleaner, sharper images and slides.
To view the layers:
- On the Home tab, click Arrange . This will bring up a drop-down list.

- Click Selection Pane . The Selection and Visibility pane will appear. This tool has three primary functions: showing visibility, renaming objects, and reordering objects on the slide.

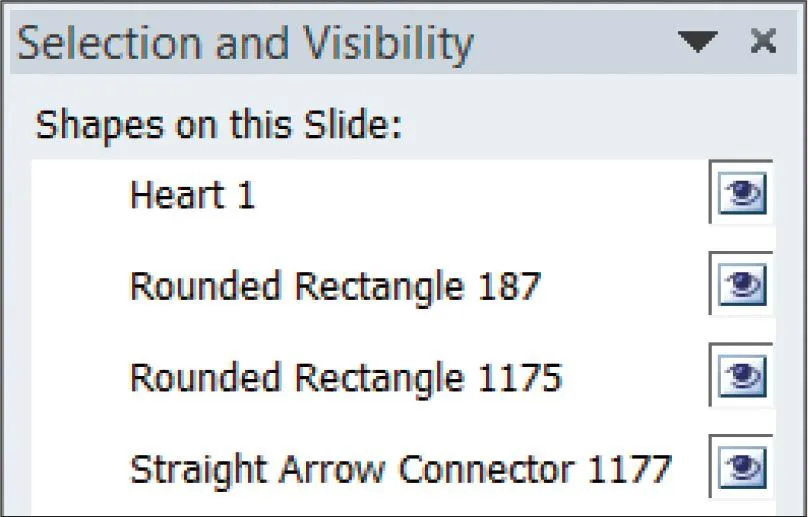
Notice how much information is presented in this screen shot. The eye represents visibility. Observe the names for the heart, rectangles, and arrow—these are typical names that you would see when working with layers or animations. For the rectangles, only the numbers are different. When there are many similar shapes, this can be confusing. This is where changing the names of the objects in the Selection and Visibility pane will be of great benefit (see To rename an object).
Changing Visibility
An object is visible by default. As mentioned previously, objects can be layered. This is especially true if you are using animations where some objects disappear or reappear. Other objects may be in the same place on the slide and thus may be over or under other objects. If you want to change a property (e.g., the size or color) of an object but it is under another positioned object that you don’t want to move, you can hide the object above it so that you can work on the one underneath.
To hide an object:
- Make sure the Selection and Visibility pane is open (see To view the layers).
- Click the eye of the object to hide. To unhide an object:

- Click the empty rectangular box of the object to unhide. The eye will reappear, as will the object on the slide.

Renaming Layers
The more objects that are on the slide, the more confusing it can be to arrange the layers. The Selection and Visibility pane allows for renaming of objects, which will assist in layering as well as animating.
To rename an object:
- In the Selection and Visibility pane, click any object. The object will be selected on the slide and in the pane.
- Click the object again and type in the new name for the object. To save the name, press <Enter> or click anywhere in the presentation.
Reordering Layers
It is important to know how to reorder the layers so that the slide will appear as you wish. This can be done with or without the Selection and Visibility pane, although with it, you will know where the layer fits in with all of the other layers.
To reorder layers through the Selection and Visibility pane:
- On the Home tab, click Arrange . This will bring up a drop-down list.

- Click Selection Pane .

- Click the name of the layer or the object on the slide.
- Click the up or down
 arrow at the bottom of the pane. You can see the objects on the slide change as they are being rearranged.
To reorder layers without using the Selection and Visibility pane:
- Click on an object.
- On the Home tab, click Arrange . This will bring up a drop-down menu.

- Click any of the following: Bring to Front, Send to Back, Bring Forward, or Send Backward. NOTE: Bring Forward and Send Backward will move the object either forward or backward one layer for each click.
Grouping Objects
There may be times when yo...