![]()
Chapter 1
Digital Art Basics
Any experienced artist knows that the composition of the tools they use—the chemistry of the paint, the ingredients of the clay—affects the quality of a finished work of art. When you are learning to become an artist, you spend a great deal of time studying how the tools behave. It is the same with digital art. This chapter reviews the fundamentals of digital art. Just as an oil painter needs to learn how the mixture of pigments and oils works with the canvas, a digital artist needs to learn how color depth, channels, file formats, and other elements factor into the quality of a digital masterpiece.
This chapter includes the following topics:
- An introduction to ZBrush
- Understanding digital images
- Understanding 3D space
- Being a digital artist
An Introduction to ZBrush
Imagine walking into a fully stocked artist’s studio. Inside you find cabinets and drawers full of paints and brushes, a large canvas, a closet full of every type of sculpting medium imaginable, a lighting rig, a camera, a light box, a projector, a kiln, armatures for maquettes, and a seemingly infinite array of carving and cutting tools. On top of this everything has been neatly arranged for optimal use while working. This is ZBrush, a self-contained studio where you can digitally create paintings and sculptures—and even combinations of the two. Furthermore, you are not limited to what you find in ZBrush. Digital 3D models and 2D textures can easily be imported from other applications and used as tools within ZBrush. ZBrush can function as a self-contained digital art workspace or as an integral part of an animation production pipeline.
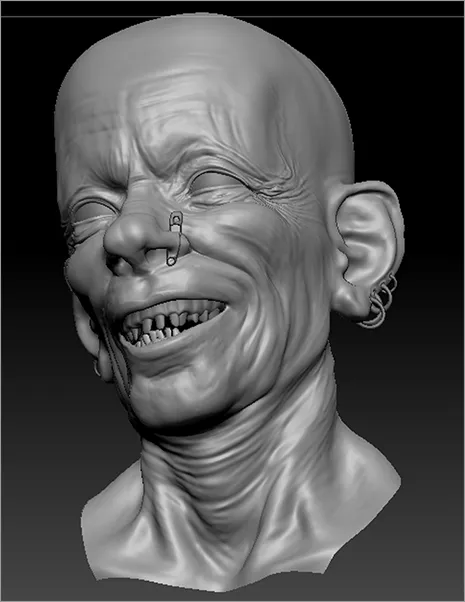
The most common use of ZBrush is for creating and editing digital models that are then animated and rendered in other 3D packages, such as Autodesk’s Maya and 3ds Max, Maxon’s Cinema 4D, and Luxology’s Modo. Artists choose to create and edit models in ZBrush to use in another package because the unique technology behind ZBrush allows them to work with very dense models (literally millions of polygons) to create a stunningly rich level of detail on organic surfaces in a way that traditional 3D packages just can’t. Fine wrinkles, fleshy folds, pores, bumps, scales, scars, and scratches can be easily sculpted into the model and then exported either as part of the geometry or as bump and displacement textures that can enhance the geometry of a model when the model is rendered in another package. The result is often an amazing level of detail and realism built into a virtual object (see Figure 1-1). Colors can also be painted directly on the model in ZBrush in an intuitive fashion and then exported as texture maps for use in shaders applied to the same model in other 3D packages. Production pipelines at studios such as ILM, Gentle Giant, Weta, and Sony Imageworks have used ZBrush in this way to create many of the characters, monsters, and set pieces seen in such films as The Lord of the Rings, Pirates of the Caribbean, and Sky Captain and the World of Tomorrow.
In the past few years, ZBrush has become adapted for use in areas beyond animation and effects. These days artists are using ZBrush as a tool in the production of toys, game characters and environments, and scientific visualization; in jewelry design and concept design; and even to help in the creation of physical sculpture.
Artists are using ZBrush to design models on computers and then translating them into physical versions via 3D printing technology. As the 3D printing process becomes more common and less expensive, one can imagine how ZBrush can easily be integrated into a desktop fabrication pipeline in the near future.
ZBrush can also be used for the creation of digital illustrations: The program has digital sculpting and painting tools as well as its own unique rendering technology. Within ZBrush, artists can create custom virtual materials, which can be procedurally designed or captured from digital images. These materials can be applied to an artistic composition and, when rendered, react to virtual lights and shadows. Many artists have taken advantage of the flexible workspace and powerful tools to create amazing ZBrush compositions. In addition, ZBrush works very well with other 2D paint programs, such as Adobe Photoshop and Corel Painter. Digital 3D models and 2D images can be exported and imported freely between these programs, so there is no limit to what can be achieved when ZBrush is incorporated into the digital artist’s toolbox.
Understanding Digital Images
Now let’s take a brief look at several ways digital imagery can be created on a computer and displayed on a monitor. Computers display digital images using colored squares known as pixels. This section reviews the basics of working with pixels and related issues.
Anatomy of a Pixel
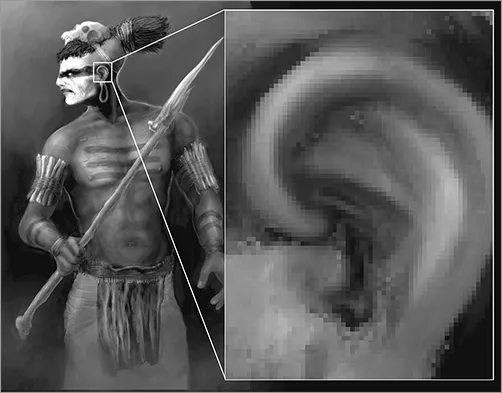
A pixel is a colored square that appears on the screen at a specified position—pretty simple, at least to begin with. A raster graphic is an image made up of thousands of pixels. A pixel is imbued with a certain amount of color and position information that is stored in memory. If you load a rasterized graphic into a digital viewing program and then scale the image up (or zoom in), you can actually see how the image is composed of these pixels (see Figure 1-2).
A digital image file stores the positional information of these pixels in terms of x- and y-coordinates. The y-coordinate is the vertical position and the x-coordinate is the horizontal position. It may seem obvious, but it’s important to note that when you zoom in or scroll around on a digital image in the software, the position and size of each pixel changes relative to the screen. However, the software still needs to remember the position and size of each pixel relative to the digital image that is being viewed. You should be aware of this fact, but don’t spend too much time thinking about it now; that’s your computer’s job.
Creating Smooth Images with Anti-Aliasing
Aliasing refers to the situation in which a curving line or shape displayed on a computer screen appears jagged. This is because the image is composed of tiny squares. To correct this problem, graphic software employs anti-aliasing, which smoothes the edges of curving shapes by blending pixels along the edges with other pixels of similar hue but varying degrees of lightness or opacity. This fools the eye into perceiving the edges as being smooth.
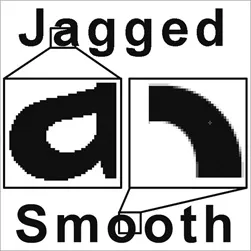
In Figure 1-3, the letters in the word jagged appear jagged because the square pixels are visible along the curving edges of the letters; this image is aliased. The letters in the word smooth appear smooth because of the blending technique that mixes pixels of varying lightness along the curving edges of the letters. The image is anti-aliased.
Channels and Color Depth
Along with positional data, the pixel stores information about how to display colors. A computer screen creates color by mixing red, green, and blue light. If a pixel is 100 percent red mixed with 0 percent blue and 0 percent green, it looks red. If a pixel is composed of 50 percent red with 50 percent blue and 0 percent green values, the pixel will look purple. When all three values are 0 percent, the pixel is black, and when all three are 100 percent, the pixel is white.
Color depth refers to how much color information is stored for each pixel in the image. A grayscale image discards all color information except for black, white, and the range of gray in between; this usually comes out to 256 shades of gray. The result is a black-and-white image, like the images in this chapter. Since color information is limited to the 256 shades of gray, the image file has less information that needs to be stored.
If you have studied painting, you may have learned that the primary colors are defined as red, yellow, and blue. The secondary color green, for example, is created when blue is mixed with yellow. This is true for paint but not so for colors created by a lighted computer screen. As far as computers are concerned, red, green, and blue are the primary colors. Red and green mixed together produce the secondary color yellow.
An RGB image stores red, green, and blue information. The information is divided into three channels (red, green, and blue) and each channel stores the values (or percentage) of red, green, and blue for each pixel. To see a demonstration of how this works, follow these instructions to view the RGB values of various colors using ZBrush’s color chooser:
1. Start ZBrush.
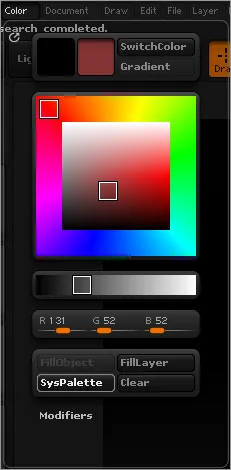
2. Click Color on the menu bar to open the Color palette.
3. Drag your cursor around in the color selector area (see Figure 1-4).
4. Observe the changing R, G, and B numeric values below the color area. These values change depending on the mixture required to create the selected color. Notice that the highest value possible for each channel is 255 and the lowest is 0 (see Figure 1-4).
5. Click on the R, G, and B sliders to select them and type in numeric values. Set R to 255, G to 0, and B to 255. The resulting color is a bright fuchsia.
An image in an RGBA format has an additional, fourth channel known as the alpha channel. The alpha channel stores information on the opacity of individual pixels. This allows for an image to have regions of transparency. The left side of Figure 1-5 shows a basic scene rendered in a 3D program; the floating spheres are transparent. The right side of Figure 1-5 shows the alpha channel. White areas are 100 percent opaque and black areas are 100 percent transparent. The gray areas show the amount of transparency.
Color depth refers to how much information is used for each of these color channels. Computers use bits to store information. A bit is a series of 1s and 0s (known as binary because there are only two options, 1 and 0). A 24-bit RGB image uses 8 bits of information for each channel (3 × 8 = 24). Each 8-bit channel stores a range of 256 shades of color, allowing for an image to have a total of 16 million colors. A 32-bit RGBA image uses an additional 8 bits f...